

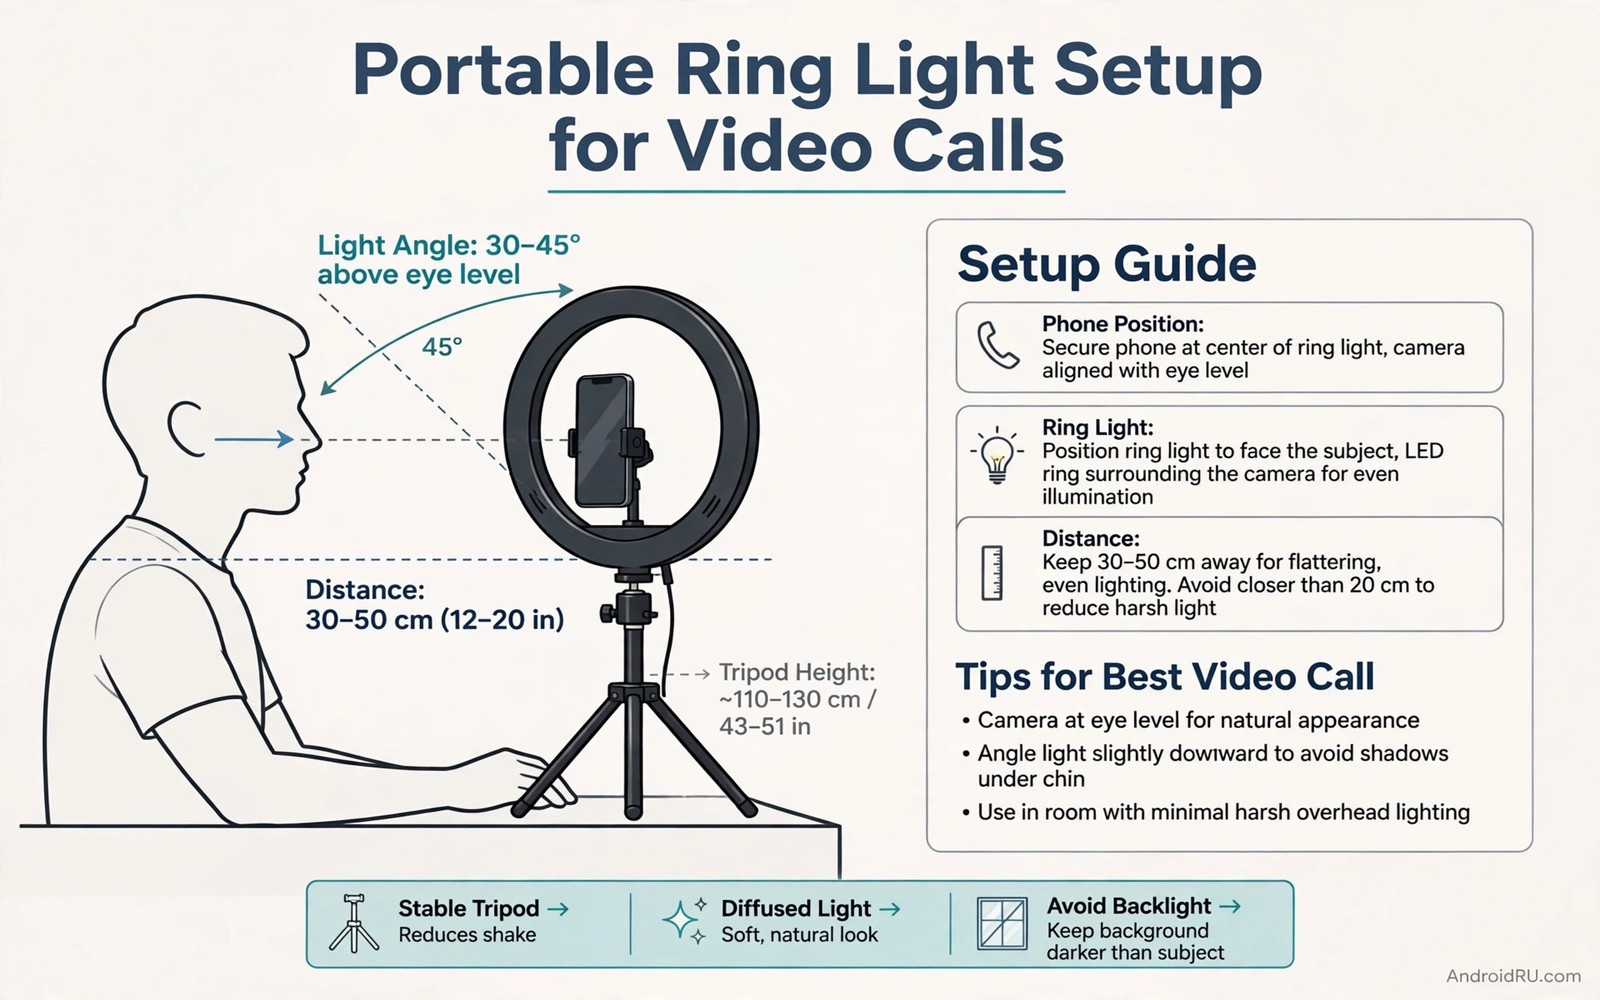
Good video call lighting changes how professional you look more than a new camera often does. A portable ring light gives even light on your face and reduces harsh shadows. It also helps a phone camera focus correctly in a dim room. Many people buy a ring light yet place it too close or too low and get glare on glasses. A few simple setup choices fix those problems and create a clean natural look.
The ring shape matters because it surrounds the camera lens with light from all sides. That even light fills shadows under eyes and chin. A small ring works for a phone on a desk. A larger ring works for a wider frame or for two people. Choose a ring size that matches your usual call framing. A ring that is too large for a desk can dominate the space and a ring that is too small can leave uneven light at the edges.
Colour temperature also matters because it sets the mood of the light. A warm light feels cosy but can look yellow on camera. A cool light feels bright but can look harsh on skin. A neutral daylight setting usually looks most natural for work calls. Test the setting with your actual camera and room background. A setting that looks good to your eye may look different on camera. For creator gear that pairs with lighting see portable tripods for mobile content creators for stable phone support.
Place the ring at the right distance and height
Place the ring about an arm length away from your face for a natural soft light. A ring too close creates a bright hotspot and harsh reflections. A ring too far away gives weak light and the camera may raise noise to compensate. Start at arm length and move the ring slightly closer or further while watching the preview. Small moves change the result more than large moves do. Let the preview guide you rather than a fixed distance number.
Set the ring slightly above eye level and tilt it down a little toward your face. That angle lights the eyes well and reduces shadows under the brow. A ring placed below eye level creates upward shadows that look unnatural. A ring placed far above eye level can darken the eyes. A gentle downward tilt from just above eye level is the most flattering standard setup. Test the height with a short video clip and not just a still preview.
Centre the phone camera in the middle of the ring for even light on both sides of the face. An off centre camera creates one bright side and one darker side. Use the ring mount or a small tripod to hold the phone steady in the centre. A steady phone also improves focus and reduces motion blur during a call. Check the framing after you sit in your normal chair position because standing setup positions differ from seated positions.
Control brightness and colour for a natural look
Start at a medium brightness and increase it slowly until your face is clear without washed out skin. A brightness that is too high erases skin detail and makes the background look dark. A brightness that is too low leaves noise and dull colours. The goal is a face that looks like natural daylight and not like a spotlight. Compare your preview with the room light off and on to find a balanced level.
Use the neutral colour setting as a starting point for work calls. Warm settings suit evening calls with warm room light. Cool settings suit bright rooms with daylight. Match the ring colour to the main room light to avoid mixed colour casts. Mixed colours can make one side of the face look yellow and the other look blue. A single consistent colour temperature gives a cleaner professional image.
Dim the room lights behind you if they compete with the ring light. A bright window behind you can turn your face into a silhouette. Close curtains or move away from a bright window for calls. A plain background with soft room light helps the ring light work well. The ring should be the main light on your face and the room should support it rather than fight it. For desk setups that keep the ring stable see desktop stand mounts for a desk workstation for mount ideas.
Fix glasses glare and harsh shadows
Glasses glare is a common ring light problem because the ring reflects as a circle in the lenses. Move the ring slightly to one side to shift the reflection away from the lens centre. Tilt your glasses down slightly if the reflection persists. Raise the ring a little higher so the reflection moves toward the top of the lens. Small adjustments often solve glare without turning the light off. Test with a video preview while wearing your usual glasses.
Harsh shadows can come from a ring that is too small or too close. Increase the distance a little to soften the light. Add a soft room light from the side to fill remaining shadows. A white wall nearby can bounce light softly onto the darker side of the face. That bounce light is free and it improves the image without extra gear. A soft overall light beats a single harsh light for video calls.
Check your background for distracting bright spots caused by the ring. A shiny surface behind you can reflect the ring light into the camera. Move the shiny object or change your angle slightly. A clean background helps viewers focus on you rather than on reflections. A quick background check before each call prevents a distracting setup from going live.
ring_light_setup.txt
Distance: about one arm length
Height: slightly above eye level
Colour: neutral daylight start
Brightness: medium then adjust
Glasses check: reflection moved off lens
The checklist above is an original example written for this guide. It summarises the key setup points in a form you can repeat for each call location. Use it when you move the ring to a new room. A consistent checklist gives consistent lighting across calls.
Pack the ring light in its case after use to protect the LEDs and the mount. A bent mount can make the ring sit unevenly and create uneven light. Keep the power cable untangled and carry a spare cable for travel calls. A protected ring light lasts longer and sets up faster. Good packing habits make portable lighting truly portable.
Keep the setup portable for travel calls
A portable ring light should pack down quickly for travel calls. Choose a ring that folds or detaches from its stand without tools. Pack the ring in a padded sleeve to protect the LEDs during transport. A travel setup that takes minutes to assemble will be skipped on busy days. A setup that assembles in seconds will be used for every call.
Carry a short USB cable and a small power bank for ring power on the road. A hotel desk may lack a convenient outlet near the best camera angle. A power bank solves that problem and keeps the ring running for a full call. Keep the desk tidy with a charging station and you can see wireless charging stations for a tidy desk for power ideas.
Common mistakes
The most common mistake is placing the ring too close to the face. That mistake creates glare and washed out skin. Another mistake is using maximum brightness for every call. Maximum brightness is rarely needed and it often looks harsh. A third mistake is ignoring the background light. A bright window behind you can ruin an otherwise good ring setup. Control the background before you blame the ring.
People also forget to test with the actual video app they will use. Different apps apply different colour and exposure processing. A setup that looks good in a camera app may look different in a call app. Test with the call app and a friend before an important meeting. That test reveals app processing effects early. A friend test is more useful than a solo preview for important calls.
A final mistake is buying a large ring for a small desk without checking space. A large ring can block the screen or crowd the workspace. Measure the desk space and the ring diameter before buying. A ring that fits the desk is more useful than a larger ring that cannot be placed correctly. Fit and placement matter more than size alone.
FAQ
What size ring light is best for phone video calls?
A ring between eight and twelve inches usually suits a phone on a desk. That size gives even light for one person at arm length. A larger ring suits wider frames or two people. A smaller ring suits travel and tight desks. Choose based on your desk space and framing. A medium ring is the safest starting point for most home calls.
Test the ring at your normal distance before keeping it. A ring that looks good at a store distance may differ at your desk distance. Return a ring that cannot give even light at your working distance. Even light at your real distance matters more than a large diameter claim.
Do I need a ring light if my room has daylight?
Daylight can work well if it falls on your face from the front. A window behind you creates a silhouette and a window to the side creates uneven light. A ring light gives consistent light regardless of weather or time. It is useful for evening calls and cloudy days. Use daylight when it is even and use a ring when daylight is uneven.
A ring light also helps when daylight changes during a long call. Clouds and sun movement can change exposure mid call. A ring light stabilises the image and reduces those shifts. Stable light looks more professional than shifting daylight. A ring is a consistency tool as much as a brightness tool.
How do I avoid looking washed out on camera?
Lower the brightness until skin detail returns and the background is visible. Move the ring a little further away to soften the light. Use a neutral colour setting rather than a cool harsh setting. Check the preview at the brightness you will use for the call. A preview check prevents a washed out live image.
Avoid wearing a very white shirt under a bright ring if washout persists. A mid tone shirt gives the camera a better exposure reference. That clothing choice helps the camera expose your face correctly. Small wardrobe choices support good lighting. Together they create a natural and professional image.
Conclusion
Clean video call lighting comes from distance and height and colour control rather than from maximum brightness. A ring at arm length and slightly above eye level gives even natural light. A neutral colour and a medium brightness keep skin detail intact. Glasses glare and background issues yield to small adjustments and a preview check. Those steps turn a portable ring into a reliable professional tool.
Your concrete next step is to set your ring at arm length and slightly above eye level tonight. Record a thirty second test clip in your call app and check for glare and washout. Adjust distance and brightness once based on that clip. Use the adjusted setup for your next real call and note the improvement.

