

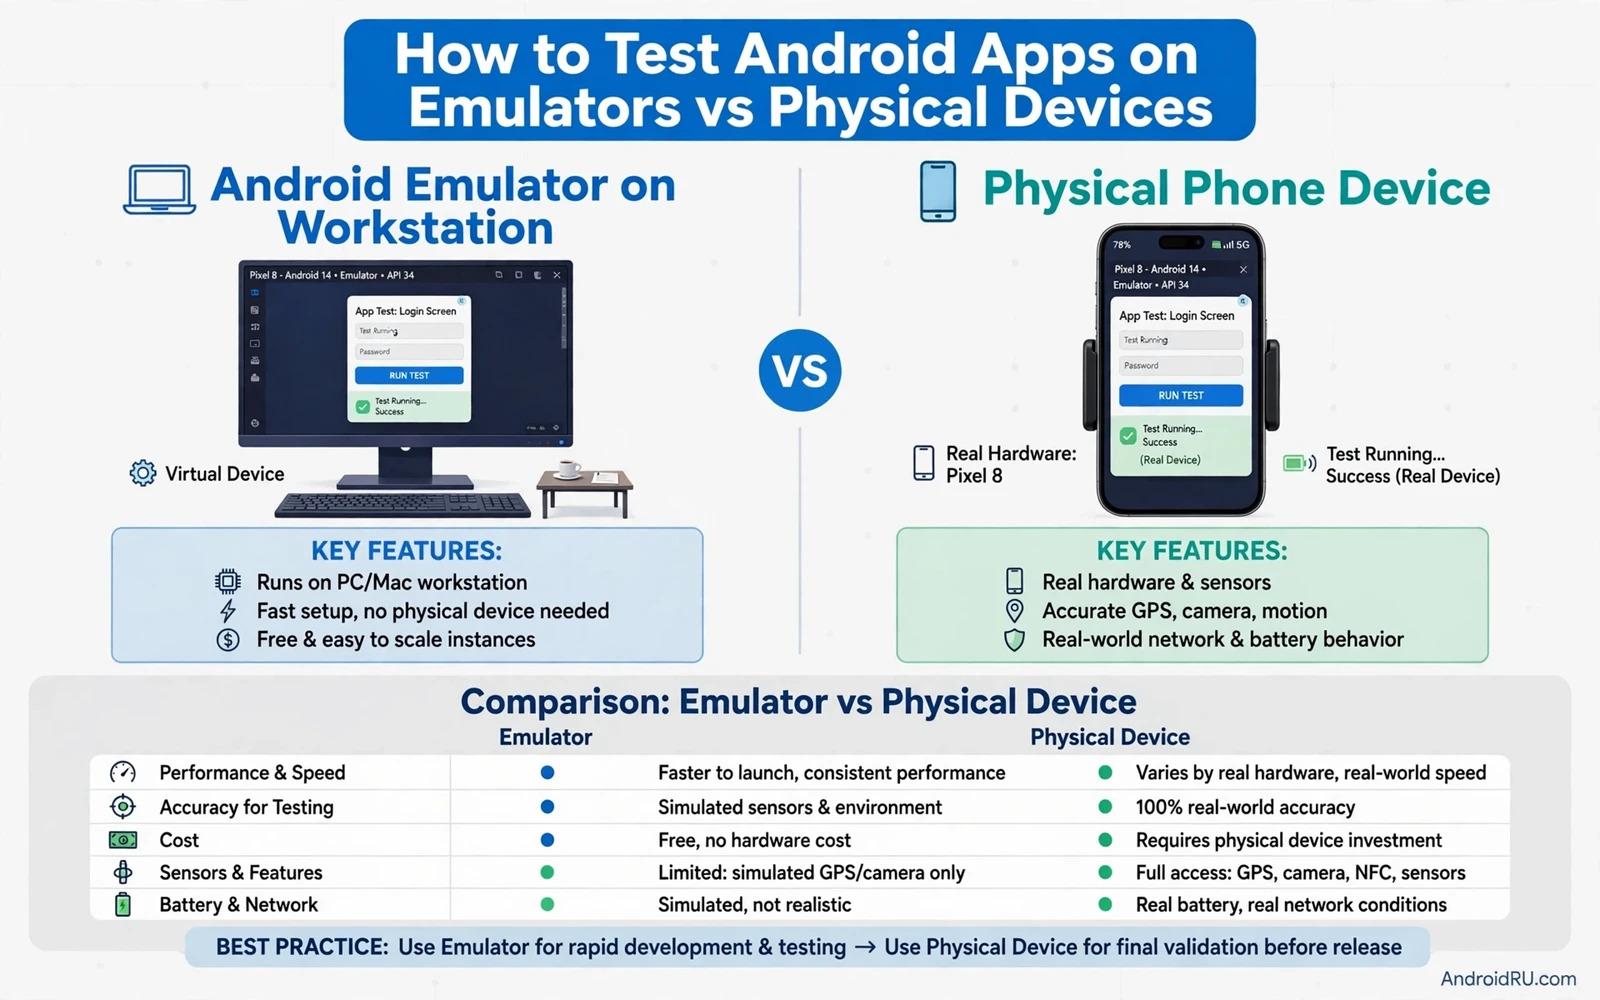
How to Test Android Apps on Emulators vs Physical Devices
I once shipped a build that passed every automated check on my workstation, then watched it stutter on a mid-range phone at a demo the next morning. The problem was that I had tested on a desktop processor with sixteen gigabytes of memory, and trusted those results for a device with a fraction of that power.
This guide shows you how to test an Android app on both environments, step by step, with the exact menus, commands, and checks for each one. You will set up an emulator in Android Studio, connect a real phone over ADB, and run the same test on both.
Android Emulator vs Physical Device: The Core Differences
An emulator is a virtual phone that runs on your workstation. You can create one in minutes, pick its screen size and Android version, and reset it to a clean state in seconds. A physical device is a real phone or tablet with a real processor, a real battery, and real radios. The emulator gives you control and repeatability. The physical device gives you truth about hardware.
| Criteria | Emulator | Physical Device |
|---|---|---|
| Cost to set up | Free, runs on your existing workstation | Requires buying real phones |
| Speed of a test run | Fast, snapshots restore a clean state | Slower, needs a cable and a charged phone |
| Screen sizes and Android versions | Any size or version from a system image | Only the versions on the phones you own |
| Performance and thermal behaviour | Runs on a desktop processor, hides slow code and overheating | Shows real frame drops, heat, and throttling |
| Battery drain | No real battery, cannot measure power use | Measures real drain, including radio and background costs |
| Sensors: GPS, camera, Bluetooth | Simulated data only, cannot prove real-world behaviour | Real GPS fixes, real camera output, real Bluetooth pairing |
| Manufacturer behaviour | Stock Android image only, no vendor tweaks | Shows battery optimisation and background kills per brand |
| Network conditions | Stable connection, easy to throttle | Real handover, weak signal, and offline gaps |
| Repeatability | Identical clean state on every run | State drifts with updates and accounts |
The verdict is simple. Use the emulator when the test is about logic, layout, or coverage across many configurations. Use the physical device when the test is about performance, battery, sensors, or anything a manufacturer could change.
Step 1: Create an Android Virtual Device in Android Studio
Start with the emulator, because you can build it in ten minutes without buying anything. If Android Studio is not installed yet, read setting up Android Studio for beginners first.
- In Android Studio, open the Tools menu, then Device Manager.
- Click Create Device, pick a hardware profile such as Pixel 8, and click Next.
- Pick a system image such as API 34, Android 14, and click Download if needed.
- Click Next, then Finish. Your new Android Virtual Device appears in the list.
- Click the Run icon next to the device. The emulator boots to the home screen; the first boot takes a minute or two.
- In the terminal, run adb devices. You should see emulator-5554 listed as a device.
Pick the right system image for your target Android version
Create at least two virtual devices: one on your minimum supported version and one on the newest version you target. Behaviour changes between versions are a common source of bugs, and they are cheap to catch this way.
Verify the emulator boots and shows in Device Manager
After the first boot, check three things: the home screen loads, adb devices lists emulator-5554 as a device rather than offline, and your app installs and opens from Android Studio. If adb shows the emulator as offline, close the window and start it again. If the screen stays black for more than three minutes, wipe its data from the three-dot menu and start it again.
Step 2: Connect a Physical Device with ADB and USB Debugging
A physical device needs one setup pass before it can run tests, mostly about turning on developer options and USB debugging. Do this once per test phone, and label it with its model and Android version.
- On the phone, open Settings, then About phone, then tap Build number seven times to turn on developer mode.
- Go back to Settings, then System, then Developer options, and turn on USB debugging.
- Connect the phone with a USB cable, tap Allow on the USB debugging prompt, and tick Always allow from this computer.
- On your workstation, run adb devices. Your phone should appear with a serial number and the word device.
- In Android Studio, confirm the phone appears under Physical devices in Device Manager.
- Run your app once from Android Studio with the phone selected, and confirm it opens on the real screen.
If adb devices shows the phone as unauthorised, unplug the cable, turn USB debugging off and on again, plug it back in, and accept the prompt. If the phone does not appear at all, try a different cable, because many cheap cables carry power but no data. If you are building your first app to practise this split, follow building a first Android app with Kotlin.
Keep test phones on known system versions
Turn off automatic system updates in Settings, then System, then System update, or at least check the version before each test session. An automatic update mid-run can change behaviour and leave you chasing a bug that was really a new OS version.
Check that adb devices lists your phone before you run anything
Before every test session, run adb devices and confirm your phone is listed as a device. If it shows as offline, unplug and replug the cable. If it shows as unauthorised, accept the prompt on the phone screen.
Step 3: Run the Same Test on Both Environments
With both environments ready, run the same test on each one and compare the results. Use the same test data, the same account, and the same steps, so the only variable is the environment. A bug that appears only on the physical device points at hardware, a manufacturer tweak, or a real-world condition the emulator cannot reproduce.
- Write the test steps down first, including the exact taps, the test account, and the data you will use.
- Run the test on the emulator first, and take a screenshot of the result screen.
- Run the identical test on the physical device with the same account and data.
- Compare the two runs: layout, response time, battery use, and error messages.
- Record the result for each environment in your test log, with the device name and the Android version.
- If a step fails on the device but passes on the emulator, reproduce it twice more, then note it as a device-only issue.
Use the same test data and the same account on both sides
Different data produces different results, and that noise hides real environment differences. Keep a shared test account with a fixed set of data: the same contacts, photos, messages, and location history. Seed both environments from the same backup, and clear app data between runs with adb shell pm clear followed by your app package name.
What Emulators Do Best: Layout, Android Versions, and Automated UI Tests
Emulators are at their best when the question is about layout, coverage, or repeatability. You can check a screen on a small phone, a large phone, a tablet, and a foldable in one session, and rotation, font scaling, and dark mode can be toggled in seconds. Automated interface tests run well on emulators because the environment resets to a clean state for each run. Version coverage is the second strength: a new system image can be downloaded without buying a phone on that version.
Layout testing across phones, tablets, and foldables
Create a virtual device for each screen class your audience uses: a small phone, a standard phone, a large phone, and a tablet. Open the same screen on each one and check for clipped text, overlapping buttons, and images that stretch oddly. Then rotate each device and turn on the largest font size in Settings, then Accessibility, then Font size. Text expansion breaks more layouts than any other single setting.
Android version coverage without a drawer full of phones
Keep one virtual device on your minimum supported version, one on the newest version, and one in the middle. Run the permission flow, the notification flow, and the first-run flow on each. Watch for version-specific traps: background location prompts on newer versions, notification permission prompts from Android 13 onward, and storage access changes.
What Only a Physical Device Reveals: Performance, Battery, and Sensors
Performance on a physical device reflects real processor limits, real memory pressure, and real thermal throttling. An emulator runs on a powerful workstation processor and can hide a problem that will be obvious on a mid-range phone. An app that feels fast on the emulator may feel slow and hot on a real phone.
Manufacturer behaviour is the second thing only a device can show. Battery optimisation, background restrictions, and permission handling vary across brands, and an app that works on a stock emulator image can be killed in the background on a heavily customised device.
Performance and thermal throttling on mid-range hardware
Pick the cheapest phone your audience plausibly owns and make it your performance reference. Run your app’s heaviest flow on it three times in a row and watch for frame drops, slow image loading, and heat building up by the third run. Then check Settings, then Battery, then Battery usage. An app that uses a large share of battery in a short test has a real problem no emulator will ever show.
Battery drain and background kills by manufacturer
Start a background task your app depends on, such as a file download or a music stream, then lock the screen and leave the phone alone for fifteen minutes. Check whether the task finished, and check the battery graph for the same period. On some brands, aggressive battery optimisation kills the task within minutes.
Automated Testing Across Emulators and Physical Devices
Automated tests should run on emulators for every change, because they are fast, cheap, and repeatable. A smaller set should also run on physical devices on a schedule, or at least before every release. That second set catches hardware regressions without slowing down every change.
Flaky tests need attention in both environments, because a flaky test erodes trust in the whole suite. Emulator flakiness often comes from timing, animations, and network stubs. Physical flakiness often comes from battery optimisation, background kills, and sensor noise. Each flaky test should be investigated and fixed or removed rather than ignored. Library choices affect this too: review top open source libraries for Android developers and prefer libraries with real device test reports.
Fix flaky tests instead of ignoring them
When a test fails once and passes on retry, do not shrug and rerun the suite. Open the failure log, find the step that timed out, and add an explicit wait for the condition the test actually needs, such as a view becoming visible. On the emulator, turn off animations in Developer options.
Release Testing Checklist Before You Ship
Release testing should include a physical device pass on the most popular devices in your audience, covering install, first run, login, core flows, payments, and sharing. It should also cover upgrading from the previous version with existing user data.
- Install the release build on the emulator and on two physical devices, and confirm first run, login, and the main flow work.
- Upgrade from the previous version on a physical device with real user data, and confirm accounts and files survive.
- Test payments and sharing on a physical device, including a real camera photo.
- Check accessibility on a physical device with TalkBack on.
- Run the longest strings in each supported language on a physical device and check for clipped buttons.
- Leave the app installed on a physical device overnight, then check the battery graph.
- Run the full automated suite on the emulator one last time and confirm zero failures.
FAQ: Emulator vs Physical Device Testing
Can I test an Android app without owning a physical device?
Yes, for most of the development cycle. The emulator covers layout, logic, version coverage, and automated interface tests, and cloud device services can fill some gaps by running your tests on real phones hosted elsewhere. What you cannot do without a physical device is prove performance, battery use, and sensor behaviour.
Why does my app feel fast on the emulator but slow on a real phone?
The emulator runs on your workstation processor, which is far faster than a phone processor, and it has far more memory and no thermal limits. Your app can waste CPU cycles and memory on the emulator without any visible cost, while the same code on a mid-range phone drops frames, heats up, and triggers thermal throttling. Profile the app on the physical device, find the hot method, fix it, and re-test on the same phone.
How many physical devices should a small team keep?
Three phones cover most small teams: a current Pixel for stock Android, a Samsung for the most common manufacturer skin, and a mid-range phone from Xiaomi or another popular brand for performance and battery testing. Add a tablet only if your app targets tablets. Keep each phone labelled, and keep automatic updates off.
Does an emulator test GPS, camera, and Bluetooth well enough?
For development, yes. The emulator lets you send fake GPS coordinates, use a virtual camera scene, and simulate basic Bluetooth states, which is enough to build and debug the feature. For proof, no. Real GPS accuracy, real camera quality in low light, and real Bluetooth pairing can only be shown on a physical device.
The split is the whole strategy. Emulator testing gives you speed, coverage, and repeatable automated runs on every change. Physical device testing gives you the truth about performance, battery, sensors, and manufacturer behaviour. Test both environments on the same steps, with the same data, and record which environment caught each bug.

