

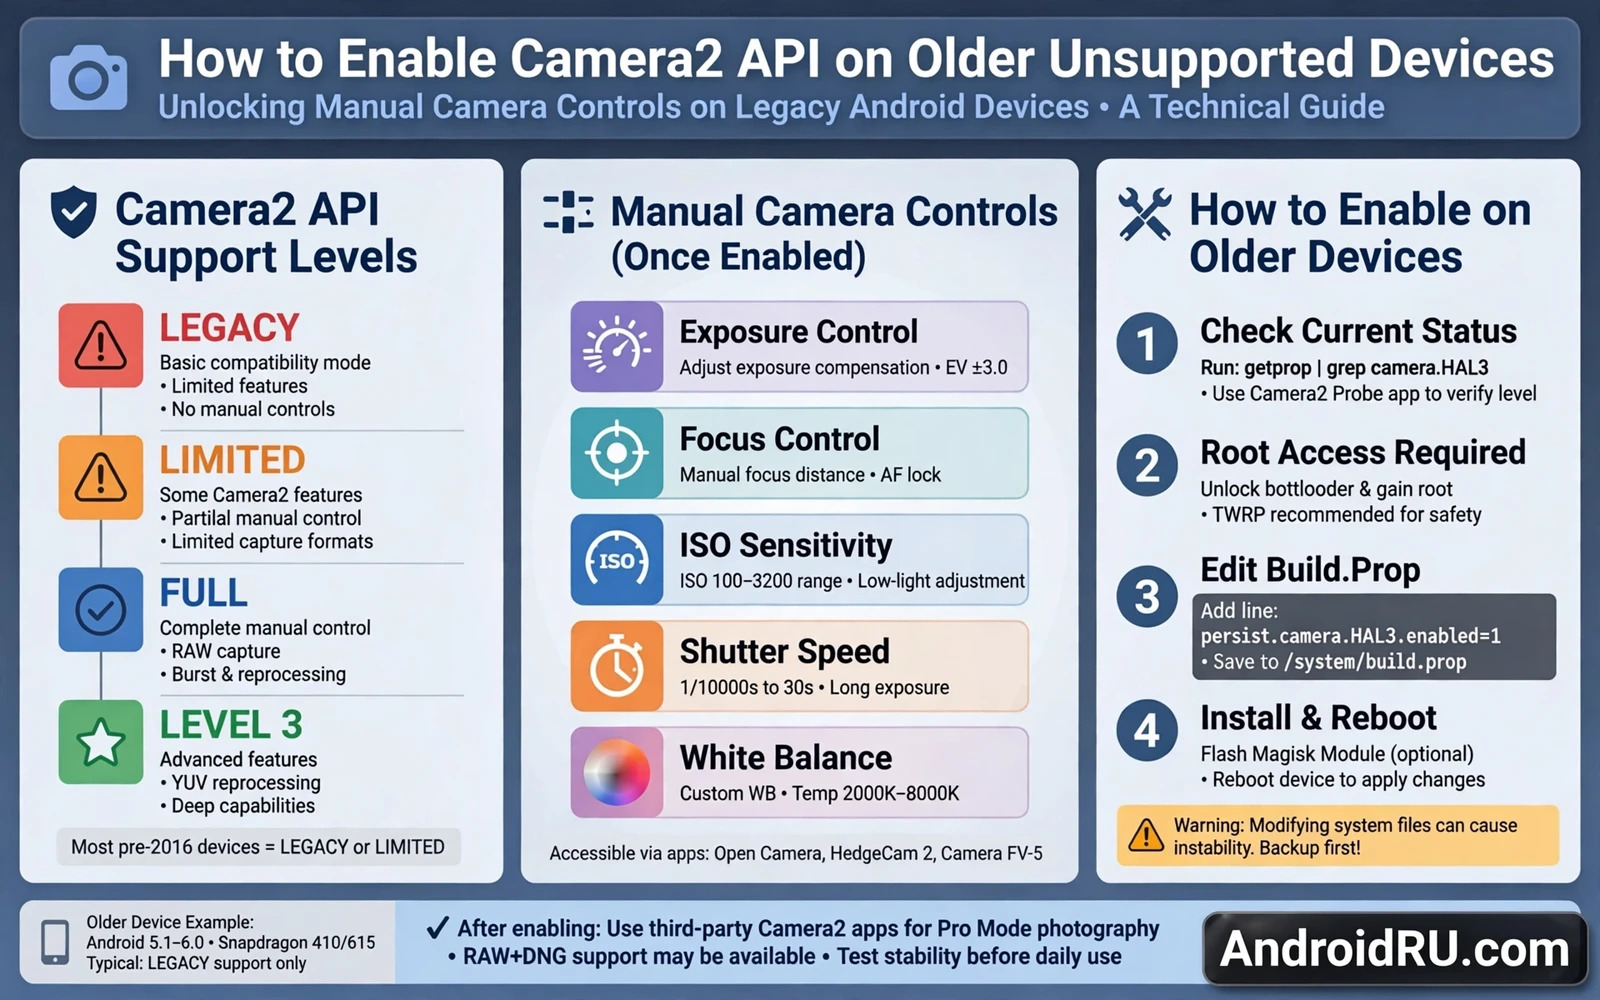
What Camera2 API Changes On An Older Phone
Camera2 API is the modern camera framework that gives apps deeper control over focus and exposure and sensor behaviour. Older phones often ship with a limited camera interface even when the hardware can do more. Enabling Camera2 API does not add a new sensor or a new lens to your phone. It unlocks software access that advanced camera apps need in order to use the hardware that is already present.
Many owners first notice the problem when a powerful camera app refuses to open manual controls or crashes on launch. The stock camera may work fine while a third party camera app shows only basic options. That gap usually points to a limited Camera2 support level rather than a broken camera module. Checking the support level before changing anything saves time and prevents needless flashing or needless resets.
Support levels describe how much control an app can request from the camera system. A legacy level offers only basic behaviour through an older compatibility layer. A limited level adds some manual control but still blocks features such as full manual focus or raw capture. A full level opens a wide set of controls for apps that know how to use them. A higher level adds still more capability for demanding camera software and for advanced processing pipelines.
No method can promise a full level on every older device. The sensor driver and the camera hardware abstraction layer set a hard ceiling. A build property change can reveal a level that the vendor hid or can enable an interface that was left disabled in software. It cannot create driver support that does not exist. Readers who expect a miracle upgrade will be disappointed. Readers who want to unlock hidden capability have a realistic path worth testing carefully.
Check Support Before You Change Anything
Start by installing a camera capability checker from a trusted source and run it with the stock system untouched. Note the support level for each rear camera and each front camera separately. Note whether raw capture and manual focus and manual exposure are listed as available. Take screenshots of the results so you can compare the before state with the after state without relying on memory.
Also test the camera apps you actually plan to use. Open the stock camera and check that focus and exposure behave normally. Open a manual camera app and see which controls appear and which controls stay greyed out. If the manual app already offers the controls you need then no system change is required. Changing system properties for no benefit only adds risk.
Back up photos and app data and device settings before any deeper step. A full device backup matters because a wrong system edit can force a recovery or a reset. Copy photos to external storage or to a cloud account you control. Export app settings where the app offers an export option. Keep the backup disconnected from the phone while you test so a later reset cannot wipe the only copy.
Readers who use a camera app that depends on advanced processing should also study the link between Camera2 support and that app. A ported camera app may need a full level for its best modes while its basic modes run on a limited level. The guide that explains how to redirect camera input to gallery videos using hooking shows how deep camera routing can go once the camera framework is open. That depth is a reason to move slowly and to test one change at a time.
Build Property Changes And Their Limits
The common software route uses a build property that declares the camera capability level for the device. On a rooted phone this property can be edited through a system properties editor or through a dedicated module that applies the change at boot. On a phone without root the same property cannot be changed persistently because the system partition is protected. That protection is not a flaw to work around casually. It is a safety boundary that keeps the system stable.
A property edit must match the real hardware. Setting a full level on hardware that only supports a limited level can make camera apps crash or can make the camera service fail to start. If the camera stops working after a change then revert the property at once and reboot. Do not stack a second change on top of a broken first change. A clean revert tells you whether the property was the cause or whether a different factor broke the camera.
Some older devices need a vendor library or a camera configuration file change rather than a single property. That deeper route belongs to device specific guides and to maintainers who understand that exact model. Generic instructions copied from a different model can break camera focus or break video recording. Always confirm that a guide names your exact model and your exact software build before following it.
Modules that promise a universal Camera2 unlock deserve scepticism. A module can apply a property change cleanly and can revert it cleanly. A module cannot rewrite a sensor driver. Prefer a module with a clear description of exactly which property it changes and with a simple disable switch. Test the camera thoroughly after enabling the module and disable it promptly if video recording or autofocus becomes unstable.
Testing After Enabling Camera2 API
After a change reboot the phone and run the capability checker again. Compare every field with the screenshots taken before the change. Look for a change in support level and for new entries under manual control and raw capture. A checker result alone does not prove real world benefit. Open a manual camera app and test focus at near distance and at far distance and test exposure compensation in bright light and in dim light.
Test video recording at every resolution you normally use. Test slow motion if your phone offers it. Test the front camera as well because a change that helps the rear camera can leave the front camera unchanged or can break its preview. Test the stock camera too because some system changes affect the stock app in ways that a third party app hides. Any regression in the stock camera is a warning sign even if a manual app looks better.
Keep notes on what changed and what stayed the same. Note which apps gained controls and which apps gained nothing. Note any crash or any freeze or any overheating during long camera sessions. Notes turn a vague feeling that the camera improved into evidence you can act on. Evidence also helps you decide whether to keep the change after a system update overwrites it.
System updates can reset build properties and can restore the old camera behaviour. That reset is normal and it is not a sign of damage. Reapply a change only after confirming that the update did not alter the camera stack in a way that makes the old method unsafe. The article that explains understanding Android system hooks and substrate architecture gives useful background on why system level changes interact with updates in this way. A careful reader treats every update as a fresh test cycle.
When To Stop And Seek Device Specific Help
Stop immediately if the camera app crashes on launch after a change or if the phone bootloops or if the camera service keeps stopping. Boot into safe mode or recovery if needed and revert the change. A phone that cannot open its camera at all is worse than a phone with limited manual control. No camera feature is worth a device that cannot take a photo when you need one.
Seek device specific help when your model needs a library change or when a property change produces no effect at all. Forums dedicated to your exact model often hold a maintainer thread with tested files and with known regressions. Read the whole thread before flashing anything. A single success report from a different software build is not proof that the method is safe for your build.
Consider whether a different camera app solves the real need without a system change. Some camera apps work well on a limited level by using the controls that are available rather than demanding a full level. Some editing apps can recover shadow detail from a standard photo well enough for social sharing. A system change should be the answer to a proven limitation and not the first step for every camera wish.
For readers planning a wider camera project the next step is to understand how camera data flows through the system. The guide on how to fix bootloop issues after installing modules or ROMs is worth reading before any risky change because it covers recovery when a camera module goes wrong. Preparation beats repair and a tested backup beats both.
Deeper Checks For Camera Capability
A capability checker result is only a starting point for a real decision because a checker reads declared support rather than testing every feature under load. A phone that declares a higher level may still struggle with raw capture in low light or with manual focus at close distance. A phone that declares a limited level may still produce excellent results through the stock camera pipeline because the vendor tuned that pipeline for the exact sensor. Owners should therefore treat checker output as a map rather than as a verdict. The map shows where to test. Testing shows whether the journey is worthwhile.
Test manual focus across the full focus range rather than only at a single distance. Focus behaviour at macro distance often differs from focus behaviour at landscape distance. A lens that focuses smoothly at far distance may hunt at near distance when manual control is forced. A lens that locks quickly at near distance may overshoot at far distance. A full range test reveals hunting and overshoot that a single snapshot test hides. Note the distances where focus feels stable and the distances where it feels uncertain.
Test exposure control in mixed lighting because mixed lighting exposes the limits of manual control. A bright window behind a dark subject is a classic mixed scene. A sunset with a shaded foreground is another classic mixed scene. Manual exposure that works in even light may clip highlights in mixed light. Manual exposure that preserves highlights may bury shadows in darkness. The goal is not a perfect photo in every mixed scene. The goal is predictable control that lets the owner choose which part of the scene matters most.
Test raw capture workflow end to end rather than only confirming that raw capture appears in a menu. Capture a raw file and open it in an editor that supports raw processing. Check that the file contains the expected resolution and that colour information survives editing. Check that the file size is plausible for a raw image rather than a compressed image renamed as raw. A menu entry without a working workflow is a decoration rather than a feature.
Test video stabilisation after any camera change because stabilisation depends on sensor data and on gyroscope data working together. A change that improves still photos can disturb stabilisation if it alters the timing of sensor reads. Walk slowly while recording and pan smoothly across a scene. Watch the footage for jumps and for wobble at the edges. Smooth footage after a change is stronger evidence than a single sharp still photo.
Document the final camera state in plain language for future reference. Record the support level and the property changed and the module used if any and the apps tested and the regressions found if any. Future updates may reset the change. Future troubleshooting will be faster with a written record than with a vague memory of a method that once worked. A short note stored away from the phone preserves the work even if the phone itself is reset.
Common Mistakes With Camera Tweaks
The most common mistake is changing several camera settings at once and then being unable to tell which change caused a problem. A property change plus a new camera app plus a new module creates three variables. A failure under three variables has three possible causes. Change one variable and test before adding the next variable. Slow testing feels tedious in the moment and saves hours of confusion later.
Another common mistake is trusting a single test photo as proof of improvement. A single photo depends on light and subject and hand stability as much as on camera settings. A single sharp photo may reflect good light rather than a good setting. A series of photos across different scenes gives a fairer comparison. Compare the same scene before and after a change whenever possible. Same scene comparison removes light and subject as variables.
A third mistake is ignoring the front camera during testing. Owners test the rear camera thoroughly because it produces the main photos. They forget that video calls use the front camera and that a camera change can affect both cameras differently. Test a short front camera video call with a willing partner after any system camera change. A broken front preview discovered during an important call is an avoidable embarrassment.
A fourth mistake is keeping a camera module enabled after it has served its purpose. A module that was needed for a single test may conflict with a later update. Disable test modules once testing is complete. Keep only modules that provide ongoing benefit. A lean module list reduces the chance that a future update breaks the camera for a reason unrelated to the update itself.
A fifth mistake is skipping a backup because photos are already synced to a cloud account. Cloud sync is not a complete backup when it depends on the same account and the same network that a reset may disrupt. A local copy on external storage protects against account lockout and network failure. Redundancy is not paranoia when the data is irreplaceable. One local copy plus one cloud copy is a sensible minimum.
A final mistake is assuming that a camera improvement on one software build will survive the next build unchanged. Vendors change camera libraries in updates. A property that unlocked a feature on one build may be ignored on the next build. A module that worked on one build may need an update for the next build. Re-test the camera after every major update rather than assuming continuity. Continuity must be verified rather than assumed.

