

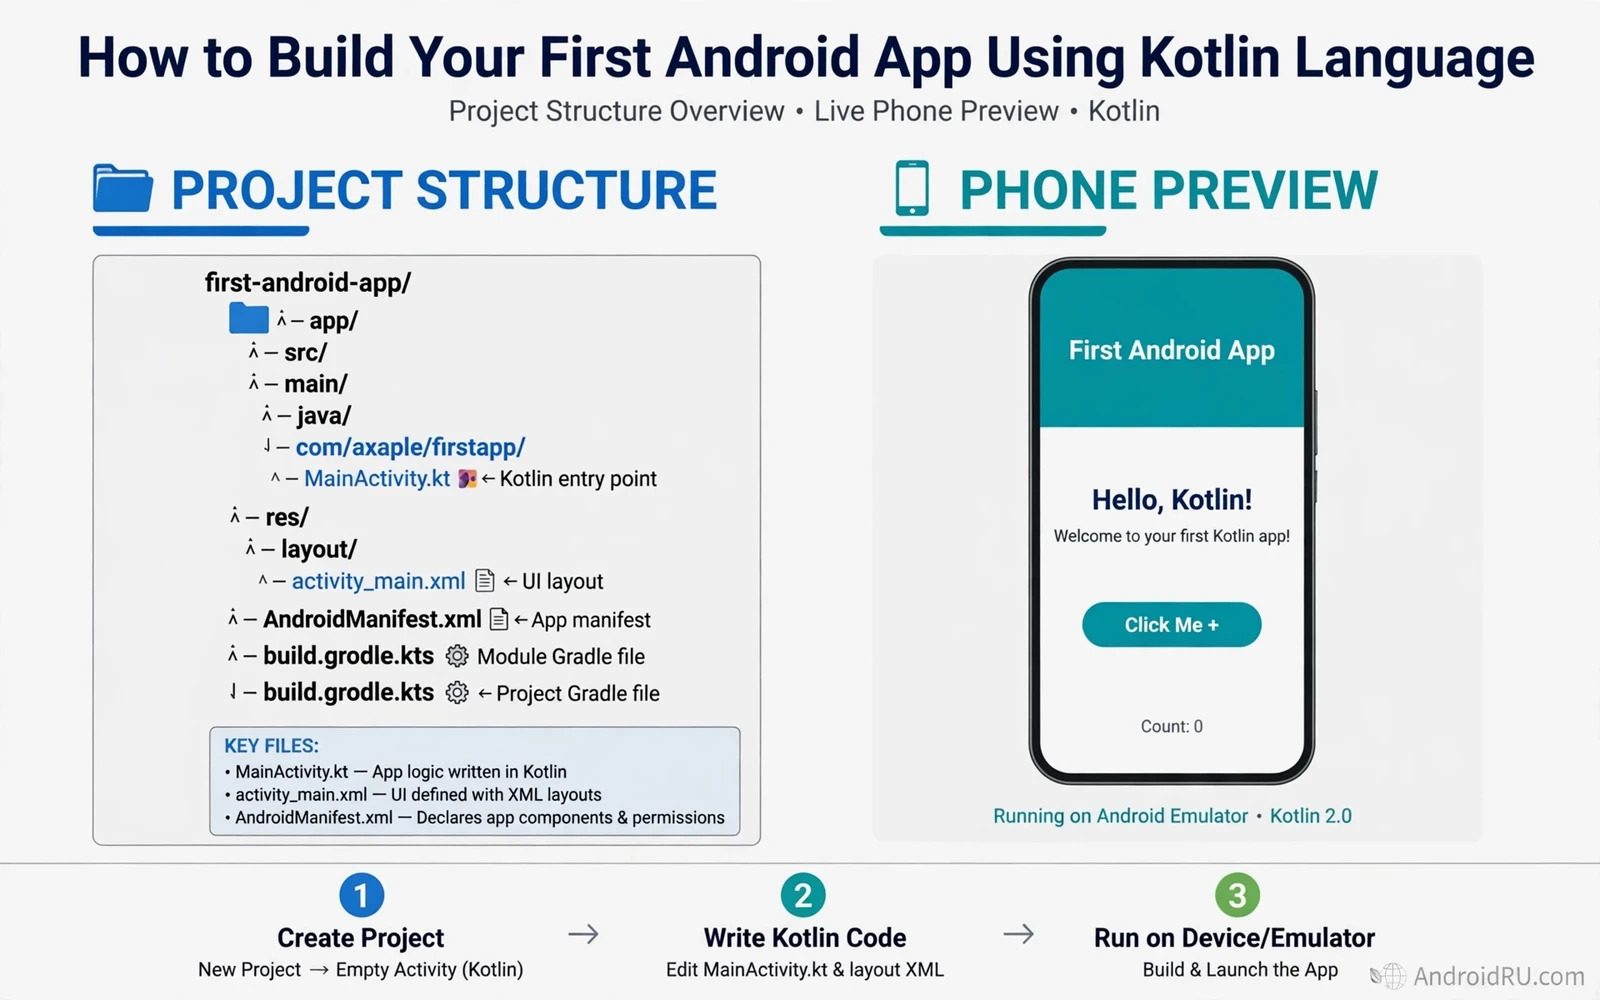
What Your First Kotlin App Should Be
A first app should be small and visible and complete. A simple counter app or a simple greeting app meets that goal. The app should show text and respond to a tap and update the screen. A small app lets a beginner learn the full flow from code to screen without getting lost in features.
Kotlin is a modern language for Android development. It offers concise syntax and null safety features that reduce common errors. Android Studio supports Kotlin as a first class language for new projects. A beginner who starts with Kotlin learns the language that most modern Android guides and samples use.
Resist the urge to build a large app as a first project. A large app hides learning behind many moving parts. A small app makes each part visible. A beginner who finishes a small app understands the whole app. That understanding is the real goal of a first project.
Set Up the Project Correctly
Create a new project in Android Studio and choose a simple empty activity template. Select Kotlin as the project language. Give the project a clear name and a package name in lowercase letters. Keep the default build settings and the default minimum API level for a first project.
Wait for the initial Gradle sync to finish before editing code. The sync downloads dependencies and configures the project. Editing files during a failed sync can create confusing errors. A successful sync is the green light for the first code change.
Setup details matter more than they seem for a smooth first run. The setup walkthrough in setting up Android Studio for beginners covers SDK and emulator choices that a first project depends on. A clean setup removes a whole class of errors before coding begins.
Understand the Files in a Small Project
The main activity file holds Kotlin code that runs when the screen opens. It sets the layout for the screen and it handles user actions such as button taps. The layout file describes the views on the screen in XML. The manifest file declares the activity as the entry point of the app. The build file declares dependencies for the project.
Kotlin code in an activity follows a lifecycle. The creation method runs when the activity is created. The layout is set inside that method. View references are obtained after the layout is set. A beginner who understands this order will avoid the common error of touching a view before the layout exists.
Resources live in separate folders for layouts and strings and images. A string resource holds text that the layout or code can reference. Using string resources keeps text in one place and makes later translation easier. A first project should use string resources for visible text even when the app has only one screen.
Design a Simple Layout That Works
Start with a vertical layout that holds a text view and a button. The text view shows a message or a count. The button triggers a change when tapped. A simple layout is easy to test and easy to explain. Complex layouts can wait until the basic flow works.
Give each view a clear identifier in the layout file. The identifier lets Kotlin code find the view at runtime. Use names that describe the purpose of the view such as greeting text or count button. Clear names make code readable months later when the project is revisited.
Test the layout on more than one screen size when possible. A layout that looks good on one emulator may overflow on a smaller screen. Use flexible sizing and avoid fixed pixel sizes for text and spacing where the layout system offers better options. A responsive habit learned on a first app scales to larger apps later.
Write Your First Kotlin Logic
Start with a variable that holds the state for the screen. A counter variable starts at zero and increases by one on each button tap. The button click handler updates the variable and then updates the text view. That short flow teaches state and events and screen updates in one place.
Kotlin syntax for this flow is concise. A variable declaration uses a keyword that marks it as mutable when it will change. A click handler is a small block of code attached to the button. A text update assigns a new string to the text view. Each line has one job and the whole handler fits in a few lines.
Avoid adding network calls or databases to a first app. Those features add failure modes that distract from the core learning goal. A first app should work offline and should work every time it runs. Reliability builds confidence and confidence supports the next learning step.
var count = 0
button.setOnClickListener {
count = count + 1
textView.text = count.toString()
}
Run and Test the App on an Emulator
Run the project on an emulator and watch the build output for errors. A successful build installs the app and opens it on the virtual screen. Tap the button and confirm that the count increases. Rotate the emulator and note whether the count survives the rotation. A basic first app may reset on rotation and that behaviour is a useful next lesson.
Fix build errors by reading the first error message in full. A missing import or a wrong view identifier is a common first error. Android Studio often suggests a fix for a missing import. Accept a suggested fix only when you understand what it changes. Blind fixes hide learning and can create new errors.
Test the app with a simple checklist. The app should launch without a crash. The button should update the screen on every tap. The text should stay readable on a small screen. The app should close and reopen without an error. A checklist turns testing from a vague feeling into a repeatable habit.
Move From Emulator to a Physical Device
A physical device test confirms touch behaviour and performance on real hardware. Enable developer options and USB debugging on the test device. Connect the device and select it in Android Studio. Run the same project that already works on the emulator. A device test that uses the same code isolates device differences from code differences.
Physical devices vary in screen size and performance and system version. A first app should still run well on a modest device. If the app lags on a real device then the problem is worth investigating even for a simple app. Early performance awareness prevents bad habits that are hard to remove from a larger app later.
Keep the device test simple and short. Confirm launch and button behaviour and rotation behaviour. Note any difference from the emulator result. A difference is a learning opportunity and not a failure. Record the difference in project notes for later study.
Handle Rotation and State in a Simple Way
Rotation destroys and recreates an activity by default. A counter stored only in a variable will reset when rotation recreates the activity. That reset surprises many beginners. It is normal Android behaviour and it teaches why state handling matters for real apps.
A simple fix for a first app is to save the counter value when the activity saves its state. Restore the value when the activity is recreated. That small change introduces the state saving concept without a large architecture change. Later apps can use more advanced state holders for the same problem.
Test the fix by rotating the device after several taps. The count should survive rotation after the fix. If the count still resets then check that the save and restore code uses the same key. A mismatched key is a common cause of a state fix that looks correct but does not work.
Debug With Breakpoints Instead of Guessing
Set a breakpoint inside the button click handler and run the app in debug mode. Tap the button and the app will pause at the breakpoint. Inspect the counter variable at that pause. Step through the handler one line at a time and watch the value change. Debugging with inspection beats adding random print statements.
Use the log output for messages that describe app flow rather than for dumping large data. A short log line at a key point helps trace a problem without clutter. Remove temporary log lines before sharing a project. Clean logs make future debugging faster for everyone who reads the code.
Studying compiled output can deepen Kotlin understanding after a first app works. The inspection guide in basic APK reverse engineering and code inspection shows how a built package differs from source. Compare your own build output with your own source to see that difference clearly.
Common First App Mistakes to Avoid
One mistake is editing the generated build files before understanding them. Generated files and build files serve the build system. A beginner edit to those files can break the build in a confusing way. Leave build files alone until a specific need requires a change and that change is understood.
Another mistake is copying a large code sample without reading it. A copied sample may use APIs that do not match the project setup. A copied sample may also hide a permission or a dependency that the project lacks. Read a sample line by line and adapt it to the small app before running it.
A third mistake is adding many libraries to a first project. Each library adds download time and build complexity. A first project needs no external library for a counter or greeting app. Add a library only when a clear feature requires it and when the basic app already runs.
Grow From One Screen to a Real App Idea
After the first app works then add one feature at a time. Add a second screen with a simple navigation action. Add a settings screen with a stored preference. Add a list screen with a small data set. Each addition should be tested before the next addition begins. A growing app built this way stays understandable at every stage.
Learn layout and navigation and state handling in that order. Layout skills make screens look right. Navigation skills connect screens into a flow. State skills keep data consistent across screens and rotations. A developer who learns in that order avoids building a complex app on a weak layout base.
Modern interface work builds on the same layout ideas with newer tools. The interface guide in creating responsive UI layouts in Jetpack Compose extends layout thinking to a declarative model. A beginner should master basic layouts first and then explore that declarative model with a solid base.
A First Week Practice Plan
Day one should cover setup and a first emulator run. Day two should cover layout edits and button logic. Day three should cover rotation state and basic debugging. The rest of the week should cover a second screen and a simple stored preference. A week plan with small daily goals beats a single long session that tries to cover everything.
End the week by explaining the app to another person or in a short note. Explain the activity and the layout and the click handler and the state fix. An explanation that is clear shows real understanding. An explanation that stalls shows exactly which part needs more practice.
Keep the first project as a reference. Later projects will reuse its patterns for activities and layouts and click handlers. A reference project that you fully understand is more valuable than a folder of copied samples that you never finished. Build the next app by adapting the reference rather than starting from a blank guess.
- Keep the first app to one simple screen
- Use Kotlin and the default project settings
- Test button logic on an emulator first
- Fix rotation state with a saved value
- Add one feature at a time after the base works

