

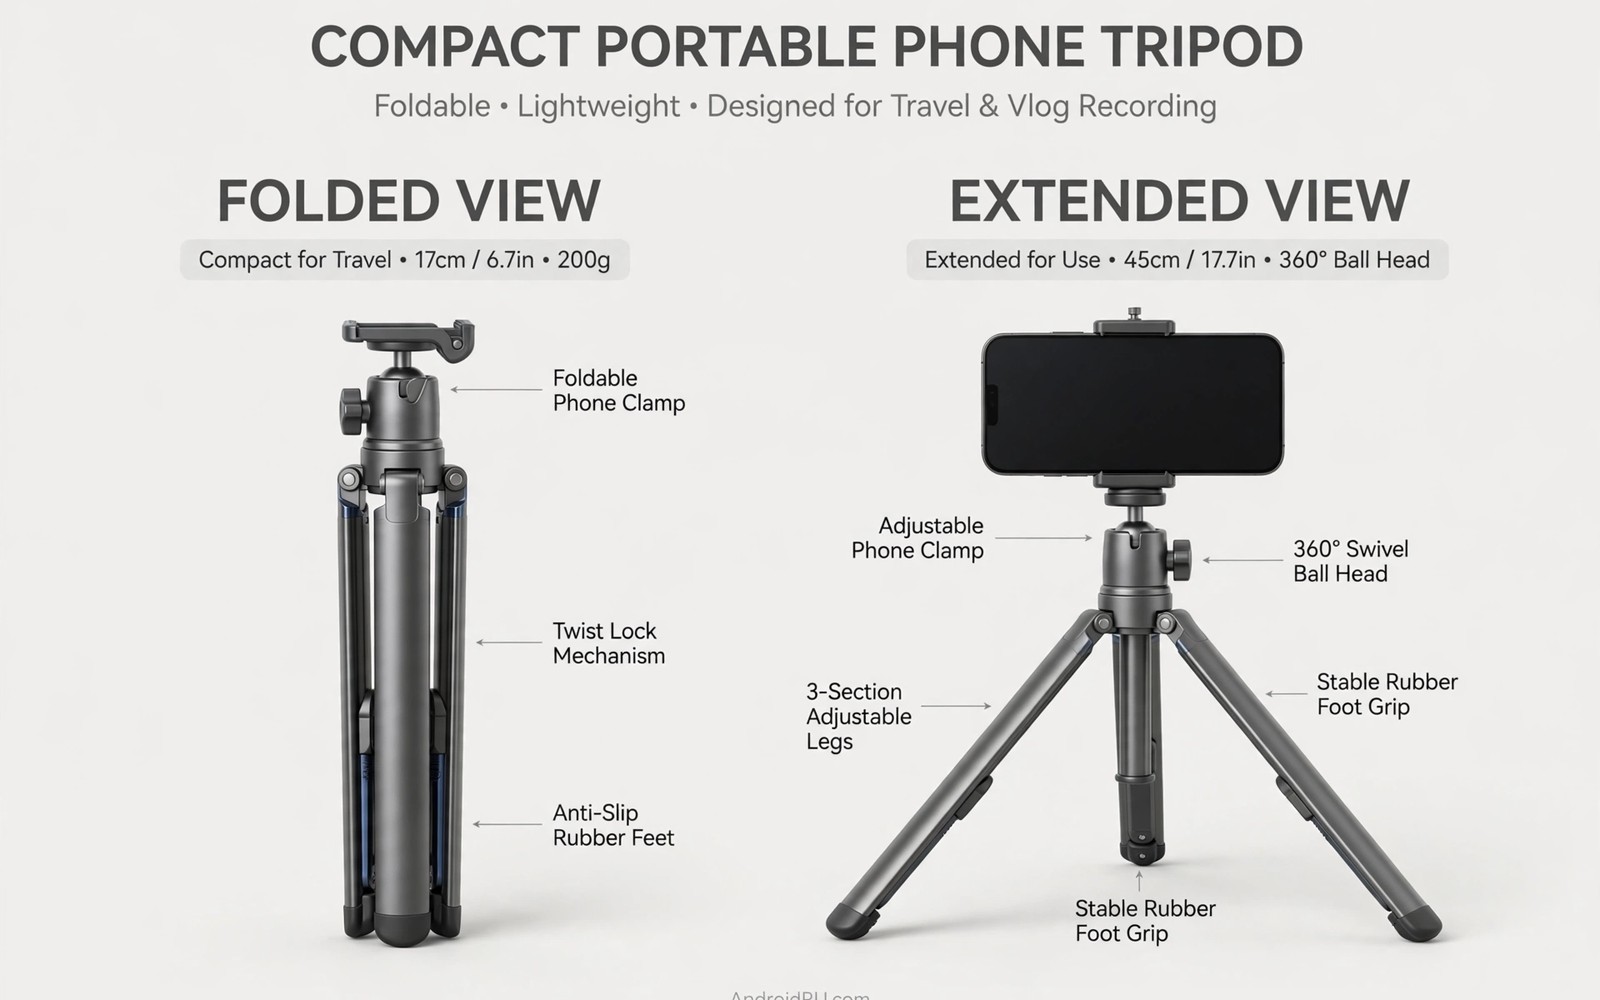
A portable tripod turns a phone into a steady camera that can run without your hands. Vloggers gain a fixed frame for talking segments and timelapses and group shots. Travellers gain sharp night photos and self portraits without asking strangers for help. The right tripod disappears into a bag until the moment it earns its place.
Portability forces trade-offs that full-size tripods avoid. Short legs and light materials pack small but catch wind easily and struggle on uneven ground. Tall travel models reach eye level but weigh more and cost more. The best choice depends on how you actually shoot rather than on a spec sheet.
This guide sorts portable tripods by form and explains heads and legs and mounts in plain terms. It also covers the field habits that keep a small tripod steady. By the end you can match a model to your bag and your shooting style without overspending.
Mini Tripods for Pockets and Tables
Mini tripods stand only a few centimetres tall and fold flat enough for a jacket pocket. They suit tabletop vlogging and product shots and video calls. Place one on a cafe table or a wall or a bench and the phone holds a steady frame. Their tiny size makes them the easiest tripod to carry every day.
The weakness of mini models is height and reach. They cannot lift the phone above a crowd or frame a standing presenter well. They also tip easily when a heavy phone leans forward on a ball head. Use them on flat stable surfaces and keep the phone close to vertical for best balance.
Mini tripods shine for overhead desk shots and cooking videos and unboxing clips. A short stand above a table frames hands and objects cleanly. Pair one with a remote shutter so you never touch the phone during a take. The combination costs little and improves desk content fast.
Check the phone clamp before buying a mini model. A weak clamp drops the phone at the worst moment. A clamp with rubber pads and a firm spring holds the phone without scratching it. Test the clamp with your phone and case at home before trusting it outdoors.
Tabletop Tripods with Flexible Legs
Tabletop tripods with bendable legs wrap around rails and branches and poles. They adapt to places where rigid legs cannot stand. A fence post or a tree branch or a chair back becomes a camera position. This flexibility makes them popular with travellers who shoot in varied terrain.
Flexible legs need care to stay safe. Wrap each leg fully and test the hold before letting go of the phone. A half-wrapped leg slips slowly and drops the phone minutes later. Keep the phone close to the wrap point so leverage stays low and the grip stays strong.
Weight limits matter more for flexible models than for rigid ones. A heavy phone with a clip-on lens can exceed the rated load on an angled wrap. Check the rated load and stay well under it for angled mounts. A safety margin protects both the phone and the shot.
Flexible tripods also work as handles for walking shots. Hold the folded legs as a grip and the phone gains stability over bare handheld shooting. The result will not match a gimbal but it beats a bare hand for short clips. This dual use adds value on travel days.
Travel Tripods That Reach Eye Level
Travel tripods extend to near eye level while folding down to a small package. They suit talking head vlogs and interviews and landscape timelapses. Eye level framing flatters faces and matches how viewers expect a presenter to appear. Standing interviews without a tall tripod force awkward low angles.
Leg sections decide packed size and setup speed. More sections pack shorter but take longer to extend and lock. Twist locks work fast with practice and lever locks work fast with gloves. Choose the lock style that suits your climate and your patience.
Carbon fibre legs cost more but weigh less than aluminium legs of similar strength. Aluminium suits budget buyers and survives rough handling well. Either material works for phone loads because phones weigh far less than cameras. Spend the saving on a better head or a remote shutter.
A travel tripod still needs a phone mount. Most models ship with a simple clamp that fits standard tripod screws. Upgrade the clamp when it feels loose or when it blocks buttons on your phone. A good clamp centres the phone over the tripod for balance.
Heads and Mounts Explained
A ball head tilts and pans with one locking knob. It adjusts fast and suits vloggers who reframe often. The trade-off is drift because a heavy phone can sag slightly after locking. Tighten firmly and check framing after every adjustment.
A pan and tilt head uses separate controls for horizontal and vertical movement. It suits video pans because each axis moves smoothly on its own. The head is larger than a ball head and suits travel tripods better than pocket models. Video creators often prefer it for controlled moves.
A phone clamp with a cold shoe mount adds room for a light or a microphone. The accessory sits above the phone and improves sound or light without a second stand. Balance shifts when accessories mount high so keep the tripod legs wide. A top-heavy rig tips in wind.
Arca style plates and quick release plates speed up mounting and removal. Slide the phone clamp on and off without unscrewing anything. This matters when you switch between tripod and handheld shooting often. Standard plates also let one clamp serve several tripods.
Stability Habits in the Field
Spread the legs fully and keep the centre column low whenever possible. A raised centre column acts as a lever that wind can push. Low and wide beats tall and narrow for stability in every condition. Raise height only when framing truly requires it.
Hang a bag from the centre hook on windy days when the tripod offers one. The added weight lowers the centre of gravity and damps vibration. Do not hang so much weight that the legs bend or the head strains. A small day bag is usually enough.
Shield the tripod from wind with your body or a wall when gusts threaten a take. Even a small wind shakes a light phone rig visibly in video. A windbreak of a few steps can save a timelapse. Check the first seconds of playback before committing to a long take.
Use a remote shutter or a timer for stills so touching the phone cannot shake the frame. A two second timer costs nothing and removes finger vibration entirely. For video start recording before stepping into frame and trim the lead-in later. Clean starts beat rushed starts.
- Pack the tripod you will actually carry rather than the tallest model you admire.
- Test the clamp with your phone and case before the first real shoot.
- Keep the centre column low and the legs wide for maximum stability.
- Use a timer or a remote shutter so your touch cannot shake a still photo.
- Recheck leg locks after moving the tripod to a new surface or position.
Choosing for Vlog Recording
Talking head vlogs need eye level height and a head that holds framing without drift. A travel tripod with a solid ball head or pan head serves this purpose well. Add a small light on a cold shoe mount when indoor light is weak. The face stays bright and the background stays steady.
Walk and talk vlogs need a different tool because a tripod cannot move with you. Use a tripod for intro and outro segments and shoot walking segments handheld or with a gimbal. Cutting between steady tripod shots and moving shots keeps the video lively. No single tool covers every vlog segment.
Group vlogs benefit from a wide stance and a remote shutter. Place the tripod back far enough to fit everyone in frame. Test the framing with the whole group in place before recording. A short test clip prevents a ruined take with everyone out of frame.
Night vlogs reward tripods more than any other setup. Long exposures and low light video need a still phone to avoid blur and noise. A tripod lets the phone gather light without hand shake. The improvement over handheld night video is immediate and obvious.
TRAVEL TRIPOD PACKING CHECK
1 Tripod folded and locked for transport
2 Phone clamp checked with phone and case
3 Remote shutter charged and paired
4 Cold shoe light or mic if planned
5 Small cloth for wiping lens and clamp pads
6 Spare mount screw in the bag pocket
Weight and Packed Size Trade-offs
Every gram in a travel tripod competes with camera gear and clothes in the same bag. A tripod that stays in the hotel because it feels heavy helps nobody. Weigh the full kit with clamp and remote before a trip. A kit under half a kilogram disappears into a day bag easily.
Packed length matters as much as weight for air travel and small bags. A tripod that folds to under thirty centimetres fits most day packs sideways. Longer folded tripods need a dedicated tripod pocket or strap. Measure your bag interior before choosing a travel model.
Tall tripods that pack small use many thin leg sections. Thin sections flex more under wind and touch. Accept the flex for travel convenience and use good stability habits to compensate. Keep the centre column low and shield the tripod from gusts.
Tripod Materials Compared
Aluminium tripods offer solid strength at a friendly price. They dent rather than crack under knocks and survive rough travel well. Their weight is higher than carbon fibre but phone loads are light. Budget travellers get excellent value from aluminium.
Carbon fibre tripods weigh less and damp vibration slightly better than aluminium. They cost significantly more for the same height and load rating. Phone shooters rarely need the weight saving because phone kits are already light. Spend on carbon only when every gram truly counts.
Plastic tripods suit pocket models and tabletop use where loads are tiny. They flex under taller loads and wear faster at joints. A plastic mini tripod is a fine starter tool. Upgrade to metal when you need height or durability.
Shooting Timelapses with a Small Tripod
Timelapses need a tripod that stays perfectly still for many minutes. A small tripod on a solid surface works well for city and sky timelapses. Avoid surfaces that vibrate from foot traffic or passing vehicles. A bridge or a wooden deck can tremble enough to ruin a long sequence.
Frame the timelapse with room for the subject to move through the scene. Clouds and crowds and shadows shift across the frame over time. A tight frame that works for a still may crop the action later. Leave margin for the whole sequence.
Protect the phone from sun and rain during long outdoor timelapses. A small shade over the phone prevents overheating shutdowns. A plastic cover with a lens hole shields drizzle without blocking the view. Check the phone after the first minutes for heat warnings.
For uneven surfaces, see flexible tripods that mount phones on irregular surfaces and learn safe wrapping habits.
For hands-free movement tracking, see AI-powered tracking tripods for content creators which follow a presenter without an operator.
For fast mounting on the go, see magnetic tripod mounts for rapid phone mounting and cut setup time to seconds.
The steps above follow the approach described in the official developer documentation and standard manufacturer guidance for camera supports and mobile video capture. The stability habits and buying checks reflect common practice for portable tripods with phones. Use them as a baseline and adapt the kit to your bag and your shooting style.

