

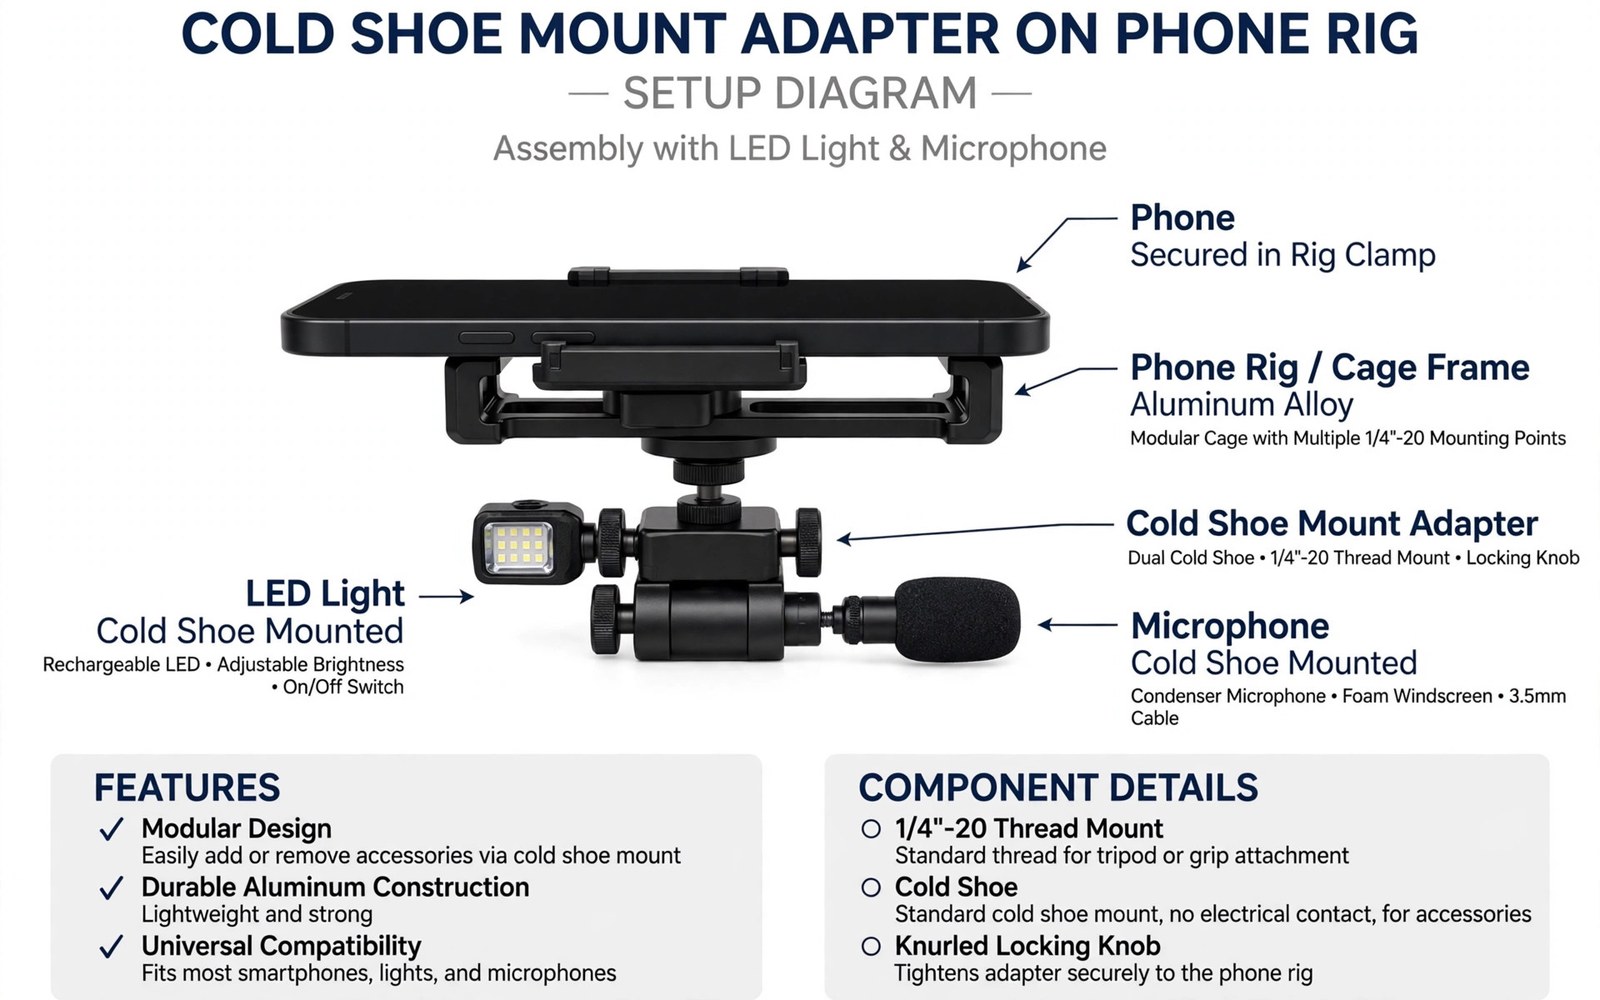
A cold shoe is a small metal bracket that holds an accessory on a camera rig. Lights and microphones and receivers slide into the shoe and lock with a small screw or lever. The name cold means the shoe carries no electrical power. It holds the accessory mechanically while cables carry signal and power separately.
Phone rigs use cold shoes to expand beyond the bare phone. A cage or a tripod head or a handle may carry several shoes. Each shoe adds one accessory without a second stand. The rig becomes a compact studio that one person can carry and operate.
This guide explains shoe types and adapters and layout habits. It covers ball heads and extension bars and the balance problems that accessories create. The goal is a rig where every accessory sits securely and nothing blocks the shot.
Shoe Types and Sizes
The standard cold shoe fits a flat mounting foot about twenty millimetres wide. Most lights and microphone mounts use this standard foot. A standard shoe accepts almost every common accessory. Compatibility problems are rare with standard shoes.
Some accessories use a smaller foot or a threaded base instead of a shoe foot. Adapters convert threads to shoes and shoes to threads. A small adapter set covers nearly every combination. Carry two adapters in the bag for surprises on location.
Dual shoes split one mount point into two shoes side by side. They suit a light plus a microphone on a single cage top. Dual shoes raise the accessory height and shift balance upward. Use them when space is tight but watch the new centre of gravity.
Extension bars move shoes away from the rig body. A bar can place a microphone further from handling noise. A bar can also lift a light above the phone to reduce lens shadow. Bars add leverage so tighten them firmly and check for flex.
Ball Heads and Angle Control
A ball head between shoe and accessory allows angle adjustment. Loosen the head and tilt the light or microphone to the desired angle. Tighten firmly and confirm the angle holds under accessory weight. Ball heads suit lights that need frequent re-aiming.
Small ball heads suit light accessories like compact LED panels. Larger ball heads suit heavier microphones and monitors. An undersized ball head slips slowly during a take. Match head size to accessory weight with margin.
Some ball heads include a shoe on top and a thread below. They stack between a cage shoe and an accessory foot. Stacking adds height and flex points. Keep stacks short and check each joint before recording.
Friction arms offer more flexible positioning than ball heads. An arm with two joints can place a light far from the rig body. Arms suit product shots where light position matters greatly. They need firm locking at both joints to hold position.
Layout Habits for Lights
Place the video light high enough to light the face without entering the frame. A light directly above the phone often works well for talking segments. A light to one side adds depth for interviews. Test both positions with a short clip before committing.
Keep the light clear of the lens axis to avoid flare. Light that shines straight into the lens creates haze and streaks. Angle the light slightly away from the lens while keeping it on the subject. A small angle change removes most flare.
Balance light weight against rig stability. A heavy panel on a tall shoe mount makes the rig top-heavy. Lower the panel or move weight to the base when the rig tips. A stable rig matters more than a perfect light angle.
Route light power cables along the rig frame. Loose cables swing during movement and pull the light off angle. Clips or small ties keep cables tidy. A tidy rig also swaps accessories faster between setups.
Layout Habits for Microphones
Place a shotgun microphone above the phone pointing toward the subject. The shoe mount on top of a cage suits this position well. Keep the microphone out of the frame by checking the widest lens view. A microphone tip in the frame ruins an otherwise clean shot.
Keep the microphone clear of handling noise sources. Hands on the rig transmit vibration into a rigidly mounted microphone. A shock mount with rubber bands isolates the microphone from handling noise. Shock mounts cost little and improve audio greatly.
Place wireless receivers on a side shoe where antennas stay clear. Antennas pressed against metal lose range. A side shoe keeps the receiver visible for battery checks too. Check receiver lights during takes without disturbing the shot.
Separate microphones from lights when heat becomes an issue. LED panels warm up during long takes and heat can affect nearby gear. A small gap between light and microphone avoids problems. Layout planning prevents heat surprises.
- Match accessory feet to standard shoes and carry two adapters for odd combinations.
- Size ball heads to accessory weight so angles never slip during a take.
- Keep lights out of the lens axis to avoid flare in the frame.
- Use a shock mount for shotgun microphones to cut handling noise.
- Route cables along the frame so nothing swings or snags during movement.
Security Checks Before Recording
Tighten every shoe lock before the first take. A loose shoe lets an accessory slide out during a tilt. Check locks again after moving the rig to a new position. Vibration loosens small screws gradually across a shoot day.
Test the full rig with a shake before recording. Accessories should not rattle or shift or rotate. Any movement means a lock needs tightening or a shoe needs replacing. Worn shoes with loose springs deserve retirement.
Check that no accessory blocks the phone screen or key controls. A light or microphone over the screen slows focus changes. Reposition accessories until controls stay reachable. Filming with blocked controls causes missed moments.
Confirm the whole rig still fits the tripod head load rating. Accessories add weight that tripod heads must hold. A head rated for a bare phone may slip under a full rig. Upgrade the head when the rig grows beyond its rating.
COLD SHOE RIG CHECK
1 Every shoe lock tightened firmly
2 Ball heads sized to accessory weight
3 Light aimed clear of lens axis
4 Microphone shock mounted and out of frame
5 Cables clipped along the rig frame
6 Screen and controls fully reachable
7 Tripod head rating covers full rig weight
Building a Shoe Layout from Scratch
Start a shoe layout with the single most important accessory for the shoot. An interview rig starts with the microphone position. A night rig starts with the light position. Build around the priority accessory rather than filling shoes randomly.
Add accessories one at a time and test balance after each addition. A rig that balances with two accessories may tip with three. Testing after each step isolates the accessory that breaks balance. Fix balance before adding the next item.
Sketch the layout on paper for complex rigs with many accessories. A sketch records positions for fast rebuilds on later shoot days. Crews rebuild sketched rigs identically without guesswork. Sketches cost minutes and save hours across a project.
Shoe Adapters for Unusual Accessories
Some accessories use threaded bases rather than shoe feet. A thread-to-shoe adapter converts them for cage use. Check thread size carefully because camera threads vary. A mismatched thread strips easily and damages both parts.
GoPro style fingers and action camera mounts need adapters for cold shoes. A finger-to-shoe adapter adds an action camera to a phone rig. The action camera can capture a second angle while the phone films the main angle. Dual angle rigs add editing options.
Monitor mounts often use shoe adapters with ball heads for angle control. A small monitor on a shoe mount helps focus checking on bright days. Phone screens wash out in sunlight while a shaded monitor stays readable. Monitors earn their weight on outdoor shoots.
When to Use a Rail Instead of Shoes
A rail system offers sliding mounts along a bar rather than fixed shoes. Rails suit rigs where accessory positions change often. Slide a light along the rail to change its angle without remounting. Rails trade some compactness for flexibility.
Rails distribute weight better than a single shoe point. A heavy accessory on a rail spreads load across the bar. Single shoes concentrate load and can bend under heavy accessories. Rails suit heavy monitors and large lights.
Rails add bulk and setup time compared with simple shoes. A small rig with two accessories rarely needs a rail. Choose rails when accessories number four or more. Simplicity wins for small rigs.
Shoe Mounts for Monitors
Small monitors on shoe mounts help framing in bright sunlight. Phone screens wash out under strong sun and hide focus errors. A shaded monitor shows the frame clearly even at noon. Monitors mount on cage shoes with ball heads for angle adjustment. Angle the monitor away from direct sun for best visibility.
Monitor weight affects rig balance more than lights or microphones. A monitor sits high on the rig and creates leverage. Counterbalance the rig when adding a monitor. A front-heavy rig with a monitor tires arms quickly. Balance testing matters most when monitors join the rig.
Monitor cables need routing that avoids snagging during movement. Route video cables along the cage frame with clips. Loose cables pull monitors off angle during pans. A tidy cable run keeps the monitor steady and the rig professional. Check cable slack before every take.
Shoe Safety on Moving Rigs
Moving rigs stress shoe mounts more than static rigs. Walking and running shake accessories in their shoes. Check shoe locks before every moving take. A lock that holds on a tripod may loosen under walking vibration. Recheck locks after the first moving take of a session.
Safety tethers protect expensive accessories on moving rigs. A thin tether from accessory to cage catches items that slip from shoes. Tethers cost little and prevent drops onto hard ground. Use tethers for monitors and lights on all moving shoots. Static shoots rarely need them.
Remove heavy accessories from shoes before running with a rig. Running multiplies forces on shoe mounts dramatically. A monitor that holds while walking may fly off while running. Simplify the rig for running shots and accept fewer accessories. Safety beats completeness on action shots.
For a full filming frame, see professional phone camera cages and rig attachments for filmmakers which carry the shoes themselves.
For better light on the rig, see ring lights and portable LED panels for mobile video shots and choose panels that fit shoe mounts.
For clearer voice on the rig, see external lavalier microphones that improve audio clarity in mobile vlogs and pair lavaliers with shoe-mounted receivers.
The steps above follow the approach described in the official developer documentation and standard manufacturer guidance for camera accessories and mobile rigs. The layout habits and security checks reflect common practice for cold shoe mounting on phones. Use them as a baseline and adapt the layout to your rig and your accessories.

