

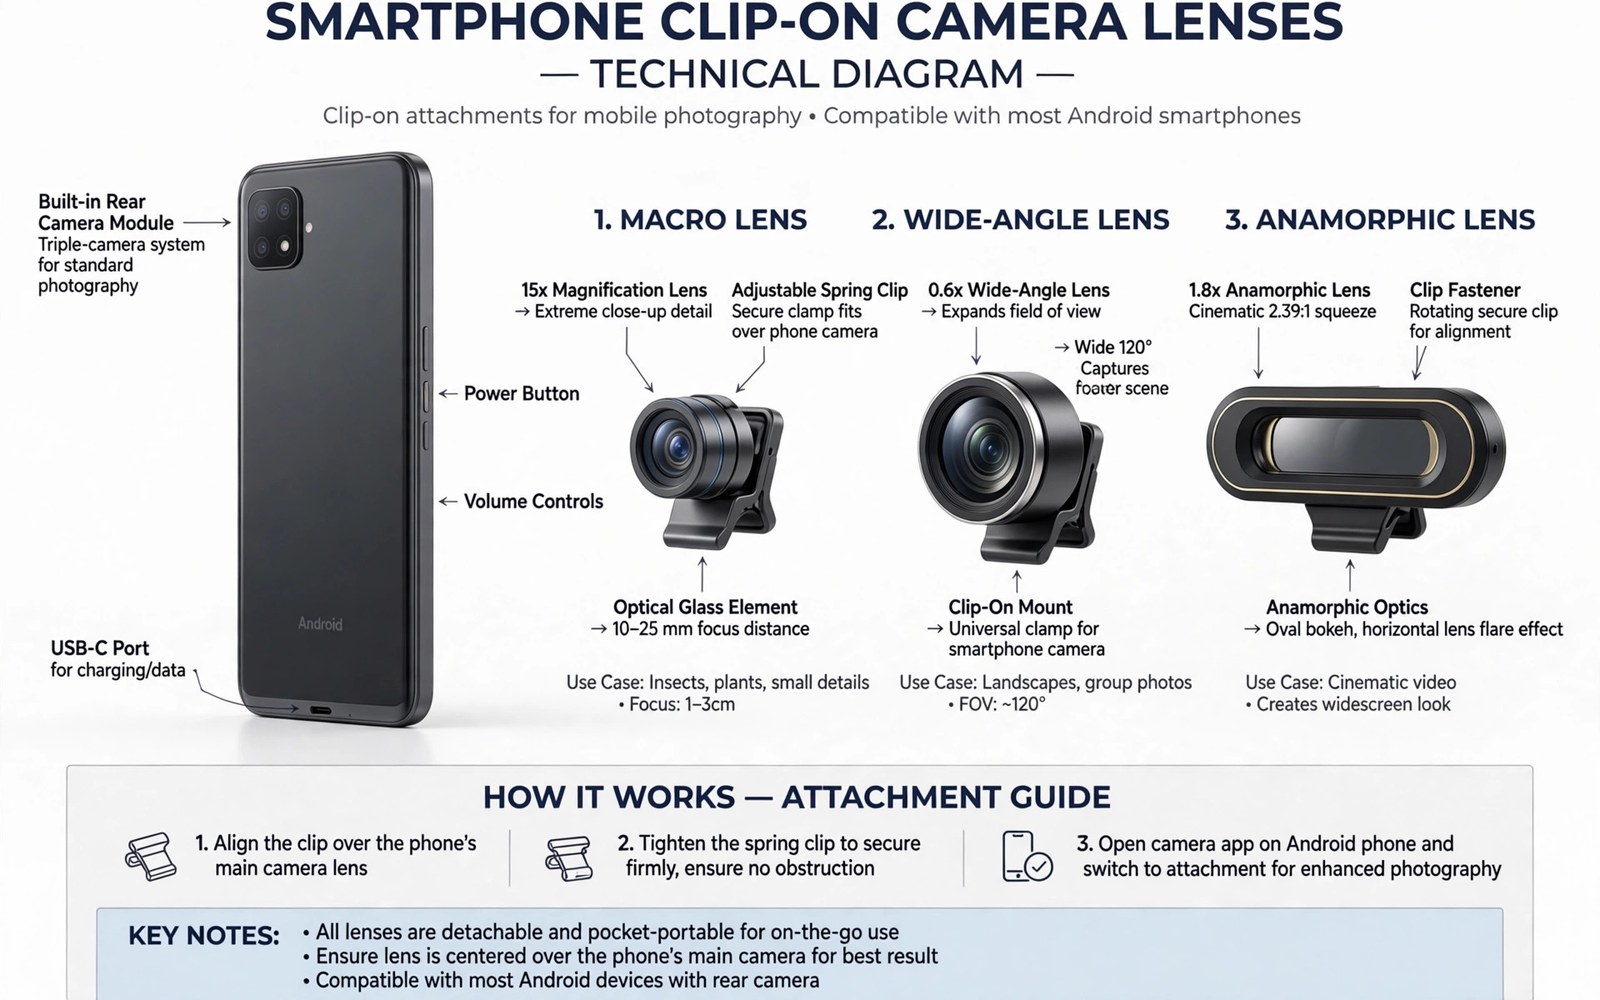
A clip-on lens changes what a phone camera can see without replacing the phone. A small glass element clips over the main camera and bends light before it reaches the sensor. The result can be a closer view of a tiny subject or a wider view of a room or a landscape.
Three types dominate this accessory class. Macro lenses focus at very short distances and reveal fine detail in insects and flowers and small objects. Wide-angle lenses widen the field of view and fit more of a scene into one frame. Anamorphic lenses squeeze a wide cinematic frame onto the sensor and produce a distinct look with horizontal flare.
Clip-on lenses cost far less than a dedicated camera and a set of lenses. They also carry real limits in sharpness and edge quality and low light performance. This guide explains how each type works and how to mount one well and how to judge results before you spend money.
How a Clip-On Lens Works
A phone camera already contains a small lens system tuned for its sensor. A clip-on element sits in front of that system and changes the effective focal length or the minimum focus distance. The phone still handles exposure and focus and image processing as usual. The add-on only changes the light that enters the built-in lens.
Alignment matters more than price. The centre of the clip-on glass must sit exactly over the centre of the phone camera. A small offset causes dark corners and soft edges and uneven sharpness across the frame. Good clips use a firm spring mount or a screw mount that holds the glass steady while you shoot.
Glass quality decides how much detail survives. Cheap single elements often add colour fringing at high contrast edges. Multi-element designs control that fringing better and keep the centre sharper. Coatings reduce flare when you shoot toward a bright window or toward the sun.
A clip-on lens cannot add sensor resolution or true optical zoom range. It reshapes the image that the existing sensor records. Judge it by the final photo at full size on a large screen rather than by a small preview on the phone. Small previews hide softness that becomes obvious in a print or a crop.
Macro Attachments in Practice
A macro attachment shortens the minimum focus distance of the phone camera. You can move within a few centimetres of a flower petal or a coin or a watch dial and still get a sharp image. The depth of field becomes very shallow at that distance. Only a thin slice of the subject stays sharp while the rest melts into blur.
Light becomes the main challenge in macro work. The phone and the lens sit close to the subject and can block daylight and cast a shadow. A small portable light or a bright window at an angle solves most of this problem. Move the light around until the texture of the subject stands out without harsh glare.
Stability matters even more at macro distances. A tiny hand movement shifts the focus plane by a large amount relative to the subject. Rest your elbows on a table or use a small tripod when the subject allows it. Take several frames while rocking focus slightly and keep the sharpest one.
Macro clips suit still subjects best. Insects and flowers in calm air reward patience and careful focus. Moving animals and windy plants frustrate macro shooting because the focus plane is so thin. Accept that many frames will miss and shoot in bursts to raise your keeper rate.
Wide-Angle Attachments in Practice
A wide-angle attachment expands the field of view beyond the built-in lens. Rooms look larger and landscapes gain more foreground and sky in one frame. Street scenes gain context because more of the surroundings fit into the shot. This makes wide attachments popular for travel and indoor photography.
Wide attachments stretch perspective near the edges of the frame. Straight lines near the corners can bend and faces near the edge can look wider than they are. Keep important subjects near the centre when distortion would hurt the shot. Step back or reframe when a doorway or a horizon line bends badly.
Many modern phones already include an ultra-wide camera. A clip-on wide lens still helps on phones that lack one or on the main camera when you want its larger sensor and better low light behaviour. Compare the clip-on result with the built-in ultra-wide camera on the same scene. Keep the option that holds detail better at the edges.
Vignetting is the most common wide-angle flaw. Dark corners appear when the attachment does not fully cover the camera field of view. Test every wide attachment on a plain bright wall before a real shoot. Reject any unit that darkens the corners strongly because no later edit fully restores that lost light.
Anamorphic Attachments and the Cinematic Look
An anamorphic attachment squeezes a wide scene horizontally onto the sensor. Software or an editing step then stretches the image back to its proper wide shape. The final frame looks wider than a standard phone video frame. Black bars above and below the image complete the cinema feel.
The signature anamorphic flare is a horizontal streak of light from bright sources. Street lamps and car headlights and sunlit windows all draw this streak. Some shooters love the effect and build whole scenes around it. Others find it distracting and avoid bright point lights while using the lens.
Anamorphic shooting needs a de-squeeze step in the workflow. Some camera apps handle the stretch live so the preview looks correct while you record. Other workflows need a stretch in an editor after the shoot. Confirm your app or editor supports your lens squeeze factor before an important project.
Focus can feel different through an anamorphic element. The squeeze changes how focus behaves across the frame and manual focus often gives more control than autofocus. Practice on static scenes first and learn how your lens renders depth. Moving subjects demand more takes until focus habits settle.
Mounting and Alignment Checks
Start with a clean camera glass and a clean clip-on element. Dust between the two glass surfaces shows up as soft spots and flare in bright scenes. A quick wipe with a microfibre cloth before mounting prevents most of these defects. Check the clip pads too because grit on a pad can scratch the phone body.
Mount the clip over the main camera and not over an ultra-wide or depth camera by mistake. Many phones place several lenses close together and a wrong mount ruins the shot. Open the camera app and watch the preview while you slide the clip into place. The image should sharpen and fill the frame evenly when alignment is right.
Lock the clip firmly and test it with a gentle shake. A loose clip drifts during a walk or a video take and softens one side of the frame. If the clip will not stay put then the mount does not fit your phone case or your camera bump. Remove the case or choose a mount made for your phone shape.
- Clean both glass surfaces before every mount so dust cannot sit between the lenses.
- Centre the clip over the main camera while watching the live preview for even sharpness.
- Shoot a test frame of a plain wall and inspect the corners for darkening or blur.
- Lock the clip firmly and recheck alignment after any bump or case change.
- Remove the clip before pocketing the phone so the glass cannot scratch or shift.
Common Problems and Fixes
Soft edges usually mean misalignment or a low quality element. Recentre the clip and shoot another test frame before blaming the lens. If one side stays soft after careful alignment then the element itself may be tilted or poorly made. Return or replace a unit that cannot deliver an even frame.
Flare and ghosting grow when stray light hits the front element. A hand shade or a small hood can block light from outside the frame. Wiping the glass also helps because fingerprints scatter light across the image. Avoid shooting straight into strong lamps unless flare is the effect you want.
Autofocus hunting happens when the add-on changes the optical path enough to confuse the focus system. Tap to focus on a high contrast area and hold focus if your app offers a lock. Manual focus gives steadier results for video because it stops the hunting entirely. Practice the focus routine before a shoot that cannot be repeated.
Colour fringing shows as purple or green edges around bright outlines. Better coated elements reduce it and stopping down is not an option on most phones. Editing software can reduce fringing after the shot but heavy fringing costs detail. Treat strong fringing as a reason to upgrade the attachment.
CLIP-ON LENS FIELD CHECKLIST
1 Clean phone glass and clip glass
2 Mount over the main camera only
3 Centre the element while watching preview
4 Shoot a plain wall test frame
5 Inspect corners for darkening and blur
6 Lock the clip and recheck after movement
7 Remove the clip before pocketing the phone
Buying Checklist
Match the mount to your phone before anything else. A universal clip fits many phones but a case or a large camera bump can break the fit. Check the return policy so a poor fit costs you nothing but time. A good seller states which phone shapes the clip suits.
Weigh glass count and coating claims with care. More elements and better coatings usually mean better edges and less flare. Marketing words alone prove nothing so read sample photos at full size when samples exist. Real user photos of brick walls and text pages reveal edge quality fast.
Decide which single type you will use most and buy that one first. A macro lens for nature walks and a wide lens for rooms serve different shoots. Buying all three at once often leaves two of them unused in a drawer. One good attachment that you know well beats three average ones.
Clip-On Lenses for Video Work
Clip-on lenses change video framing just as they change still framing. A wide attachment captures more of a room during a walkthrough video. A macro attachment captures extreme close-ups for product videos. An anamorphic attachment gives footage a cinematic width that standard phone video lacks. Each type needs testing in motion because video reveals edge flaws that stills hide.
Focus behaviour matters more in video than in stills because subjects move continuously. A clip-on lens that focuses well on a still subject may hunt during video. Manual focus lock helps when the subject distance stays constant. Autofocus works better when the subject moves toward or away from the camera slowly. Test focus behaviour with a moving subject before a real video project.
Stabilisation interacts with clip-on lenses in ways that surprise first-time users. Electronic stabilisation crops the frame and can expose the edge of a wide attachment as dark corners. A gimbal avoids the crop problem because it steadies the phone physically. When using a clip-on lens for video, prefer physical stabilisation or disable aggressive electronic correction. Check the full frame edges in test footage before committing to a setup.
Storing and Carrying Clip-On Lenses
Clip-on lenses scratch easily because their glass sits exposed on both sides. A padded pouch with individual slots protects each lens during travel. Caps on both ends add protection when the pouch allows them. A scratched clip-on lens flares in sunlight and softens every image it touches. Protective storage is part of owning these accessories.
Keep clip-on lenses away from keys and coins in bags. A dedicated small pocket or pouch prevents contact damage. Inspect lenses before mounting because bag dust settles on glass during travel. A quick blower puff before mounting removes loose dust safely. Clean storage habits keep lenses sharp for years of use.
Label lenses clearly when the collection grows beyond two pieces. Macro and wide and anamorphic lenses can look similar in a pouch. Small labels or colour-coded pouches speed up selection on location. Fast selection matters when light changes quickly during a shoot. Organisation turns a collection into a usable kit.
If you want reach rather than width, see telephoto auxiliary lenses for mobile cameras and compare their long range behaviour with a wide attachment.
For close-up lighting ideas, see macro photography lighting and auxiliary lens configurations which covers light placement for tiny subjects.
To cut glare in bright scenes, see lens hoods and polarizer filters that eliminate reflections and pair a filter with your clip-on lens.
The steps above follow the approach described in the official developer documentation and standard manufacturer guidance for camera accessories and mobile optics. The mounting checks and test shots reflect common practice for add-on lenses on phones. Use them as a baseline and adapt the routine to your phone model and your shooting style.

