

How Wear OS Smartwatches Act as Remote Camera Viewfinder Shutters
Group photos suffer from a classic problem. Someone must hold the camera, and therefore someone misses the photo. A timer helps, but it forces a rushed run into frame, and the result is usually a blur of motion and a forced smile. I lived with that compromise for years, until a weekend barbecue changed my mind. My Pixel Watch sat on my wrist while the phone stood on a small tripod across the garden, and for the first time I could see the whole group on my wrist, wait for the toddler to stop pulling faces, and tap the shutter at the exact right second. I was in the photo, and the photo was actually good.
That is what a Wear OS watch does for a phone camera. It shows a live viewfinder from the phone on your wrist, and it fires the shutter with a tap, so you can join the group and still control the perfect moment. No more sprinting from the tripod, no more guessing whether everyone fits in frame, and no more asking a stranger to take the shot. This guide explains how the trick works, how to set it up on Pixel Watch, Galaxy Watch and other Wear OS watches, how to frame with a tripod, how to use the timer and burst modes, and how to fix the connection drops that ruin so many first attempts.
Before we start, one honest note. The watch preview is a framing aid, not a finished photo. It looks softer and slightly delayed compared with the final image, because the phone sends a compressed preview over Bluetooth to a small screen. The final photo still comes from the full phone camera, with all its resolution and processing. Judge framing on the watch, judge sharpness on the phone, and you will never be disappointed by the gap between the two.
How a Wear OS Watch Becomes a Remote Camera Viewfinder and Shutter
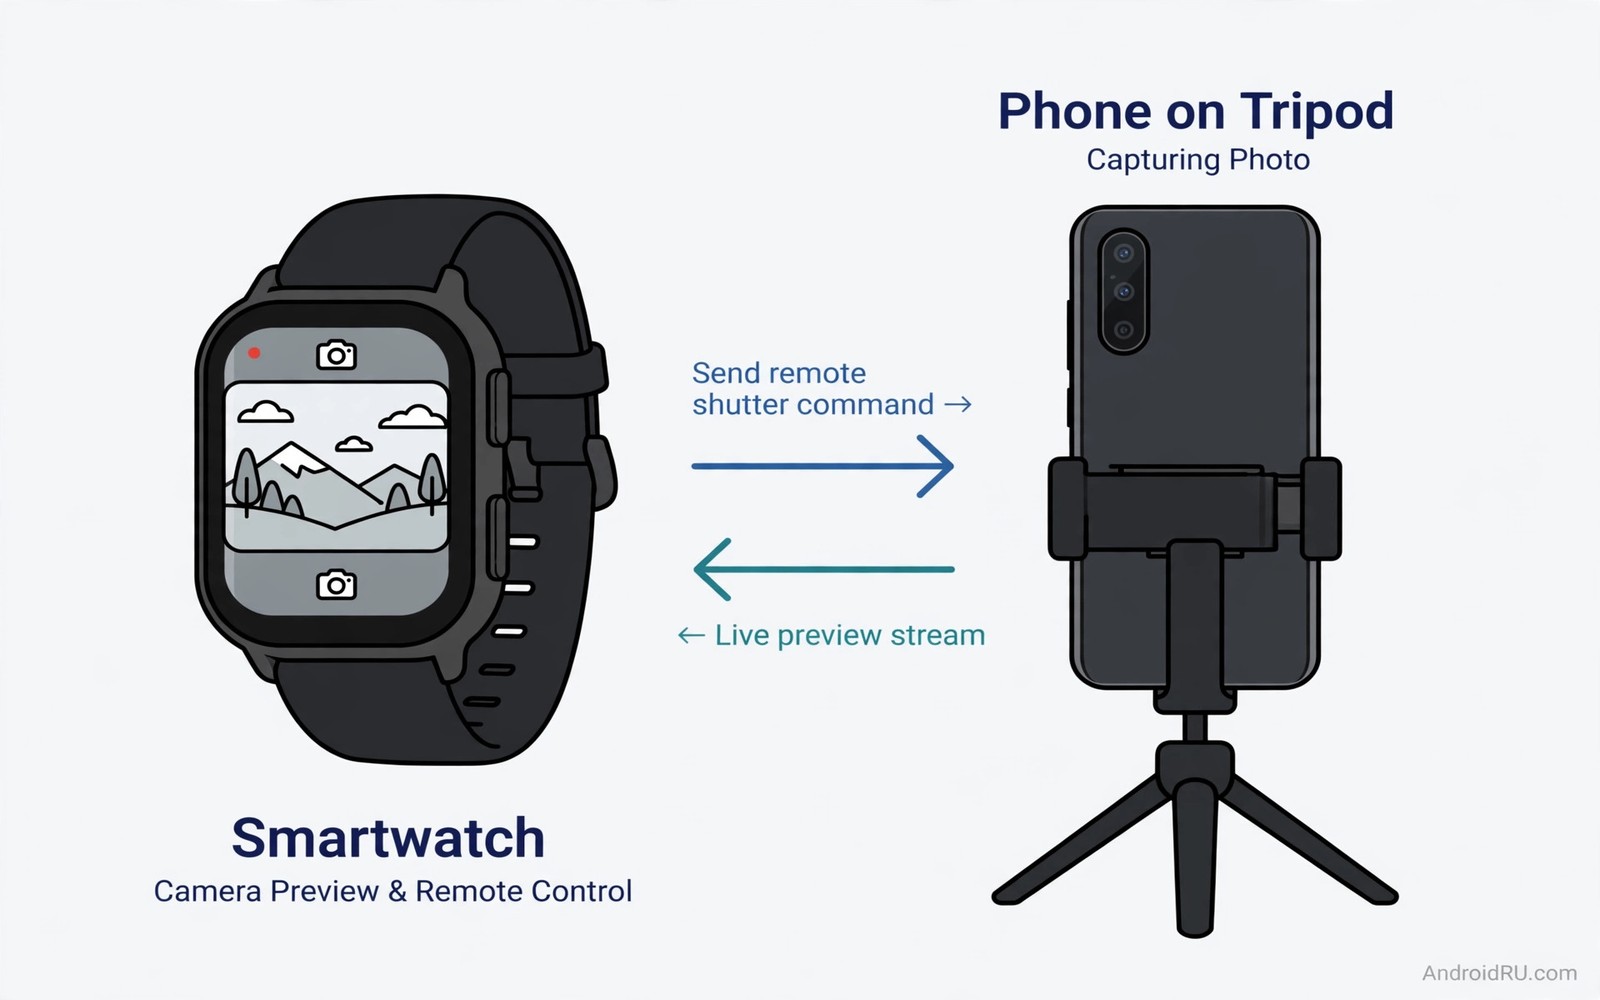
The idea is simple, but the plumbing behind it is worth understanding, because it explains both what works well and what goes wrong. When you open the camera app on the watch, the watch tells the phone to open its camera over the Bluetooth link that already connects the two devices. The phone then streams a live preview back to the watch screen, and every tap on the watch shutter button travels back to the phone as a capture command. The phone takes the photo with its own camera, saves it in its own gallery, and the watch simply shows you what happened.
That link is the same phone-watch connection that carries notifications, calls and health data between the two devices. The health sync guide in how Wear OS watches sync health data shows the same phone-watch link that powers camera control, and the lesson carries over: when the link is healthy, everything works, and when the link is weak, everything stutters. Keep the two devices close, keep Bluetooth on, and keep both charged, and the camera link behaves itself.
What you can control from the wrist depends on the watch and the companion app. On the best setups you get a live preview, a shutter button, a timer, a switch between front and rear cameras, a switch between photo and video, and sometimes zoom. On simpler setups you get a shutter button and nothing else, which still beats a timer, but it means you must frame the shot from the phone screen first. The sections below walk through each major setup so you know exactly what your watch can do before an important event.
What the watch preview can and cannot show you
The preview shows framing, position and rough lighting. It tells you whether everyone fits, whether the background is tidy, and whether someone is standing half hidden behind another person. It does not tell you whether the final photo is perfectly sharp, whether the exposure is exactly right, or whether a face is slightly soft, because the preview is compressed for a small screen and a short-range radio link. Treat it as a viewfinder, not as a proof, and review the real photo on the phone straight after the session while a retake is still possible.
Bluetooth range and why distance matters
Bluetooth is a short-range link, and the camera preview is one of the most demanding things it carries. In open space with a clear line of sight, most watches hold a stable preview at five to eight metres from the phone. Through a wall, through a crowd, or with the phone in a pocket, that range drops fast, and the preview starts to stutter, freeze or drop out. The practical rule is simple: keep the phone tripod close to the group, within a few metres, and keep the watch on the same side of the room as the phone. A short distance gives a stable preview and a fast shutter response, and it costs you nothing.
Pixel Watch and Pixel Camera: Setup Step by Step
The Pixel Watch with a Pixel phone is the smoothest remote camera setup I have used, because the Camera app on the watch and the Pixel Camera app on the phone are built to work as a pair. The watch app opens the phone camera automatically, the preview appears without extra pairing steps, and the controls cover the things that matter: shutter, timer, front and rear camera switching, and video. Here is the exact sequence.
- Pair the Pixel Watch with the Pixel phone in the Google Pixel Watch app, and confirm that Bluetooth is on and the watch shows as connected.
- Update both apps: open the Play Store on the phone and check for updates to Pixel Camera, and open the Play Store on the watch and check for updates to the Camera app.
- Place the phone on a tripod or a stable surface, open Pixel Camera on the phone, and frame the shot from the phone screen first.
- Open the Camera app on the Pixel Watch. The phone camera should open on its own, and the watch screen should show the live preview within a few seconds.
- Join the group, raise your wrist low near your waist, check the framing on the watch, and tap the shutter button on the watch screen.
- Review the photo on the phone immediately, and retake it while the group is still gathered if anyone blinked.
If the watch app opens but the phone camera does not, close the camera app on both devices, check that the watch is still connected in the Pixel Watch app, and try again. If the preview appears but the shutter does nothing, check that the phone camera is in photo mode rather than a mode the watch cannot trigger, and check that the phone is not showing a permission prompt or a storage warning. Most first-time failures come from one of those two causes, and both take seconds to fix.
Pixel Watch timer, camera switching and video controls
On the Pixel Watch Camera app, tap the timer icon to choose a three or ten second delay before the shot, tap the camera switch icon to move between the rear and front cameras, and tap the video icon to switch the phone into video recording, which you start and stop from the wrist. The timer is the control I use most, because a three second delay lets everyone relax after the tap and smile naturally, while an instant shutter often catches surprised faces. Combine the watch shutter with a short timer for the best of both worlds.
Pixel Watch tip: keep your wrist low in the frame
Hold the wrist low near your waist and tap with a finger from the other hand, or tap with the thumb of the same hand if that feels steadier. A wrist raised high enters the frame awkwardly and photobombs the group photo, while a low wrist stays out of the shot and still lets you control the shutter. Practise the gesture once before the real shot, because a smooth tap beats a fumbled one when the group is waiting.
Galaxy Watch and Camera Controller: Setup Step by Step
Samsung Galaxy Watch owners get their remote camera through the Camera Controller app, which pairs with the Camera app on a Galaxy phone. The experience is close to the Pixel setup, with a live preview, a shutter button, a timer and a camera switch, plus a zoom control on some models. The setup sequence is a little different, so follow it in order.
- Pair the Galaxy Watch with the Galaxy phone in the Galaxy Wearable app, and confirm that Bluetooth is on and the watch shows as connected.
- Open the Galaxy Wearable app, go to Watch settings, then Apps, and confirm that Camera Controller is installed on the watch. If it is missing, install it from the Galaxy Store on the watch.
- Place the phone on a tripod, open the Camera app on the phone, and frame the shot from the phone screen first.
- Open Camera Controller on the Galaxy Watch. The phone camera should open, and the watch should show the live preview.
- Use the on-screen shutter button to take the photo, the timer icon for a delayed shot, and the camera switch icon to move between front and rear cameras.
- Review the photo on the phone straight away, and retake it while the group is still together if needed.
One Galaxy quirk is worth knowing. Camera Controller works best with Samsung’s own Camera app, and it may offer fewer controls, or no preview at all, with third-party camera apps on the phone. If you normally shoot with another camera app, switch to the Samsung Camera app for remote sessions, and switch back afterwards. The trade-off is small, and the preview is worth it.
Galaxy Watch zoom and video from the wrist
On recent Galaxy Watch models, Camera Controller offers pinch zoom on the watch screen and a video mode toggle, so you can record a group greeting or a celebration moment without walking back to the phone. Zoom from the watch is slower than zooming on the phone, so set the rough zoom level on the phone first and use the watch only for small adjustments. For video, start recording from the watch, keep your wrist low and steady, and stop recording from the watch when the moment ends.
Galaxy Watch tip: test the link before the event
Open Camera Controller at home the night before an event, take five test shots at the distance you plan to use, and watch for preview freezes or shutter delays. If the link struggles, move the tripod a metre closer to where the group will stand, and the problem usually disappears. A test that takes two minutes at home saves an awkward troubleshooting session in front of guests.
Other Wear OS Watches: Fossil, TicWatch, OnePlus Watch and Third-Party Camera Apps
Not every Wear OS watch ships with a first-party camera app, and that is where third-party camera apps earn their place. Watches from Fossil, Mobvoi TicWatch, OnePlus and other makers run the same Wear OS, so they can run the same camera companion apps from the Play Store, even when the maker never built one of its own. The setup is a little more hands-on, because you must install the matching pair of apps yourself, one on the phone and one on the watch, and confirm that they talk to each other before the event.
Start by searching the Play Store on the phone for a Wear OS camera remote app with recent updates and a clear description of which watch models it supports. Install the phone side first, then open the Play Store on the watch and install the watch side from the same developer. Open the watch app and follow its pairing prompt, which usually asks you to confirm a code or to grant the phone app camera and Bluetooth permissions. Take a test photo at home before you rely on the setup, and check three things: the preview appears, the shutter fires, and the photo saves on the phone. If any of those three fails, the app is not a good match for your watch, and you should try a different one rather than fighting it on the day of an event.
Generic camera apps on the watch may offer basic shutter control only, with no live preview, and that is still useful, but it changes how you shoot. Without a preview you must frame the shot from the phone screen first, lock focus and exposure, and then use the watch purely as a remote shutter. That workflow works well for solo portraits and for group shots where the framing does not change between takes, and it is far better than a timer alone.
Choosing a third-party camera remote that actually works
Look for an app that was updated recently, that names your watch model or your Wear OS version in its description, and that explains its permissions plainly. Avoid apps that demand broad permissions with no explanation, or that have not been updated in years, because the Bluetooth and camera interfaces on Wear OS change, and an old app may fail silently on a new watch. Read a handful of recent reviews from users with the same watch you own, because a five-star average from a different watch model tells you nothing about your own setup.
Set Up the Phone, Tripod and Framing Before You Touch the Watch
The watch is the last step in the setup, not the first. A stable phone, a clean frame and a locked focus decide whether the photo is good, and the watch only decides when it is taken. Place the phone on a tripod or a stable surface before you open the watch app, because a phone leaning against a book slides at the worst moment, and a small tripod costs little and transforms group photos. Set the tripod at eye level for natural looking portraits, because a low angle makes people look distorted and a high angle makes them look small.
Frame the shot from the phone screen first. Arrange the group and check the background for clutter, because a clean background makes the group stand out, and removing a distracting object behind the group matters more than any fancy camera setting. Lock focus and exposure on a face in the middle of the group with a long press on the subject, because a locked focus prevents the camera from hunting when someone moves slightly, and locking before you join the group ensures the final photo stays sharp on the people that matter.
Scout the location before guests arrive when you can. A spot near a large window gives flattering natural light, a spot against a plain wall avoids distracting backgrounds, and a planned spot lets you set the tripod early without blocking guests. Take a test shot with one volunteer before the full group gathers, because a test shot reveals lighting problems and framing problems early, and the full group then steps into a setup that already works.
Tripod choices for phone photography
A pocket tripod with flexible legs works well on tables and fences, a full-size phone tripod with a phone clamp works well on open ground, and a small selfie stick with a tripod base covers both jobs in a bag that fits in a jacket pocket. Whatever you choose, check two things before the event: the clamp holds your phone firmly without pressing the side buttons, and the legs stand steady on the surface you will use. A tripod that tips over mid-session is worse than no tripod at all.
Lighting and background checks that take thirty seconds
Stand where the group will stand, look at the phone screen, and ask three questions. Is anyone backlit by a bright window, so faces go dark? Is there a bright object or a mirror directly behind the group? Is the horizon or a shelf line cutting across someone’s head? Fix what you find by moving the tripod a step to the side or by turning the group slightly, because a thirty second check at the start saves a set of photos you cannot fix later.
Shutter Timing, Timer, Burst Mode and Video From Your Wrist
Timing is where a watch shutter earns its keep, because the difference between a good group photo and a great one is usually half a second. An instant shutter catches people mid-blink or mid-sentence, while a short timer lets everyone settle, look at the lens and smile naturally. Set a three second timer on the watch after framing, walk calmly into position during those seconds, and let the shutter fire while the group is relaxed. A calm walk produces a relaxed pose, and a rushed run produces a tense expression.
Take several shots in a burst when the watch app supports it, because bursts increase the chance that everyone has eyes open and a natural smile in at least one frame. Review the burst on the phone after the session and keep the best frame, because deleting extra frames later costs nothing, while missing the perfect moment costs the whole photo. Switch between photo and video modes from the watch when the app allows it, because a video mode lets you capture a group greeting or a celebration without returning to the phone, and mode switching from the wrist keeps you in the group for both.
Solo portraits benefit from burst mode even more than group shots. A burst captures subtle expression changes across frames, and one frame will show a natural smile while others show blinks or awkward poses. Practise solo remote shots at home before a trip, because home practice teaches tripod placement and watch gestures without travel pressure, and a practised setup works smoothly at a scenic location while an unpractised one wastes golden light on troubleshooting.
When to use the timer and when to shoot instantly
Use the timer when the group needs a moment to settle, when you must walk into frame yourself, or when the light is low and a steady shot matters. Shoot instantly when the moment is unrepeatable, such as a toast, a laugh or a child doing something funny, because the moment will be gone before a timer finishes. Knowing which situation you are in is the skill, and the watch gives you both options on the same screen, so choose per shot rather than per session.
Burst mode settings worth checking in advance
Check before an event whether your watch app supports burst shooting at all, and whether the phone camera is set to save bursts as a stack you can pick from later. Some phones save every burst frame as a separate photo, which fills storage fast, while others group them, which makes selection easy. Clear space on the phone before a long session, because a burst of twenty frames in high resolution is not the moment to meet a storage full warning.
Solo Portraits, Selfies and Group Photos With a Watch Shutter
Remote camera control helps solo portraits as much as group photos. A solo traveller can frame a self portrait with the watch viewfinder, and a tripod plus a watch replaces asking a stranger to take the photo. Solo portraits gain composition control that stranger photos lack, because you can check framing before every shot, move the tripod a step to the left, and try again until the background sits exactly where you want it.
For group shots, communicate the plan briefly before you start. Tell people where to stand and when to smile, keep directions short and friendly, and take the first shot quickly so the group relaxes. A relaxed group photographs far better than a stiff group following complex instructions, and a quick first success gives everyone confidence for the next few frames. Review photos on the phone immediately after the session while the group still gathers, because a quick review catches closed eyes or awkward framing while a retake remains possible, and a retake after the group disperses is impossible.
For selfies and solo portraits, a watch timer combined with a remote shutter gives the most natural results. Set a five second timer on the watch after framing, walk into position calmly during those seconds, and let the shutter fire while you are settled. Practise timer timing at home with different distances, because a short distance needs only a short timer, a long walk to the photo spot needs a longer timer, and knowing the right timer for each distance turns timer choice into instinct rather than guesswork.
Troubleshooting Dropped Connections, Laggy Preview and Battery Drain
Connection drops break remote camera sessions more often than any other problem, and the fix is almost always distance or interference. Keep the phone and watch within a few metres, keep Bluetooth active, and keep both devices on the same side of any wall or crowd. Walls and crowds weaken the link, and a short distance gives a stable preview and instant shutter response. Move the tripod closer when the preview stutters, and the problem usually clears at once. If the link drops completely, close the camera app on the watch, wait five seconds, reopen it, and let the phone camera reconnect before you tap the shutter again.
Battery drain rises during remote camera use, because the watch screen and radios stay active for the whole session. Charge the watch fully before a photo event, and keep the phone above half charge as well, because a watch at low battery may close the camera app mid-session, and a phone at low battery may dim its screen or close background apps. The battery guide in Wear OS power saving tweaks will keep the same watch ready for both photos and daily tracking, and a full charge before the event prevents disappointment during an important group moment.
Low light challenges both the preview and the final photo in different ways. The watch preview looks grainy in dim rooms, but the phone camera may still capture a good photo with night mode, so trust the phone camera in low light and use the watch only for framing and shutter. A grainy preview does not mean a grainy final photo. If the preview freezes in low light, that is usually the radio link struggling rather than the camera, so move closer and try again before you blame the light.
Preview frozen, shutter dead or app closing on its own
Work through this checklist in order when something stops working. First, check the distance and move closer. Second, check that Bluetooth is on for both devices and that the watch still shows as connected. Third, close the camera app on the watch and reopen it. Fourth, close the camera app on the phone and reopen it. Fifth, restart the watch if the app keeps closing. Sixth, check battery on both devices. In my experience the first three steps fix most failures, and the rest cover the stubborn ones.
When to restart the watch instead of the phone
Restart the watch when the camera app freezes, closes on its own, or shows a preview that never updates, because the fault usually sits on the watch side of the link. Restart the phone when the camera app on the phone refuses to open, shows a storage warning, or keeps switching modes on its own. Restarting both at once is fine too, but doing them one at a time tells you which side was at fault, and that knowledge saves time next time.
Wear OS Camera Frequently Asked Questions
Does remote camera work with any phone and any Wear OS watch?
Remote camera works best with phones and watches from compatible makers, because the companion apps are built as pairs. Generic camera apps on the watch may offer basic shutter control with other phones, but the live preview and the extra controls often need the matching pair. Check companion app support for full viewfinder features before you plan an event around them.
Can I zoom from the watch?
Some watch camera apps support pinch or button zoom, while others offer shutter only. Pixel Watch and Galaxy Watch both offer zoom controls in their camera apps, though the range and the smoothness vary by model. Check your watch app controls before an event, and set the rough zoom level from the phone beforehand when the watch lacks zoom control.
Will the watch shutter work from far away?
Bluetooth range limits remote camera use to a few metres reliably, usually five to eight metres in open space, and less through walls or crowds. Keep the phone tripod close to the group for a stable preview and fast shutter response. If you need a shot from further away, move the tripod rather than stretching the link, because a stretched link gives a frozen preview and a shutter that fires late or not at all.
Does using the watch camera drain the battery fast?
Yes, faster than normal watch use, because the screen stays on and the radio streams the preview continuously. A full charge handles a normal photo session easily, but an all-day event with the camera open for hours will need a top-up. Close the camera app between shots, dim the watch screen when you can, and charge the watch fully before the event to stay safe.
Can I record video from the watch as well as photos?
On Pixel Watch and Galaxy Watch you can switch the phone into video mode from the wrist and start and stop recording from the watch, which is ideal for group greetings and celebrations. On other watches it depends on the companion app, so check video support in advance. When video matters, test a short clip at home first, because a video that fails to start at the event is worse than a photo you already know works.
Your Next Step: Take One Test Photo Tonight
A Wear OS watch turns group photography from a compromise into a pleasure. Set up a stable phone, frame from the phone first, lock focus on a face in the middle of the group, and then control the shot from your wrist. Your concrete next step is to set up a tripod tonight, open the watch camera app, and take one test group photo with a friend. Check framing on the watch and sharpness on the phone, try the timer once, and try a burst once, so you know how all three feel before you need them. If that test works, the watch is ready for your next gathering, and the stranger you would have asked to take the photo can stay in the frame where they belong. As a related next step, explore mirroring a tablet display to a desktop PC monitor to extend what you set up here. Remote camera control on Wear OS is a small feature that changes group photos completely, and once you have used it, going back to a timer and a sprint feels like a chore from another decade. Wear OS camera control rewards a little preparation with photos that finally include everyone, including the person who used to hold the camera.

