

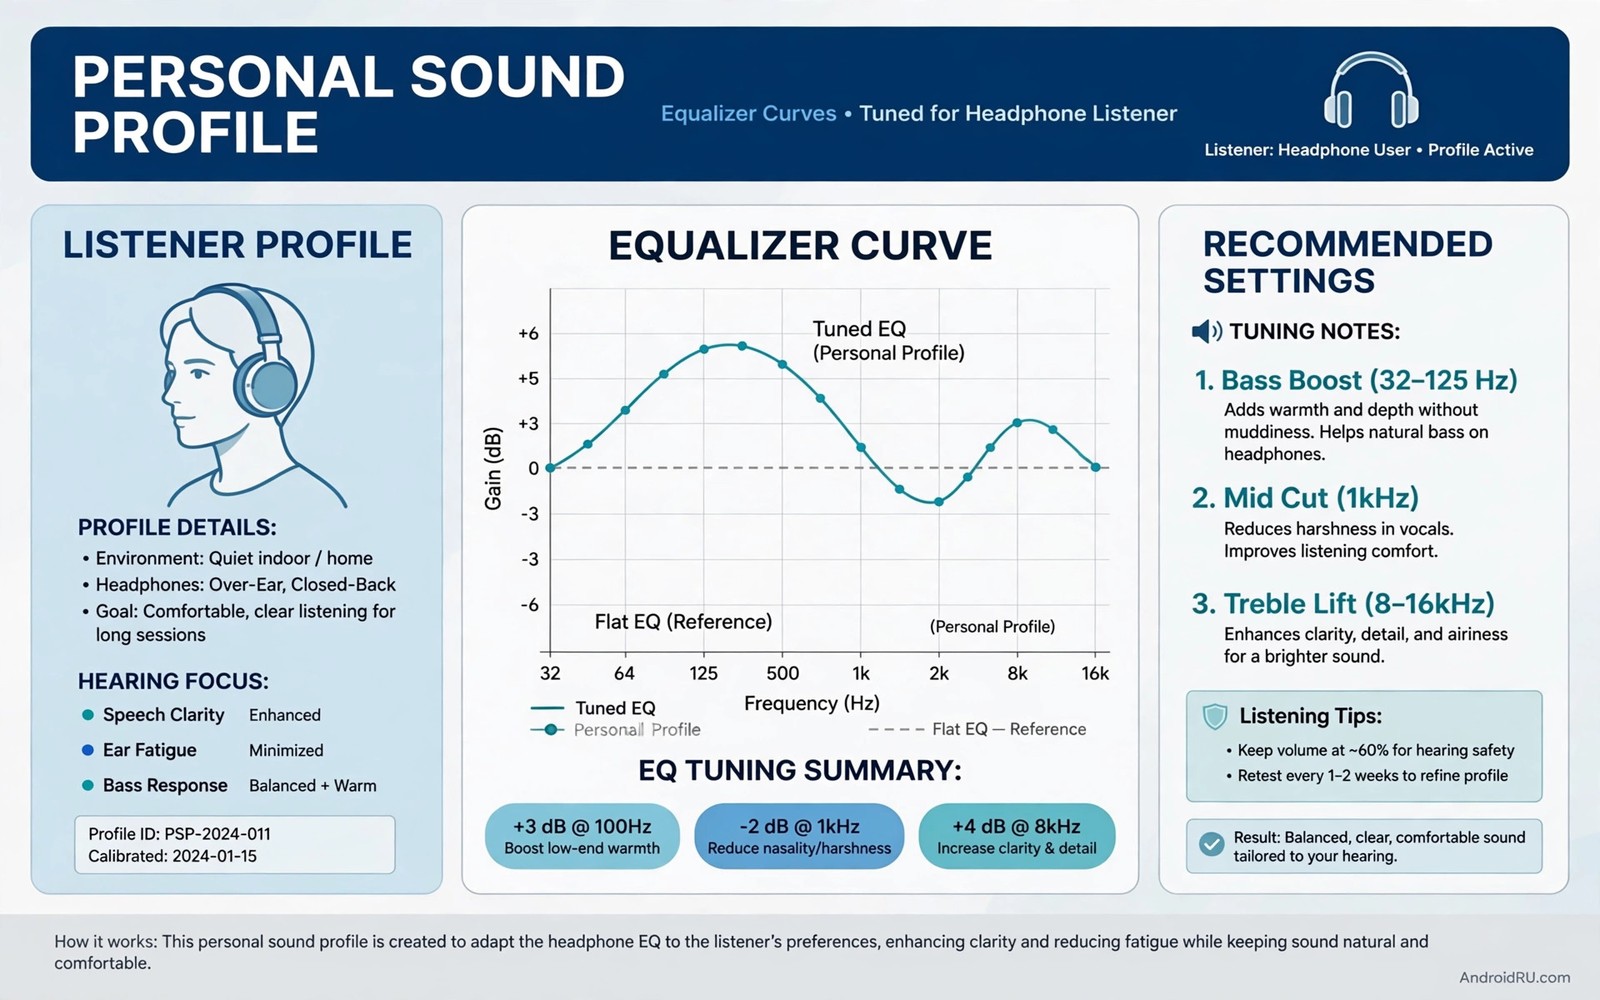
No two listeners hear exactly the same way. Age and hearing history and headphone fit all shape what sounds balanced. A factory preset cannot know your ears. A personal profile built from listening tests can come much closer to a sound that feels natural to you.
Custom tuning does not require a hearing clinic or special equipment. It requires quiet time and a familiar set of songs and a willingness to make small changes. The process in this guide uses comparison rather than numbers. You compare two settings and keep the one that sounds clearer to you.
Work in a quiet room and use the headphones you use most. A profile tuned on one headphone will not transfer perfectly to another. Build a separate profile for each main output. That extra work pays off every time you listen.
Start with a hearing baseline
Play a familiar song at a comfortable volume and listen without any equalizer. Note which parts feel weak or harsh. Voices may sound distant. Cymbals may sound sharp. Bass may sound muddy. Those notes are your baseline and they guide every later move.
Test with three kinds of content. Use a vocal song and an acoustic track and a spoken podcast. Each type exposes a different part of your hearing. A profile that helps all three types is a strong personal profile. A profile that helps only one type needs more work.
Listen at a normal volume rather than maximum. Loud volume hides subtle balance problems and it tires the ear quickly. A profile tuned at a normal level will sound good at other levels too. A profile tuned loud often sounds harsh when you turn it down.
Adjust one band at a time
Reset the equalizer to flat and choose the weakest area from your baseline notes. If voices feel distant then raise the midrange by one step. Listen to the same song again and decide whether the voice improved without new harshness. Keep the change only if the answer is yes.
Move to the next weakest area only after the first change is settled. If bass feels muddy then lower the low bass by one step. Listen again for clarity in the voice and the beat. Small steps prevent a chain of compensating boosts that muddy the whole mix.
Take breaks between rounds. The ear adapts to a new balance within minutes and that adaptation can fool you. A five minute break with silence resets your judgement. Return fresh and compare the new profile with the flat start again.
Use A and B comparison properly
Save your tuned profile and the flat profile as separate presets. Switch between them during the same song. A direct comparison reveals differences that memory hides. Listen to a short passage in each mode and note which mode gives clearer vocals.
Use a short passage of about twenty seconds for each comparison. A long passage lets the ear adapt and blurs the difference. A short passage keeps the comparison sharp. Repeat the passage in both modes before you decide.
Ask a friend to switch presets without telling you which is active. A blind test removes expectation bias. If you consistently prefer your tuned profile without knowing which is which then the tuning is real. If you cannot tell them apart then keep the simpler flat profile. A free systemwide sound engine makes preset switching easy across apps.
Account for age and listening history
High frequency hearing often fades first with age and noise exposure. A gentle treble lift can restore sparkle for older listeners. Keep the lift small because a large lift adds hiss and harshness. A lift of one or two steps is enough for most people.
Listeners who work in loud environments may need a clearer midrange for speech. A midrange lift helps dialogue cut through without raising overall volume. That change also helps podcast listening during a commute. It is a practical tuning rather than a cosmetic one.
Do not tune to compensate for a medical hearing issue alone. A personal profile can improve enjoyment yet it cannot replace professional advice for significant hearing loss. If you struggle to follow normal conversation then seek a hearing check. A guide to studio quality audio on cheap headphones pairs well with personal tuning for budget gear.
Save and name profiles by use
Name profiles by output and situation rather than by preset style. Daily headphones and quiet room speaker and commute podcast are clear names. Clear names help you switch quickly without opening the equalizer each time.
Review profiles every few months. Headphones age and ear tips wear and your hearing changes slowly. A profile that sounded perfect last year may need a small refresh. A quick A and B test with a familiar song is enough for a review.
Baseline: flat profile with familiar songs
Step 1: fix weakest area by one step
Step 2: A and B test with short passage
Step 3: blind test with a friend switching
Save rule: name by output and situation
The routine above is an original illustration created for this guide. It uses only general listening test practice and standard equalizer terms. It is meant to keep personal tuning honest and repeatable.
Test your profile with different volumes
A profile tuned at one volume may behave differently at another volume. Bass perception rises with loudness while treble perception changes less. Test your tuned profile at low and medium and high comfortable levels. A good profile stays balanced across that range without a major flaw at any level.
Low volume testing is especially important for night listening. A profile that sounds full at medium volume may sound thin when quiet. A small bass lift for night use can restore fullness without raising overall volume. Save that night variant as a separate profile.
High volume testing reveals harshness that medium volume hides. A treble lift that sounds sparkling at medium volume may sound sharp when loud. Lower the treble by one step if high volume listening feels harsh. That adjustment protects both comfort and hearing.
Share profiles with care
Sharing a personal profile can help a friend with similar headphones. Warn the friend that the profile was tuned for your ears and your gear. Encourage them to use it as a starting point rather than a final answer. A shared profile that is tested by the friend often improves for both people.
Document the headphone model and tip size with any shared profile. Those details explain why the profile sounds a certain way. Without them a friend may judge the profile unfairly on different gear. Clear documentation turns a personal file into a useful starting point.
For a clean engine to host your profile read about a free systemwide sound engine. That engine applies one profile consistently across apps. It keeps personal tuning from being undone by scattered app equalizers.
Revisit tuning after changing headphones
A new headphone pair needs a fresh tuning session even if the old profile was perfect. Drivers and fit differ between models and those differences change balance. Copying an old profile to new headphones gives a starting point only. A fresh A and B test adapts the profile to the new gear.
Start the new tuning from flat rather than from the old profile. A flat start reveals the new headphone character honestly. An old profile applied blindly can hide a new strength or exaggerate a new weakness. Flat first is slower yet it gives a truer result.
Compare the old and new headphones with the same song during the transition. That comparison helps you understand what changed. A new pair may need less bass or more treble than the old pair. Those notes guide the new profile quickly.
Keep the old profile saved under the old headphone name. A saved old profile lets you return to the old pair without retuning. That archive is useful when you switch pairs for different tasks. Clear naming prevents confusion between profiles.
For bass tuning on a new wireless pair read about boosting bass on wireless earbuds without muffled sound. That guide focuses on seal and gentle bass moves. It pairs well with a fresh personal tuning session.
Use reference tracks for every tuning session
Reference tracks give tuning sessions a stable anchor across months. Choose three tracks that you know deeply and use them for every profile review. A familiar track reveals small balance changes that a new track hides. That familiarity is the most valuable tuning tool you own.
Store reference tracks in a dedicated playlist for quick access. A dedicated playlist prevents searching during a tuning session. Quick access keeps the session focused on listening rather than on browsing. That focus improves the quality of every decision.
Common mistakes
The biggest mistake is tuning at maximum volume. Loud tuning hides harshness and it tires the ear fast. Tune at the volume you use most days. That level gives the most useful profile for real life.
Another mistake is copying someone else profile exactly. A profile built for another person ears and headphones will not match yours. Use other profiles as starting sketches only. Adjust each band with your own A and B tests.
People also tune only with music and forget speech. A music profile can make podcasts sound thin or boomy. Test speech after music tuning and create a separate speech friendly profile if needed. Daily listening includes both kinds of content.
Frequently asked questions
How long does personal tuning take?
A useful first profile takes about thirty minutes of focused listening. That time includes baseline notes and small band moves and A and B tests. Refinement over later days improves the profile further. Do not rush the first session.
Can tuning damage my hearing?
Tuning itself does not damage hearing when volume stays at a comfortable level. Damage comes from sustained loud volume rather than equalizer shape. Keep volume moderate during tests and take breaks. A comfortable level protects both judgement and hearing.
Should I tune each headphone separately?
Yes each headphone deserves its own profile because drivers and fit differ. A profile that sounds balanced on one pair can sound harsh on another. Save profiles by headphone name and switch when you switch gear. That habit keeps every pair at its best.
Conclusion
Personal sound comes from your ears and your gear and your listening habits. Build a baseline with familiar content. Adjust one band at a time and test with A and B comparison. Save profiles by output and situation and review them over time.
Your concrete next step is to spend thirty minutes today building one headphone profile with a vocal song and a podcast. Start flat and fix only the weakest area first. If you want a consistent engine for that profile then explore a free systemwide sound engine next.

