

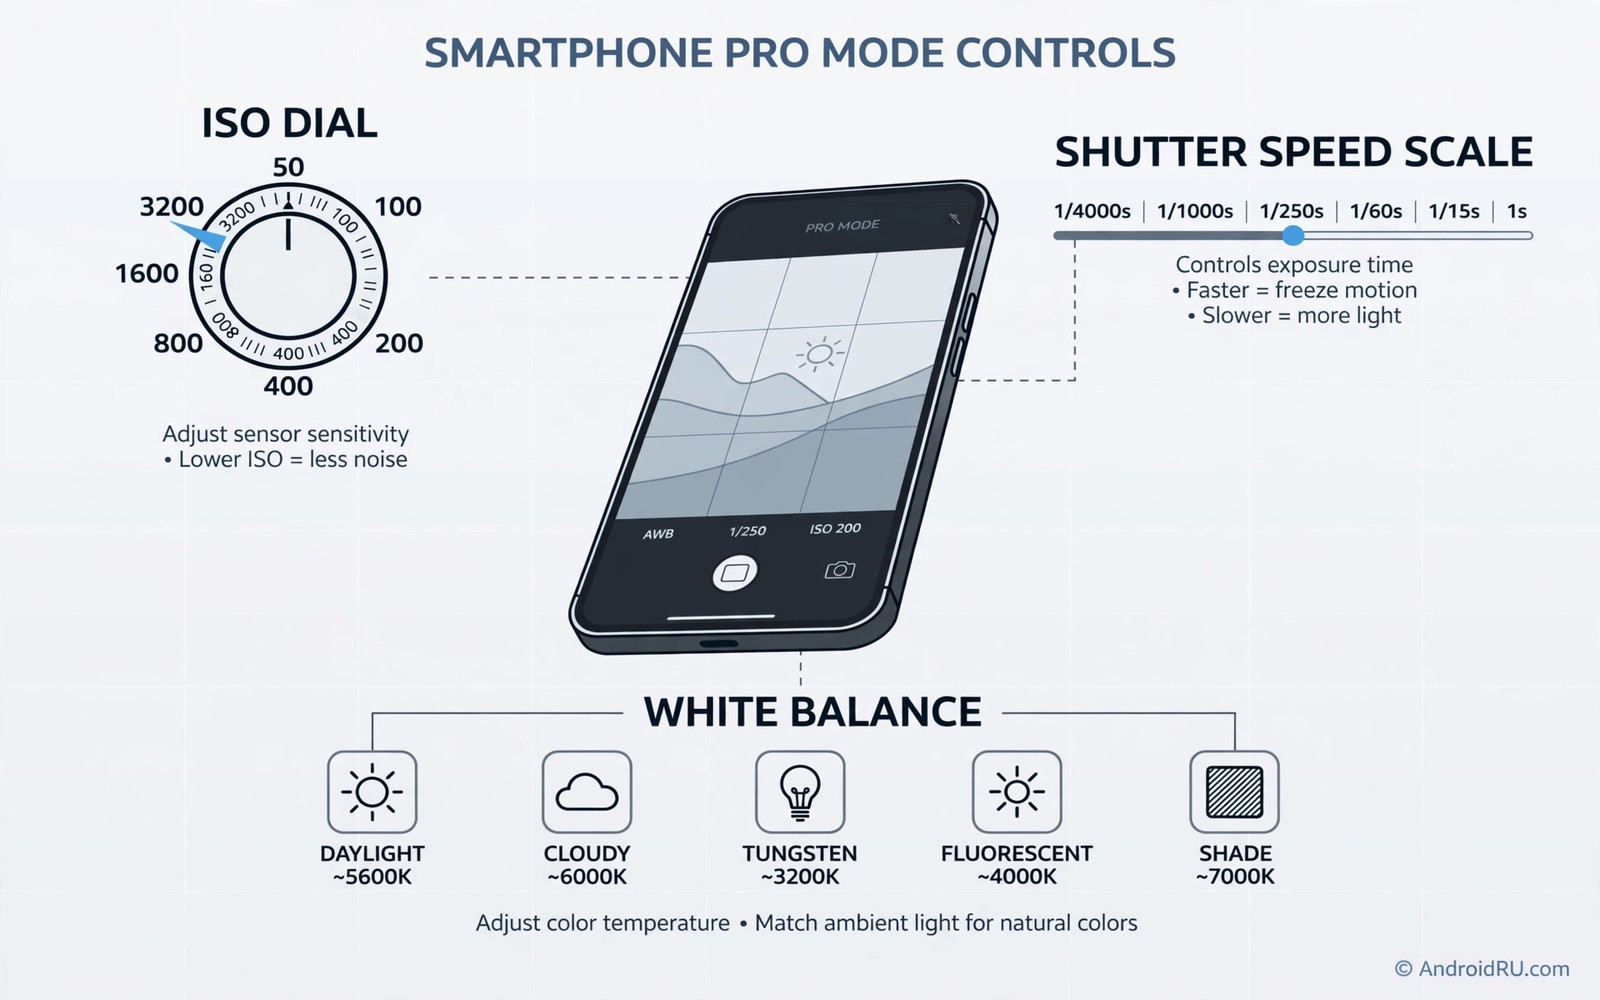
Pro mode looks intimidating because it shows numbers instead of auto magic. Those numbers are simply three controls. ISO controls sensor sensitivity. Shutter speed controls time. White balance controls colour temperature. Together they decide brightness and sharpness and colour. Learn them one at a time and pro mode becomes friendly. This guide explains each control in plain language with practical starting points.
Start in good daylight where mistakes cost little. Daylight gives room to experiment without noise or blur dominating. Set one control manually and leave others auto at first. Learn ISO alone for a day. Learn shutter alone the next day. Learn white balance alone after that. Single control learning builds intuition fast. Three controls at once confuse beginners. Patience in learning pays off in control later.
Use a tripod for early pro mode practice. A tripod removes shake from the learning process. Shake can mask the effect of a setting change. A stable base isolates each control’s effect. Practice on a static subject first. A building or a still life subject stays constant. Constant subjects let you compare settings fairly. Fair comparisons build reliable intuition.
Understand ISO Simply
ISO measures how sensitive the sensor is to light. Low ISO means low sensitivity and clean files. High ISO means high sensitivity and more noise. Use ISO 100 in bright daylight for cleanest results. Use ISO 400 in shade for a balance of clean and fast. Use ISO 1600 in dim rooms when shutter speed must stay fast. Each step trades cleanliness for light gathering ability.
Noise from high ISO looks like grain across the image. Grain is most visible in shadows and smooth skies. A little grain is acceptable for a sharp moment. Heavy grain distracts from the subject. Choose the lowest ISO that still gives a fast enough shutter. Lowest workable ISO is the golden rule for beginners. It maximises quality while keeping motion control.
Test ISO on your own phone because noise behaviour varies. Shoot the same dim scene at several ISO values. Compare shadow grain at full size. Find the highest ISO you find acceptable. That personal ceiling guides future low light choices. A ceiling learned from your phone beats a generic chart. Generic charts ignore sensor differences between models.
Understand Shutter Speed Simply
Shutter speed measures how long the sensor gathers light. Fast speeds freeze motion. Slow speeds blur motion. A speed of one five hundredth of a second freezes most sports action. A speed of one sixtieth suits static subjects handheld. A speed of one second needs a tripod for sharp results. Match speed to subject motion first. Match speed to light second.
Camera shake also depends on shutter speed. Handheld shots need a speed fast enough to freeze hand tremor. A common guideline uses focal length as a reference. In practice one sixtieth works for most phone handheld shots. Longer phone lenses need faster speeds. Test your own hand stability with a static subject. Your personal shake limit may differ from guidelines. Learn it through test shots.
Creative blur uses slow shutter speeds deliberately. Waterfalls blur into silk at slow speeds. Light trails streak across night streets at slow speeds. Panning follows a moving subject at a medium speed. The subject stays sharp while background streaks. Slow speed creativity needs a tripod or a steady pan. Practice creative blur on static water first. Water practice teaches slow speed control safely. Best manual camera apps for Android power users offers deeper shutter control tools.
Understand White Balance Simply
White balance adjusts colour temperature so whites look white. Daylight is neutral. Tungsten lamps are warm and orange. Shade is cool and blue. A wrong white balance casts the whole photo warm or cool. Auto white balance guesses correctly most of the time. Manual white balance wins in mixed lighting. Mixed lighting confuses auto systems badly.
Set white balance in Kelvin when your pro mode offers it. Kelvin numbers describe colour temperature precisely. Lower numbers mean warmer light. Higher numbers mean cooler light. Daylight sits near 5500 Kelvin. Tungsten sits near 3200 Kelvin. Shade sits near 7500 Kelvin. Start from those anchors and adjust by feel. Small Kelvin shifts change mood noticeably. Large shifts create obvious colour casts.
Use a white or grey reference when colour accuracy matters. Photograph a white card under the scene light. Set custom white balance from that reference when the app allows it. A reference removes guesswork completely. Product and food photography benefit most from references. Casual photography can rely on presets. Presets for daylight and cloudy and tungsten cover most scenes. Custom references cover critical colour work.
Balance The Three Controls Together
Exposure triangle thinking links ISO and shutter and aperture. Phones usually fix aperture. That leaves ISO and shutter as the main balance pair. Bright light allows low ISO and fast shutter together. Dim light forces a trade. Raise ISO for a fast shutter or slow shutter for low ISO. Choose the trade that suits the subject. Action needs fast shutter plus higher ISO. Static subjects need low ISO plus slower shutter.
Use exposure compensation as a quick brightness adjuster in pro mode. Compensation shifts the overall brightness target. It does not change the relationship between ISO and shutter directly. Raise compensation when a subject looks too dark. Lower compensation when a bright background washes out a subject. Compensation is a fast tool for backlit scenes. Manual ISO and shutter remain the precise tools for creative control.
Check the histogram after each pro mode test shot. A histogram shows brightness distribution across the frame. A histogram bunched left means underexposure. A histogram bunched right means overexposure. A balanced histogram spans the range without clipping ends. Histogram feedback beats screen brightness guessing. Screens vary in brightness and mislead the eye. Histograms stay honest across screens. Manual focus for super sharp macro close-ups pairs focus control with pro exposure control.
Practice Pro Mode In Real Scenes
Practice pro mode at a park in changing light. Shoot the same tree at midday and at golden hour. Note ISO and shutter changes needed as light falls. Golden hour needs higher ISO or slower shutter. Note white balance shifts as sun warms. Warm light needs cooler Kelvin settings for neutral whites. A park practice session teaches all three controls naturally. Natural scenes teach better than indoor test charts.
Practice pro mode indoors with a lamp lit portrait. Start at low ISO and a slow shutter on a tripod. Raise ISO step by step and note grain growth. Lower shutter step by step and note motion blur growth. Find the balance that keeps the face sharp and clean. A lamp portrait is a controlled lab for exposure tradeoffs. Controlled practice transfers to real events quickly.
Practice pro mode at night with street lights. Night forces high ISO and slow shutter choices. Use a tripod for static night scenes. Use higher ISO for moving night subjects. Note white balance under mixed street lamps. Mixed lamps create colour patches that auto balance mishandles. Manual Kelvin settings unify night colour better. Night practice is the hardest pro mode test. Passing it means daylight feels easy.
Review pro mode shots with settings displayed to reinforce learning. A gallery that shows ISO and shutter beside each photo teaches fast. Compare a sharp keeper with a blurred failure. Note which setting differed between them. That difference is the lesson for next time. Settings visible beside results turn every shoot into a lesson.
pro_iso = lowest workable value
pro_shutter = motion first
pro_wb = Kelvin by light type
pro_check = histogram after shot
pro_practice = one control per day
The snippet above is an original pro mode checklist written for this guide. It lists only standard camera settings for your own Android phone. It does not copy instructions from any outside source.
Save a favourite pro mode setup as a preset when your app allows it. A daylight preset and a night preset cover most scenes. Presets speed up real shooting without losing manual intent. Name presets by scene for fast recall. Scene names recall purpose faster than numbers under pressure. Update presets as your skill grows and your taste changes.
Common Mistakes
One common mistake is to set all three controls manually at once as a beginner. Three simultaneous changes confuse learning. Learn one control per day. Another mistake is to use maximum ISO in dim light always. Maximum ISO creates heavy grain. Use the lowest ISO that still freezes motion.
A third mistake is to trust screen brightness for exposure judgement. Screens vary and mislead. Check the histogram instead. A fourth mistake is to ignore white balance in mixed light. Mixed light creates patchy colour casts. Set Kelvin manually for mixed scenes. Locking exposure for sunset photos shows exposure locking that complements pro mode.
Frequently Asked Questions
Is pro mode better than auto mode always?
No. Auto mode wins for fast unpredictable moments. Pro mode wins for planned scenes with specific needs. Use auto for speed and pro for control. A skilled photographer switches between modes by situation. Mode choice is a tool choice rather than a quality ranking.
What ISO should I use indoors?
Start at ISO 400 for bright indoor rooms. Move to ISO 800 or 1600 for dim rooms. Accept grain when motion must stay sharp. Use a tripod for static indoor subjects at low ISO. Your phone’s personal noise ceiling guides the final choice.
How do I remember Kelvin numbers?
Remember three anchors only. Tungsten is near 3200. Daylight is near 5500. Shade is near 7500. Adjust from the nearest anchor by feel. Small adjustments matter more than exact numbers. Practice with anchors builds Kelvin intuition fast.
Conclusion
Open pro mode today in daylight and set ISO manually for one scene. Tomorrow set shutter manually for a moving subject. The next day set white balance in Kelvin for a lamp lit room. That three day practice will turn pro mode from intimidating numbers into three friendly controls.

