

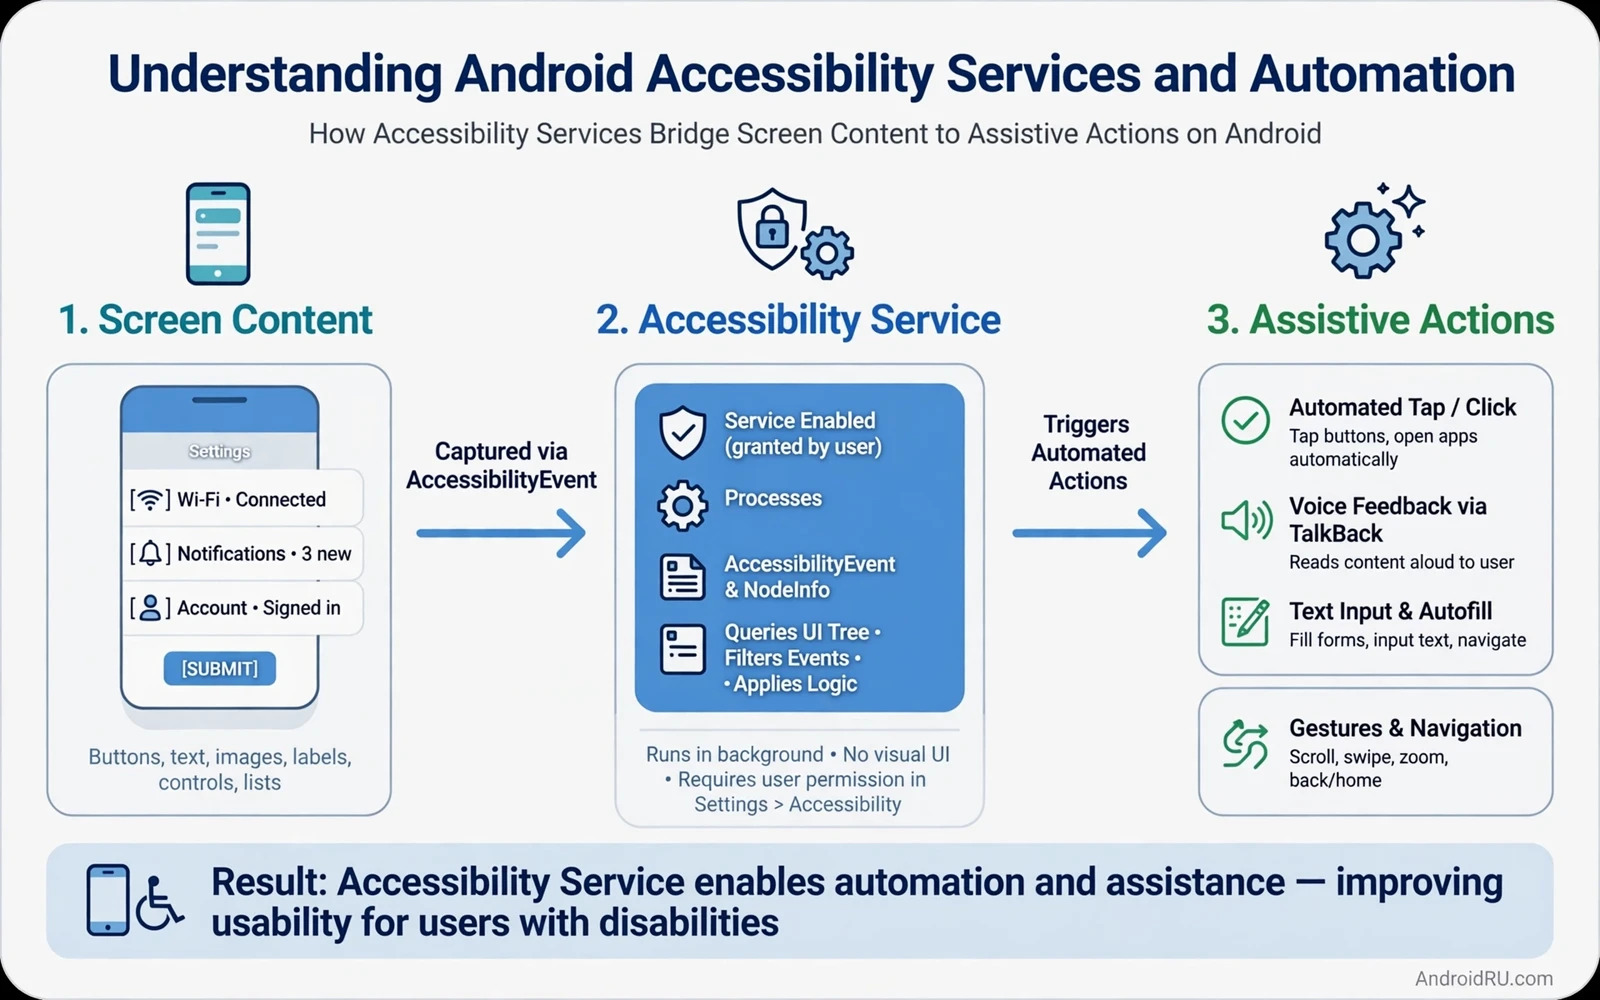
Understanding Android Accessibility Services and Automation
My mother-in-law taps her phone with the side of her hand because a tremor makes precise taps hard, and for two years she could not send a text without help. Then a support worker turned on Switch Access, and she started choosing messages with a single large button. That change did not come from a new phone. It came from a part of Android most people never open: Accessibility Services. These services sit quietly in Settings, they can read what is on your screen, and they can tap, scroll, and type for you. That power helps millions of people use a phone independently, and the same power is exactly why Android guards it with big warnings.
This guide explains what an Accessibility Service is, how it works in plain language, which built-in tools use it, and how apps like Tasker, MacroDroid, and auto-clickers build automation on top of it. You will get real setup steps, honest security risks, and the limits Android 13 and later versions put in place. You will also learn when to use the Accessibility API as a developer and when a ready-made automation app is the better choice.
Read this before you tap Allow on any app that asks for accessibility access. The warning screen is not decoration. A service with this permission can see passwords, messages, and banking screens. A good service earns that trust with a clear purpose. A bad one hides behind a vague promise.
What Android Accessibility Services Actually Do
An Accessibility Service is a special kind of Android app component that runs in the background and watches the user interface for you. It receives events when a window opens, when focus moves, when text changes, and when a list scrolls. With permission, it can read the view hierarchy of the active window, which is the structured list of every button, label, and text field on screen. It can then act on that structure: tap a button, scroll a list, fill a field, or press Back. Think of it as a helper that sits between you and the screen, translating what is shown into speech, switch presses, voice commands, or automated taps.
Ordinary apps cannot do this. A normal app only sees its own screens. An accessibility service, once you enable it, can see screens from other apps, because that is the only way a screen reader can read a message app or a switch tool can press buttons in a browser. That broad reach is the whole point, and it is also the whole risk. Android therefore never enables one silently. You must go into Settings, open Accessibility, pick the service by name, and confirm a warning that spells out what it can observe.
What an AccessibilityService is in plain language
In developer terms, an AccessibilityService is a class that extends the system service and runs with the BIND_ACCESSIBILITY_SERVICE permission. In plain language, it is a background helper you switch on by hand. It declares what it wants in a configuration file: which event types it listens for, which feedback it gives, whether it can retrieve window content, and whether it can perform gestures. The system reads that declaration and shows it to you before you enable the service, so you can judge whether the request matches the feature. A screen reader that asks to retrieve window content makes sense. A torch app that asks for the same thing does not.
Once enabled, the service stays running across apps until you turn it off. It does not need to be open on screen. It wakes when an event it asked for arrives, decides what to do, and either speaks, vibrates, shows a menu, or performs an action. That said, a well-built service does as little as possible. It filters events by package and by type, it ignores screens it does not care about, and it waits for a layout to settle before it acts. A sloppy service that reacts to every event on every app feels slow, drains battery, and taps the wrong thing during animations.
How the system talks to a service
The system sends accessibility events, and the service answers them in its onAccessibilityEvent method. A window state change fires when a new activity opens. A view focused event fires when the keyboard cursor lands on a field. A view scrolled event fires when a list moves. A text changed event fires when you type. The service checks the event, looks at the active window if it needs detail, and then decides. Here is the catch: events can arrive in bursts. Open a chat app and a dozen events fire while the layout animates. A careful service debounces those bursts, waits a fraction of a second, and only then acts on the stable screen.
The config file that declares power
Every service ships with an XML config that states its powers in advance. It lists event types such as typeAllMask for everything or a narrow set such as window changes only. It lists feedback types such as spoken, haptic, or audible. It sets flags such as canRetrieveWindowContent and canPerformGestures. It also carries a short description that the system shows on the enable screen. Developers should write that description in plain words, not jargon, because it is the only explanation most users ever read. Users should read it, and if the description is vague, treat that as a warning sign.
Events, nodes, and gestures
When a service needs detail, it asks for the root node of the active window and walks the tree of AccessibilityNodeInfo objects. Each node carries text, a content description, its screen bounds, and the actions it supports, such as click, long click, scroll forward, or set text. The service finds the node it wants, checks that it is still valid, and dispatches the action. Nodes are safer than raw coordinates because they follow the layout. Gestures are the fallback: a service can dispatch a swipe or a tap at exact x and y coordinates through dispatchGesture, which helps with custom-drawn canvases that expose no nodes. Coordinates break when a screen rotates or a font grows, so good services prefer nodes and keep gestures for the few controls that truly have no other path.
TalkBack, Switch Access, and Voice Access: Real Examples That Ship With Android
Google ships three flagship tools on this system, and they show what accessibility power is for. They are built by the same team that builds Android, they are tested with disabled users, and they ask for exactly the power their job needs. If you want to understand the technology, start by trying one of them for ten minutes, even if you do not need it. You will feel how much work goes into reading a screen aloud or driving a whole phone from one button.
TalkBack screen reader
TalkBack is the built-in screen reader. It speaks the name of every item you touch, reads text aloud, and announces notifications, and it lets a blind user explore a screen by touch before committing to a tap. A single tap selects and speaks; a double tap activates. Swipe right moves to the next item, swipe left moves back, and a two-finger swipe scrolls a list. On my test phone, TalkBack read a news article cleanly when every image had a content description, and it stumbled on a shopping app where three icon buttons had no label at all and were announced only as button, button, button. That gap is an app problem, not a TalkBack problem, and it shows why labels matter. TalkBack also supports Braille displays, adjustable speech rate, and verbosity settings, so a new user can start slow and a daily user can run it at high speed.
Switch Access
Switch Access drives the whole phone from one or two switches. A switch can be a dedicated Bluetooth button, a keyboard key, or even a tap on the screen itself. The system scans through items on screen, highlighting each in turn, and the user presses the switch to choose the highlighted item. Two-switch mode is faster: one switch moves the highlight, the other selects. This is the tool that helped my mother-in-law, and it works because the scan order follows a logical reading order and because every action is reversible. A menu button always offers a way back. Switch Access also supports camera switches, where a smile or a raised eyebrow acts as the press, which sounds odd until you watch someone who cannot move their hands send a message with it.
Voice Access
Voice Access puts a number on every tappable item and lets you control the phone by voice. Say a number to tap it, say scroll down to move a list, say type hello to enter text, and say go home to leave an app. It runs on-device speech recognition on modern phones, so short commands work without a network round trip. In practice, it shines for hands-free moments: cooking with messy hands, driving with the phone mounted, or holding a child. It struggles in a noisy cafe and with apps that pack dozens of tiny buttons onto one screen, because the numbers get small and the command list gets long. Still, for a user with limited hand movement, it turns a phone from a locked box into a tool they can drive with their voice alone.
Tasker, MacroDroid, and Auto-Clickers: Automation Built on Accessibility
Automation apps borrow the same power for a different purpose: doing repetitive taps so you do not have to. They are popular, they are powerful, and they sit right on the line between help and misuse. The table below compares the three best-known approaches before we look at each one in detail.
| Tool | What it does | Needs accessibility | Best for | Main risk |
|---|---|---|---|---|
| Tasker | Profiles, tasks, and variables that react to time, location, and events | For UI taps and some actions | Complex routines across apps | Steep learning curve, powerful mistakes |
| MacroDroid | Simple trigger plus action macros with a friendly wizard | For UI interaction actions | Beginners and quick daily macros | Macros can fire at the wrong moment |
| Auto-clicker apps | Repeat taps and swipes at set points on a timer | Almost always, for gestures | Games and repetitive tapping | Game bans, accidental purchases |
Tasker and the power of profiles
Tasker is the heavyweight. You build a profile, which is a trigger such as time, location, Wi-Fi network, or an app opening, and you attach a task, which is a list of actions. A classic routine turns on Wi-Fi at home, silences the phone at work, and reads the time aloud when headphones connect. Tasker can also use accessibility actions to tap a button in an app that offers no proper integration, which is where the permission comes in. I tested a Tasker routine that opened a transit app each weekday morning and tapped the saved route; it worked, and it also taught me the weak point, because one app redesign moved the button and the routine tapped empty space for a week. Tasker rewards patience and punishes vague targeting, so name your taps by text or node where you can and keep a manual fallback.
MacroDroid and the friendly macro
MacroDroid is Tasker with training wheels, and that is a compliment. Its wizard asks what triggers the macro, what it should do, and what limits apply, and it builds the routine from templates. A shake of the phone can turn on the torch, a low battery level can dim the screen and turn off sync, and plugging in headphones can open a music app. Its accessibility actions cover UI taps and scrolls, and its interface shows each macro as a plain sentence, which makes it easy to review what you built. For most people, MacroDroid is the right starting point: you get real automation in an evening, and you can see every macro in one list, edit it, and switch it off without hunting through settings.
Auto-clicker apps and where they cross a line
Auto-clickers record a tap point or a swipe path and repeat it on a timer. They help in games that demand the same tap hundreds of times, and they help a user with a motor impairment press a button that sits in an awkward corner. The same tool can farm rewards in a game, click ads, or tap through consent screens, and that is where the line sits. Games ban accounts for automated play, and an auto-clicker left running can tap Buy while you are not looking. If you use one, set a short run time, keep the phone in view, and never let it run on a payment screen. An auto-clicker that runs unattended is a purchase waiting to happen, and no refund policy covers a tap you scheduled yourself.
How to Turn On an Accessibility Service Step by Step
Turning on a service takes about a minute, and the warning screen is the most important step. Do not rush past it. Follow these steps exactly, and check the result after each one.
- Open Settings, then tap Accessibility. On Samsung phones it sits under Settings, then Accessibility; on Pixel phones it is a top-level Settings entry.
- Find the section for the tool you want, such as Downloaded apps or Interaction controls, and tap the service name. Check the name matches the app you installed, letter for letter.
- Read the short description on the service screen. It should name the feature in plain words, such as reads the screen aloud or taps buttons for a macro.
- Turn on the switch for Use service or the service name. Android shows a full-screen warning that lists what the service can observe, including text, passwords, and actions.
- Read that warning. If the listed powers match the feature you want, tap Allow. If they do not, tap Cancel and uninstall the app.
- Test the feature right away on a safe screen, such as the home screen or a notes app. Confirm it behaves as described before you use it anywhere sensitive.
- Return to Settings, then Accessibility, and check the service shows as On. If it shows Off after a restart, the system or a battery saver may have stopped it.
Before you tap enable: read the warning
The warning screen lists three things in plain language: the service can observe your actions, it can retrieve window content, and it can perform gestures as if it were you. That means it can read a one-time code on screen, see a message as you type it, and tap a confirm button. A genuine screen reader needs all three. A flashlight app needs none of them. A clipboard manager that asks for them is asking for your messages, not for your clipboard. If an app cannot explain why it needs the permission in one sentence, the honest answer is that it does not need it.
Turning a service off again
Switching a service off is just as quick: Settings, then Accessibility, then the service name, then turn off the switch. Do this the moment a service misbehaves, taps without being asked, or shows ads you did not agree to. Also check the list once a month, because an app update can add a new service or re-enable an old one after a system update. If a service you never enabled shows as On, turn it off, uninstall the app that owns it, and change the passwords for any account you used while it was active. That last step sounds dramatic, and it is the right response when a tool that can read screens was running without your knowledge.
The Security Risks: How Malware Abuses Accessibility Permissions
Accessibility access is the most abused permission on Android, and security teams say so plainly. The reason is simple: it is the only permission that lets an app read any screen and tap any button, including inside a banking app. Real malware families have used it to overlay fake login screens, to read one-time codes from messages, to grant themselves extra permissions, and to tap through install prompts for more malware. Google Play policy now rejects apps that request accessibility access for features that do not need it, and the system blocks the permission for apps installed from outside Google Play unless you take extra steps. Those barriers help, and they are not enough on their own, because a convincing fake app can still talk a user into tapping Allow.
The pattern is always the same. A fake cleaner, a free VPN, a battery booster, or a cracked game promises a quick benefit and asks for accessibility access during setup. The request appears at the exact moment the user wants the benefit, so the user taps through. Once enabled, the malware waits. It watches for a banking app to open, it overlays a pixel-perfect fake login, and it sends the typed password to a server. It can also read a one-time code the moment it arrives and use it before you do. The user sees nothing wrong, because the fake screen looks identical to the real one.
Red flags that should stop you
- An app that needs accessibility access for a job that has nothing to do with reading screens or tapping buttons, such as a torch, a wallpaper app, or a cleaner.
- A setup flow that rushes you to the permission screen before it explains the feature, or that blocks the app until you grant it.
- A vague description on the enable screen, such as improves your experience, with no named feature.
- An app with few installs, no website, and reviews that mention pop-ups, strange taps, or missing money.
- A permission request that arrives by message or by a link, rather than from an app you chose and installed yourself.
Why banking and password screens are prime targets
Banking apps, password managers, and two-factor screens are prime targets because they hold the keys. A service that can read window content can read the account number on screen, the amount on a transfer confirmation, and the code in a message. That is why the guidance for developers is blunt: never auto-fill or auto-confirm an authentication screen, and never use accessibility actions to bypass a login. Readers who protect sign-in flows can continue with the piece on implementing biometric authentication in Android apps and keep fingerprint and face checks as actions only the user performs. A fingerprint prompt exists so a person proves they are present. Automation that taps it for them removes the proof.
What a fake cleaner or battery app asks for
A fake cleaner typically asks for accessibility access plus permission to draw over other apps, and that pair is the classic overlay attack. The draw-over permission lets it paint a fake screen on top of the real one, and the accessibility permission lets it read what is underneath and tap the real buttons behind the fake. If an app asks for both, stop and ask why a cleaner needs to draw over your banking app. The honest answer is that it does not. Uninstall it, and if you want a cleaner, use the storage tools already built into Settings instead.
What to do if you already granted access
If you granted access to an app you now distrust, act in this order: turn off its accessibility service, uninstall the app, run a scan with Google Play Protect, and change passwords for banking, email, and payment accounts from a different device. Check recent transactions and look for permission grants you did not make. Speed matters more than embarrassment here, because a service that read your screens may already have sent what it saw. Tell your bank if you see a transaction you did not make, and do not reinstall the app from the same link that brought it to you.
Android 13 and Android 14 Limits on Accessibility Access
Android 13 introduced a change that catches many people by surprise: apps installed from outside Google Play cannot use accessibility services until you explicitly allow a restricted setting for that app. The setting lives on the app info page, under a toggle called Allow restricted settings. Android 13 blocks the toggle by default for sideloaded apps, and the user must open it by hand. Android 14 kept that rule and tightened Play policy further, so apps on Google Play must declare a genuine accessibility need in their listing and in their code, or face removal.
These limits frustrate legitimate developers, and they frustrate users who sideload a trusted automation app. That frustration is the point. Sideloaded apps are the main delivery route for accessibility malware, because they skip Play review. By forcing an extra manual step, Android makes a drive-by install much harder: the malware cannot silently enable itself, and the user has to go looking for the toggle. A user who goes looking for it on purpose, for an app they trust, can still enable it. A user who is tricked into it has one more screen where they can stop and think.
Restricted settings and sideloaded apps
Here is how the restricted setting works in practice. Install an app from a file or a third-party source, open its app info page, and look for the three-dot menu or the restricted settings entry. If the app requests accessibility access, Android shows a notice that the setting is blocked for your protection. Tap Allow restricted settings, confirm, and only then go to Accessibility and enable the service. The extra step does not make a bad app safe. It makes the decision deliberate. If you cannot explain why you are taking that step, do not take it.
Why the extra step exists
The extra step exists because the old flow failed. Before Android 13, a sideloaded app could guide a user straight to the accessibility screen with a few taps, and many users tapped Allow because the app told them to. Scam call centres used exactly that flow: they called a victim, told them to install a support app, and talked them through enabling accessibility while the malware watched. The restricted setting breaks that script, because the victim has to leave the guided flow, open app info, and flip a toggle that Android labels as a risk. Some victims still do it, and that is why the advice stays the same: never enable accessibility access for an app a stranger told you to install, no matter who they claim to be.
Accessibility API vs Automation Apps: When to Use Which
Developers face a choice that users do not: build with the Accessibility API, or tell users to install an automation app. The right answer depends on who benefits and who carries the risk. The API gives you precise control, a proper config, and a disclosure you write yourself, and it puts the power inside your own app. An automation app gives you speed, because the user already knows the tool, and it puts the power in someone else’s app, which you cannot audit. That trade-off decides the answer in most cases.
| Question | Use the Accessibility API | Use an automation app |
|---|---|---|
| Who is the user? | Someone who needs your app to be usable | Someone automating their own routine |
| Who writes the code? | You, in your own app | The automation app maker |
| What is the risk? | You must disclose and minimise data | You trust a third party with screen access |
| Best example | Screen reader support in your app | A morning routine across five apps |
Use the Accessibility API when the benefit is inside your app
Build with the API when your app itself needs to be accessible, or when your app offers a named assistive feature such as a screen reader mode, a switch-driven interface, or a voice-driven flow. In that case, declare the narrowest event set you need, filter by your own package where possible, process screen content on the device, and write a disclosure that a non-technical user can understand. Design the interface well first, because good native accessibility reduces the need for workarounds. Readers who design interfaces can continue with the piece on Material Design 3 guidelines for developers and apply its rules for labels, roles, and contrast to every new screen. A well-labelled interface is the cheapest accessibility feature you will ever build, and it helps every user, not only those with a service enabled.
Use an automation app when the routine crosses many apps
Recommend an automation app when the job crosses many apps and belongs to the user, such as a morning routine that opens transit, silences the phone at work, and dims the screen at night. In that case the user defines the routine, the user triggers it, and the user can inspect every macro in one list. Keep the routine visible, editable, and reversible, and never hide a macro that acts on a payment screen. A macro list the user can inspect builds trust. A hidden macro engine invites suspicion, and suspicion is fatal for a tool that can read screens. Test the routine in both themes, because a layout that works in light mode can break at large font size in dark mode. Readers who handle theme changes can continue with the piece on implementing dark theme support in apps and check every automated tap in both themes before they trust it.
Frequently Asked Questions About Android Accessibility Services
Is it safe to enable an accessibility service?
It is safe when the service comes from a trusted maker, the feature genuinely needs screen access, and the description on the enable screen matches that feature. TalkBack, Switch Access, and Voice Access meet that test. A cleaner or a torch app that asks for the same power does not. Check the maker, read the warning, and turn the service off the moment it behaves in a way you did not ask for.
Can an accessibility service read my passwords?
Yes, a service with permission to retrieve window content can read text shown on screen, including a password you type and a code that arrives in a message. That is why the enable screen warns you in plain language. Only enable services you trust, never enable one for an app a stranger told you to install, and change your passwords if you suspect a service you enabled was malicious.
Why does Android 13 block accessibility access for sideloaded apps?
Android 13 blocks it because sideloaded apps are the main route for accessibility malware, and the block forces a deliberate extra step called Allow restricted settings. You can still enable a trusted sideloaded app by flipping that toggle by hand on its app info page, and then enabling the service in Accessibility. The step is a speed bump, not a ban, and it exists so a scam call cannot talk you through the whole flow in one smooth script.
Do accessibility services drain the battery?
A well-built service adds little drain, because it filters events and ignores screens it does not care about. A broad service that processes every event from every app can drain battery and slow the phone, especially during animations that fire bursts of events. If your battery drops after enabling a service, check battery usage in Settings, turn the service off for a day, and compare. A service that costs a fifth of your battery for a feature you rarely use is not worth keeping on.
What to Do Next With Accessibility on Your Phone
Open Settings, then Accessibility, and look at what is already on. Most phones have TalkBack, Switch Access, and Voice Access waiting, and one of them may solve a problem you have been working around for months. Try TalkBack for ten minutes with your eyes closed, or try Voice Access while your hands are busy, and you will understand the technology faster than any article can explain it. If you use automation, audit your macros tonight: list every routine, delete the ones you do not recognise, and switch off any service you cannot explain in one sentence.
For developers, the next step is smaller and harder: open your own app with TalkBack on, try to complete one real task such as sending a message or finishing a purchase, and fix the first place where the flow breaks. That single test will teach you more about your interface than a checklist ever will, and it will make your app usable for people who depend on these services every day.

