

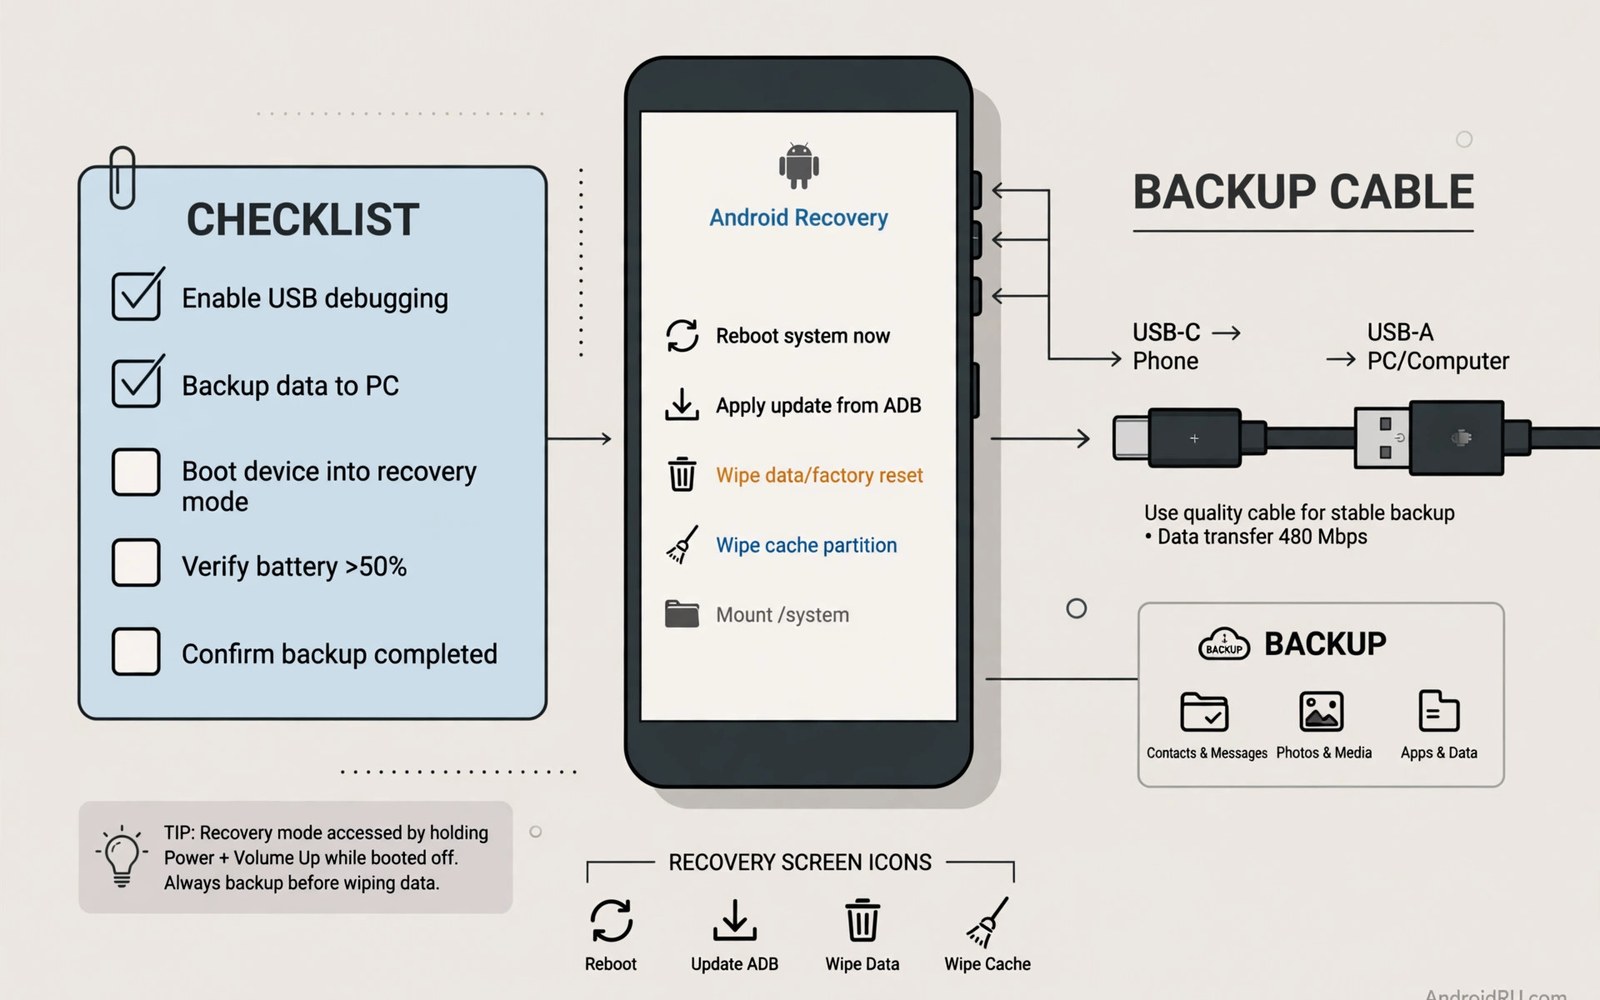
Installing a custom ROM can transform an older phone. It can also erase your data in minutes if you skip a basic step. A calm checklist protects you from that outcome. Work through each stage in order and do not rush the boring parts. The boring parts are the ones that save your phone.
Start by learning your exact device model and its codename. Two phones can share a marketing name while using different hardware inside. The codename decides which recovery image and which ROM build are safe for you. Check the codename in your device settings or on the box. Write it down before you download anything.
Backups come before any unlock or flash. A backup is only useful if you test that it opens on another device or on your computer. Copy photos and documents to a computer or to cloud storage you control. Export your contacts and your message history where your app allows it. Keep one copy offline so a failed flash cannot take every copy at once.
Your bootloader state decides what you can flash. Most custom ROM guides require an unlocked bootloader. Unlocking usually wipes the phone by design. That wipe is a security feature and not a bug. Plan for it by finishing your backup first. Read the unlock warning on your own device screen before you confirm it.
When you are ready to go further, read about installing LineageOS step by step and compare it with the plan you made for your own phone.
Know Your Device Before You Download Anything
Every safe install starts with exact identification. Your model number and codename must match the ROM build you choose. A build for a sister model may boot and then break the camera or the mobile network. That kind of partial failure is harder to fix than a clean refusal to boot. Spend ten minutes confirming the codename from two places on the phone.
Check the software version that is already on the phone. Note the Android version and the security patch level. Some ROM builds require a minimum stock firmware version before you flash. If your phone is far behind on updates, update the stock system first. This step avoids modem and bootloader mismatches later.
Back Up Everything You Cannot Replace
A full device backup has several layers. Your photos and files are the first layer. Your app data and your accounts form the second layer. Your call history and your messages form a third layer that people often forget. List each layer on paper and tick it off as you copy it. Do not rely on memory during a stressful flash.
Test one restore before you unlock anything. Open a copied photo folder on your computer. Open an exported contact file and check that names and numbers look right. If a backup file is corrupt, you want to learn that fact while the old system still works. A tested backup turns a failed flash into a delay instead of a disaster.
- Confirm the exact codename and model number
- Record the current Android version and patch level
- Back up photos files contacts and messages
- Test at least one backup restore before unlocking
- Download recovery and ROM files only for your codename
Unlock The Bootloader With Eyes Open
Unlocking removes a lock that protects the system from unsigned changes. It also wipes user data on most phones. It may affect warranty terms and payment app checks on some models. Read those trade-offs before you start. If you depend on a banking app every day, test how it behaves on an unlocked device first on a spare phone if you can.
Keep the unlock code or the unlock tool output in a safe note. Some makers require an account or a waiting period before unlocking. Start that process early so a waiting period does not stall your install weekend. Never share your unlock code in a public forum. Treat it like a password for your device.
When you are ready to go further, read about installing Pixel Experience for a clean Pixel interface and compare it with the plan you made for your own phone.
Install A Trusted Recovery And Verify It
A custom recovery is the tool that installs the ROM file. Download it only for your exact codename. Check the file size and the checksum when the project provides one. A damaged download can fail in the middle of a flash. Boot the recovery once without installing anything. Confirm that touch works and that storage mounts correctly.
Learn the recovery buttons before you need them under stress. Know how to reboot to recovery and how to reboot to the bootloader. Know where the wipe menu lives and where the install menu lives. A calm first visit to recovery makes the real install much safer. Take a photo of the recovery main screen for your notes if that helps you.
Prepare Firmware And Files In One Folder
Put every file you need in one folder on your computer. Include the ROM file and the recovery image and any extra package the guide calls for. Name the folder with your device codename and the date. Copy the same folder to a second drive or to a USB stick. A single organised folder prevents the classic mistake of flashing the wrong file at midnight.
Check that each file matches your device and your Android version target. Read the release notes for known problems with your model. Note any warning about firmware or vendor files. If the notes mention a required stock firmware version, install that version first. Skipping firmware steps is a common cause of broken sensors and broken calls.
Plan The First Boot And The First Hour
The first boot after a flash can take several minutes. Do not pull the battery or force a restart during that wait. Charge the phone well before you start. Keep the charger connected during the install if your guide allows it. A dead battery during a flash can leave partitions half written.
After first boot, test the basics before you restore everything. Make a test call and send a test message. Test mobile data and test Wi-Fi. Test the camera and test the fingerprint reader. If a basic feature fails, you can fix it before your apps and accounts complicate the picture. Keep notes on what works and what does not.
When you are ready to go further, read about choosing the right GApps package size and compare it with the plan you made for your own phone.
Keep A Rollback Path Ready
A rollback plan is part of preparation and not a sign of doubt. Download the stock firmware for your model before you flash anything custom. Keep the fastboot tool and the drivers ready on your computer. Know the button combination that enters fastboot mode. If a custom build disappoints you, a prepared rollback saves hours of searching.
Store the stock firmware file where you can find it months later. Label it with the model and the version. Keep a short note that lists the exact commands you used for the custom install. That note also helps you reverse the steps in the right order. Good preparation ends with a clear way back to a working phone.
Build A Written Install Plan Before You Start
A written plan turns a nervous install into a calm procedure. Write your device codename at the top of the page. Write the ROM name and version below it. Write the recovery version and the firmware version you will use. Add the backup location and the date you tested the backup. This single page becomes your reference during the whole install. It also helps you recover if the phone reboots unexpectedly.
Add a step list to the plan with checkboxes for each stage. Include unlocking and recovery install and ROM flash and first boot tests. Tick each box only after the step truly finishes. Do not tick a box early because the screen looks close to done. A half finished flash is not a finished step. The checkbox habit forces honesty about progress. It also shows exactly where a failure happened if you need help later.
Share the plan with yourself in two places. Keep a paper copy near the computer. Keep a digital copy on the computer itself. If the phone fails, the paper copy still guides you. If you lose the paper, the digital copy fills the gap. Redundancy sounds excessive until the night you need it. Most install disasters involve a missing note more than a missing file.
Common Preparation Mistakes And How To Avoid Them
One common mistake is downloading files for a similar model. Marketing names hide hardware differences. A phone sold under one name in two regions can use different modems. A ROM for the wrong region may boot and then drop calls. Always match the codename and not just the marketing name. Check the codename in settings and on the download page. That double check takes one minute and prevents hours of repair.
Another mistake is skipping the backup test. People copy files and assume the copy worked. A copy can fail silently on a faulty cable or a full drive. Open the copied files on the computer before unlocking. Play a copied video. Open a copied document. Confirm contact counts match the phone. A tested backup is the only backup you can trust during a flash.
A third mistake is starting late at night with a low battery. Flashing needs focus and power. A tired user misreads a warning. A dying battery interrupts a write. Start early with a full charge. Keep the charger connected. Stop if you feel rushed. The ROM will still exist tomorrow. Your data may not survive a rushed install tonight.
Questions To Answer Before Unlocking
Ask yourself whether you truly need a custom ROM right now. Stock software may already meet your needs after a cleanup. Remove unused apps from stock first. Update stock to the latest version available. Test battery and speed after that cleanup. If stock still frustrates you, custom software becomes a reasoned choice. A reasoned choice survives setbacks better than an impulsive flash. Impulsive flashes often end in regret when a favourite feature breaks.
Ask which features you cannot live without. List your banking app and your work apps and your camera habits. Check whether each one works on the target ROM. Search the device thread for reports on those exact features. A feature that fails daily will dominate your experience. A beautiful system cannot compensate for a broken daily tool. Honest feature lists prevent disappointment. They also focus your testing after first boot.
Ask who will help you if the install fails. A device community thread is a good support source. A friend with flashing experience is even better. Know where you will ask before you start. Save the thread link on your computer. Note the exact details helpers will request. Prepared support access turns a failure into a solvable problem. Unprepared users panic and make random changes that worsen the fault.
After Preparation: A Calm Install Day Timeline
Begin install day by rechecking every file. Confirm codename matches on each download. Confirm checksums where the project provides them. Confirm the backup opens on your computer. This recheck takes fifteen minutes. It prevents most install day failures. Rushing past the recheck saves minutes and risks hours. Treat the recheck as the first install step and not as optional preparation.
Flash in the middle of the day when you feel alert. Avoid starting after a long workday. Alert users read warnings carefully. Tired users click through warnings. Keep water nearby and keep the phone charged. Work through steps in order without skipping ahead. If a step confuses you, stop and reread the guide. A pause costs minutes. A mistaken flash costs data.
End install day with a written result note. Record the ROM version and the recovery version. Record which features passed testing. Record any quirk you noticed. That note guides future updates. It also helps you answer community questions later. A finished install deserves a finished record. Good records compound over years of custom ROM use.
fastboot devices
fastboot flashing unlock
fastboot boot recovery.img
adb backup -apk -shared -all -f backup.ab
The steps above follow the approach described in the official developer documentation for this platform and in the project guides that ship with each build.

