

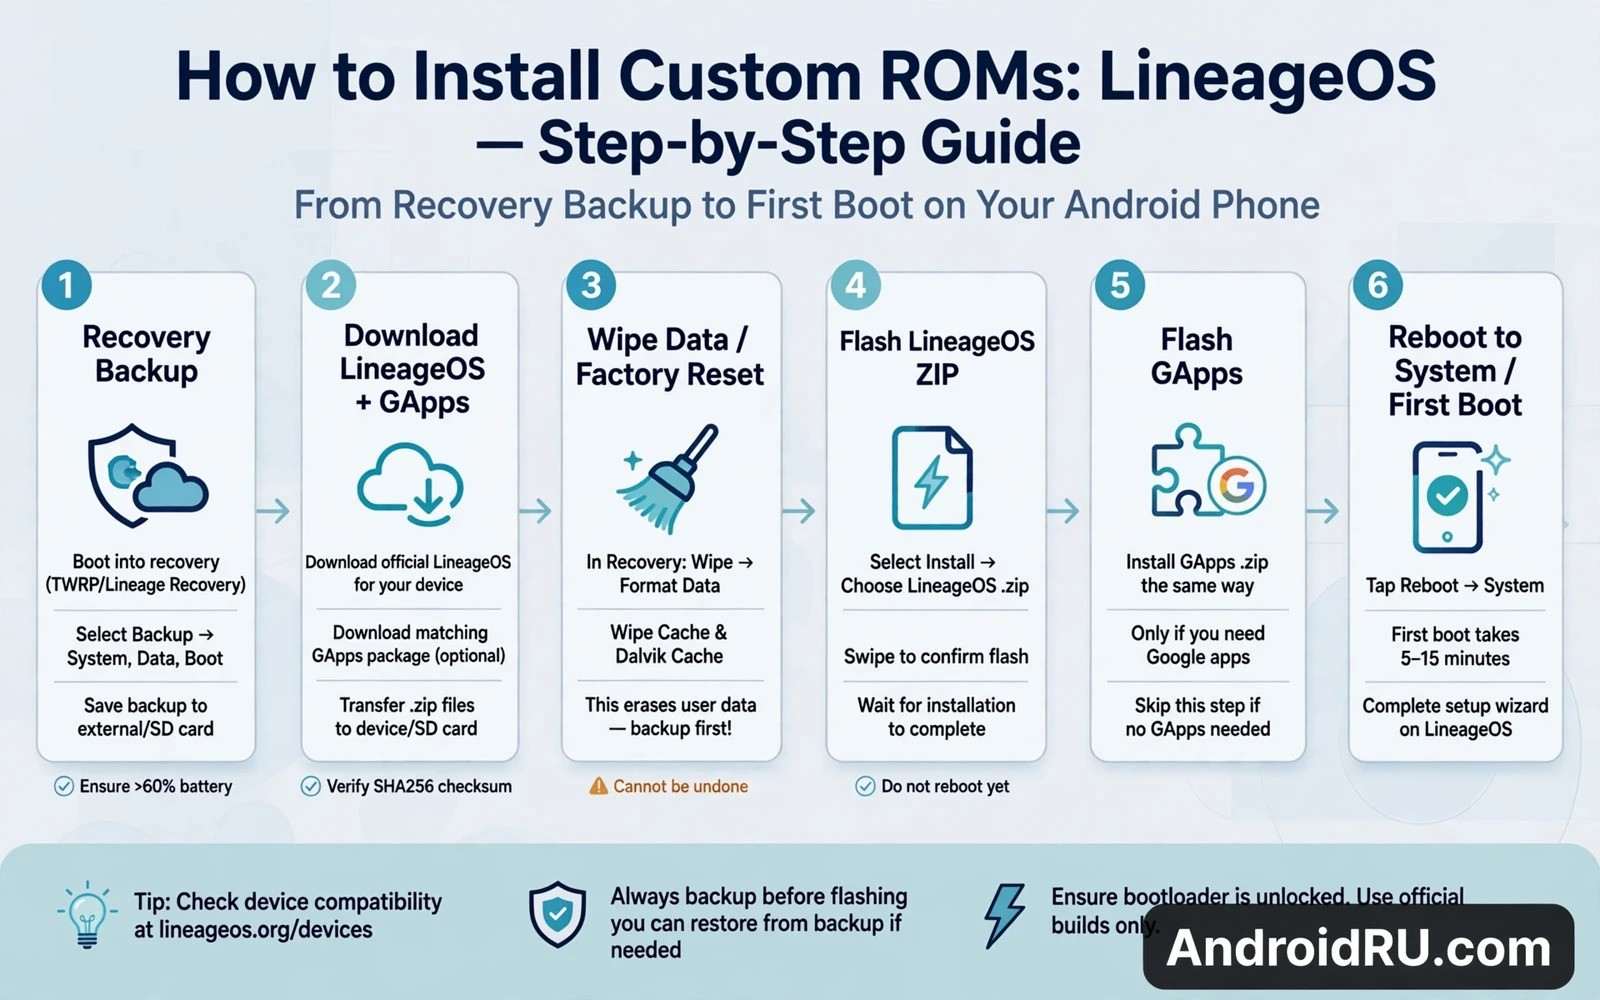
LineageOS is a community built version of Android based on open Android code. LineageOS runs on many phones after maker support ends. LineageOS offers a clean interface without maker apps. LineageOS offers regular updates for supported models. LineageOS offers privacy controls beyond stock settings on many builds. This guide explains installation step by step for a supported model. It also explains backup and recovery and updates. Read every step before you start. A rushed ROM flash causes data loss and boot problems.
A custom ROM replaces the entire system on your phone. A custom ROM changes the interface and the apps and the update path. A custom ROM can extend the life of an old phone. A custom ROM can also break camera quality or banking apps. Research your exact model before you choose any ROM. Check camera reports. Check modem reports. Check banking app reports. Check update frequency. A ROM that suits one model may fail on another model.
Check Support For Your Exact Model
LineageOS supports a specific list of models. Each model has its own build and its own install guide. Each model has its own known issues. Find your model on the official device list. Confirm that a current build exists for your model. Confirm that the build matches your model variant. A build for a similar variant can brick your phone. A build for a different region variant can break mobile data.
Read the device install guide for your model from start to finish. Note the required bootloader state. Note the required recovery version. Note the required firmware version before flashing. Note the partition layout for your model. Note any warning about camera or fingerprint or mobile data. A device guide overrides general advice in this article when the two disagree.
Check community reports for your model as well. Look for recent install reports. Look for recent update reports. Look for battery reports after a week of use. Look for camera comparison notes. A ROM that looked good at launch can develop problems after updates. A ROM with an active maintainer fixes problems faster.
Back Up Everything First
Unlocking the bootloader wipes the phone on most models. Flashing a ROM wipes data again in most install paths. Back up photos and contacts and messages before you start. Back up files that live only on the phone. Back up app data where the app allows export. Check that the backup finished. Copy the backup to a computer as well. A backup that lives only on the wiped phone is useless.
A recovery backup adds a deeper safety net. A recovery backup can restore the old system when the new ROM fails. A recovery backup can restore the old system when a critical app refuses to run. Make the recovery backup before you wipe anything. Store the recovery backup on external storage or a computer. The how to backup system partitions via TWRP recovery routine shows which partitions to include and how to verify the backup before you trust it.
Download stock firmware for your exact model as well. Stock firmware lets you return to maker software when the ROM path fails. Stock firmware lets you recover from a bad flash. Stock firmware lets you restore warranty state on models that allow relocking. Keep the stock firmware file ready before the first flash. A missing stock file turns a small failure into a long rescue.
Unlock The Bootloader And Install Recovery
Enable developer options on the phone. Enable USB debugging in developer options. Enable the bootloader unlock option when the phone shows it. Follow the maker unlock path for your model. Read every warning on the phone screen. Confirm only when you accept data loss. After unlock the phone may show a warning at every boot. That warning is normal for an unlocked device.
Install the recovery that the device guide requires. Some LineageOS models use Lineage recovery. Other models use TWRP or a similar custom recovery. Recovery choice affects backup and flashing options. Weighing TWRP and OrangeFox custom recovery for your model helps when the device guide allows either option. Install only the recovery build for your exact model and version.
Boot into recovery and confirm it works. Check that touch input responds. Check that storage mounts correctly. Check that ADB sideload responds when the guide uses it. Make a recovery backup at this stage when the guide allows it. A recovery that you have tested on a calm day works better in a crisis.
Download The Correct Files
Download the LineageOS build for your exact model. Download the build from the official device page for that model. Verify the file hash when the project provides one. A corrupt download can cause a failed flash. A wrong model download can cause a hard brick. Keep the build file and any extra packages in one folder on the computer.
Decide about Google apps before you flash. LineageOS ships without Google apps by default. Some users add a Google apps package during install. Some users run without Google apps and use alternative stores. The choice affects banking apps and location services and push notifications. Decide before flashing because adding Google apps later often needs a clean flash. Read the device guide for the recommended package size.
Check firmware requirements before flashing. Some models need a specific maker firmware version as a base. Some models need a specific modem firmware. Flash the required firmware first when the device guide says so. Skipping a firmware step can break mobile data or fingerprint unlock. Follow the device guide order exactly.
Flash LineageOS Step By Step
Work in this order and do not skip steps. First back up and charge the phone. Second unlock the bootloader through the official path. Third install the required recovery. Fourth boot into recovery. Fifth wipe the partitions that the device guide lists. Sixth flash the LineageOS build. Seventh flash the Google apps package when you chose one. Eighth reboot and wait for first boot to finish.
Wiping needs care. The device guide lists exactly which partitions to wipe. Wipe only those partitions. Wiping the wrong partition can remove firmware that the ROM needs. Wiping internal storage removes the ROM file when the file lives on the phone. Use ADB sideload or external storage when the guide warns about internal storage wipe.
Flashing through recovery follows the same pattern on most models. Choose the install option in recovery. Choose the ROM file from storage or sideload. Confirm the flash and watch the log. Read the log for errors before reboot. A flash that reports errors needs attention before reboot. Rebooting after a failed flash can cause a bootloop.
adb devices
adb reboot bootloader
fastboot devices
adb sideload lineageos-build.zip
The commands above show the general shape of device checks and sideload flashing. File names vary by model and build. Commands vary by device guide. Replace the file name with your own build file. Do not run a flash command for a different model. Read each command before you run it.
First Boot And Setup
First boot after a ROM flash takes longer than a normal boot. The system builds app caches. The system optimizes apps for the new version. Wait patiently and do not interrupt first boot. A phone that seems stuck may still be working. Wait at least fifteen minutes before you judge a first boot as failed. Check the device guide for expected first boot time.
Set up the phone as a fresh device after first boot. Sign in only when you trust the ROM build. Restore app data from your earlier backup where possible. Test calls and messages and mobile data first. Test Wi-Fi and Bluetooth next. Test the camera and fingerprint unlock next. Test banking apps before you rely on the phone daily. A problem found early is easier to fix than a problem found after full setup.
Test battery life over several days rather than one day. A fresh ROM always feels fast at first. Real battery behavior shows after apps and data return to normal use. Test camera quality in daylight and in low light. Test video recording as well as photos. Compare results with your notes from stock software. Revert to stock when camera or banking or stability suffers badly.
Updates And Long Term Care
LineageOS updates arrive through the built in updater on most models. Updates keep your data in place for minor versions. Major version updates may need extra steps from the device guide. Read update notes before you install any update. Back up before any major update. Keep stock firmware ready as a fallback.
Google apps packages need attention during updates. A Google apps package may need an update after a major version change. A mismatched package can break the app store or location services. Follow the package maintainer notes for your version. Update the package only through the recommended path.
Root access is optional on LineageOS. Some users add root for backup tools or system tweaks. Root adds security and integrity tradeoffs on top of ROM tradeoffs. Add root only after the ROM itself proves stable. Test the ROM for a week before you add root. A stable ROM plus careful root beats a rushed combination.
Stock software remains the simpler path for many users. The Android stock vs custom ROM performance discussion weighs update simplicity and camera tuning and app support against custom control. That weighing helps when a ROM experiment frustrates you. Returning to stock is a valid choice and not a failure. A phone that works reliably beats a phone with more features and daily problems.
Reverting To Stock Software
Reverting starts with stock firmware for your exact model. Flash stock firmware through the maker flashing path for your model. Follow the maker guide order for partitions and slots. A stock flash usually wipes data. Restore user data from your earlier backup after the stock flash finishes. Test calls and messages and mobile data after revert. Test banking apps after revert. A clean stock restore should pass integrity checks again on most models.
Relocking the bootloader is a separate decision after revert. Relocking restores verified boot state on many models. Relocking wipes data again on most models. Relocking can fail when the system differs from stock in any partition. Verify a fully stock state before you attempt relock. Read the maker relock warning carefully. A failed relock attempt can leave the phone in a difficult state. Keep stock firmware ready before any relock attempt.
Reporting bugs helps the maintainer and other users. Note the build date and the model variant. Note the steps that trigger the bug. Note whether a clean flash reproduces the bug. Note whether a specific app triggers the bug. Attach a log only when the log contains no private data. A clear bug report gets fixed faster than a vague complaint. A bug report with a clean reproduction helps every user on the same model.

