

How to Fix Bootloops Without Losing Personal Storage Data
A bootloop is a special kind of phone panic. The logo appears, the phone restarts, and the logo appears again. Your photos and messages sit inside a device that will not stay on long enough to open them. The good news is that most bootloops are software problems with software answers. The bad news is that the most common advice makes things worse. A factory reset is not step one. It is the last resort, after you have tried every repair that keeps your data intact.
Bootloops usually have a short list of causes, and each one has a repair that touches only the broken part. A bad module can hook a system process that crashes on every boot. A bad system update can leave two partitions disagreeing about the system state. A corrupted cache can stall the boot sequence before the home screen loads. Your job is to work through those repairs from the least destructive to the most destructive, and to stop the moment the phone boots. The recovery mindset you build here also helps when you study the emergency recovery command that calms boot loop panic, because both guides teach the same lesson: panic deletes data and patience saves it.
Stay calm and work with a cable and a computer nearby. A computer gives you recovery commands and a place to copy rescued files the moment the phone wakes up. Before you touch anything, charge the phone if you can, use a known-good cable, and write down the exact model code printed in your settings or on the box. That model code is what stops you flashing firmware meant for a different phone, which is one of the few mistakes that can turn a soft problem into a hard one.
What Causes a Bootloop and Why Your Personal Storage Data Is Usually Still There
A bootloop means the system cannot finish starting, so it restarts and tries again. It does not mean your files are gone. On a modern Android phone, your photos, messages, and app data live on the data partition, while the system lives on its own partitions, and most boot failures live in the system side. That separation is the whole reason a careful repair can work: you can fix or replace the system without touching the partition that holds your files.
The most common causes are easy to rank. A root module that hooks a system process is the top cause on modified phones, and a module that worked for months can break overnight when a system update changes the code it hooks. A failed or interrupted system update is next, especially on phones with A/B partitions, where a bad update can leave the phone trying to boot from a slot that never finished writing. A corrupted cache partition can stall the boot before the home screen loads. A bad app that starts at boot is less common but real, and it is the one cause that safe mode can prove in minutes.
Hardware failure is possible but it is the least common cause, and it usually gives itself away. A phone that loops only after a software change points to software. A phone that loops with no change, with a hot battery, a swelling case, or a screen that flickers before the loop starts, points to hardware and needs a repair shop rather than more flashing. If the phone was dropped in water or the battery is visibly swollen, stop flashing anything and take it to a professional, because repeated attempts on failing storage can make recovery harder.
Before You Touch Anything: The Bootloop Rescue Checklist
Preparation takes ten minutes and it is what separates a rescue from a loss. Work through this checklist before you run a single command. First, charge the phone for at least thirty minutes on a wall charger, or charge it in recovery mode if your recovery supports charging, because a phone that dies mid-flash can corrupt a partition that was healthy before the attempt. Second, use a short, known-good USB cable and a computer port that you have used for file transfer before, not a random cable from a drawer.
Third, install or update the platform tools on your computer so the ADB and fastboot commands actually work, and test them with a healthy device or with the looping phone in recovery mode. Fourth, write down your exact model code, your Android version, and the last change you made before the loop started: the last module installed, the last module updated, and the last system update. Those three items are your prime suspects, and a written log turns a mystery into a short list. Fifth, decide where rescued files will go on your computer, and make that folder now, because you do not want to be creating folders while a rescued phone is waiting.
How do I know if my phone is really in a bootloop?
Wait at least ten minutes on the first boot after an update, because the system may be building caches and a long first boot is normal. If the logo restarts in a clear repeating cycle three times, treat it as a bootloop and move to recovery mode. A single long logo is patience territory and a repeating cycle is repair territory. Count the cycles rather than guessing, because the count tells you whether the phone is progressing or stuck.
Step-by-Step Fix for a Bootloop Without Wiping Data
Follow these steps in order and stop the moment the phone boots normally. Each step is more invasive than the one before it, and skipping ahead costs you data you did not need to lose. After every step, let the phone try a full boot and wait a full two minutes before you decide the step failed, because some repairs need a slow first boot to rebuild caches.
Step 1: Force a full power off and boot into recovery mode
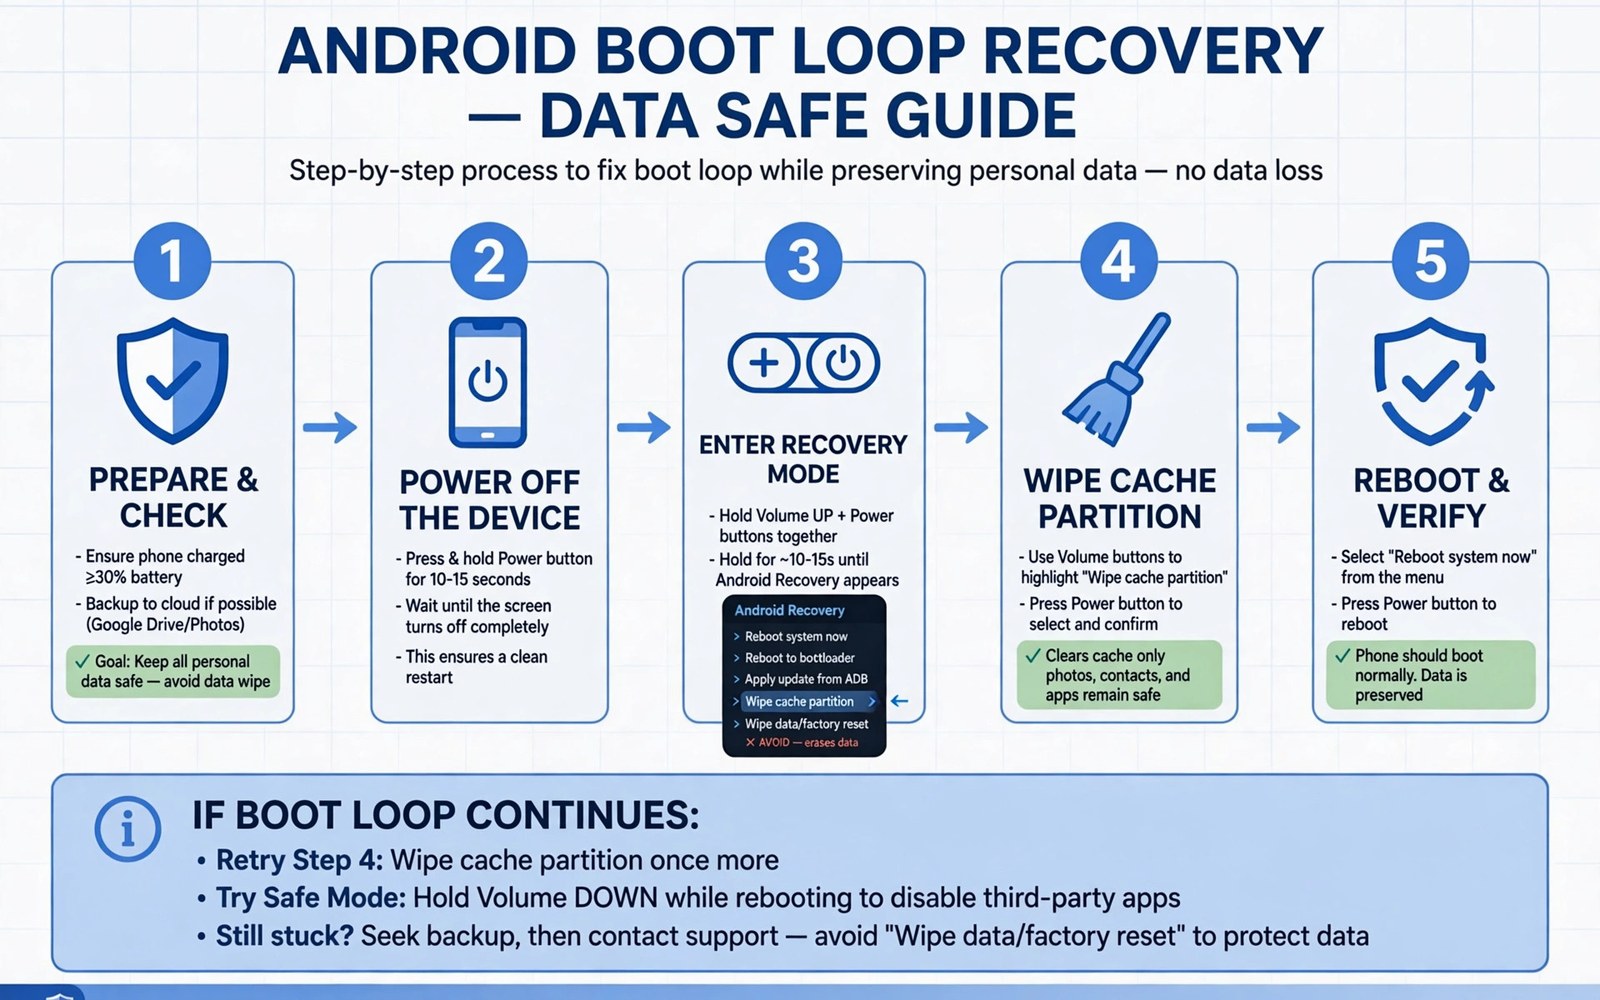
Hold the power button long enough for the phone to stop cycling, usually ten to twenty seconds, then wait a full minute before you touch anything. Boot into recovery mode with the button combination for your model, which is usually Power plus Volume Down or Power plus Volume Up held together from the powered-off state. Check your maker’s support page for the exact combination, because it varies by brand and by model. Recovery mode runs outside the normal system, so it can work even when the system itself cannot boot.
What to check after entering recovery mode
Check that the recovery menu appears and that you can move through it with the volume keys. Check that the computer sees the device with the command adb devices while you are in recovery. If recovery appears and the computer sees the phone, you have a working rescue path and you should move to the next step instead of trying random button combinations again.
Step 2: Clear the cache partition from recovery
From the recovery menu, choose the option to wipe or clear the cache partition. On devices that still offer that option, clearing cache removes temporary system files only and it leaves photos, messages, and app data untouched. Do not choose the option that wipes data or performs a factory reset, because that is a different menu item with a very similar name, and on a stressed day it is easy to pick the wrong one. Read every recovery menu label twice before you confirm it.
What to check after clearing the cache partition
Reboot the phone and wait a full two minutes, because the first boot after a cache clear rebuilds temporary files and can look slow. If the phone reaches the home screen, you are done, and the first thing to do is copy your photos to the computer before you change anything else. If the phone loops again, the cache partition was not the cause and you have lost nothing, so move to the next step.
Step 3: Try safe mode to find a bad app or module
Try safe mode next if the phone reaches the system briefly before restarting. Safe mode loads only the core system and it disables third-party apps and many modules. On most phones you reach it by holding the power button until the power menu appears, then long-pressing the Power off option and tapping OK, or by holding Volume Down during boot on some models. If the phone stays on in safe mode, then a third-party change is the culprit and you can remove it from inside the system. If safe mode also loops, then the problem lives deeper in the system or in a system-level module and recovery tools become your main path.
When safe mode works, remove the most recently installed or updated app first, then reboot normally. Work through recent changes one at a time and reboot after each removal, because removing everything at once hides the culprit and costs you a working setup that you must rebuild blind. Keep notes as you go, because the note is what stops you removing the same innocent app twice.
Step 4: Disable the last module from recovery with ADB
Root modules are the top cause of bootloops on modified phones, and recovery mode lets you disable them without booting the system. Mount the data partition in recovery, connect the phone to the computer, and list the modules with the device bridge. Rename the folder of the most recently changed module so the root manager skips it on the next boot, then reboot and test. Remove only one module at a time and reboot after each removal, because the phone that boots after one removal has told you exactly what broke it.
adb wait-for-device
adb shell ls /data/adb/modules
adb shell mv /data/adb/modules/BadModule /data/adb/modules/BadModule.off
adb pull /sdcard/DCIM /home/user/rescue-photos
adb reboot
Read the block carefully before you use it. The rename command disables a module by changing its folder name so the root manager skips it on the next boot. Replace the placeholder name with the real module folder from the list command. The pull command copies a folder to the computer, and the path on the computer side must exist before you run it. Never type a delete command in this stressed state, because a tired typo can erase the very files you are trying to save.
Step 5: Rescue your files while recovery is available
Do not wait for a perfect repair before you rescue files. Boot into recovery and connect the phone to a computer, because many recoveries offer a file transfer mode that exposes internal storage over a cable. Copy photos and documents first and verify that the copies open on the computer before you move on. An ADB pull backup copies whole folders, so use adb pull /sdcard/DCIM for photos, adb pull /sdcard/Documents for documents, and adb pull /sdcard/Download for downloads. Only after that rescue should you attempt riskier repairs, because a repair that fails after a rescue is an inconvenience, while a repair that fails before a rescue is a loss.
If the computer cannot see the phone over ADB, try a custom recovery such as TWRP, which offers a proper file manager and a mount menu that can expose storage over USB. In TWRP, mount the data partition, connect a USB OTG flash drive, and copy the DCIM and Documents folders straight to the drive. That OTG copy works even when the computer drivers are missing, and it is the method I would reach for first on a phone that has TWRP installed. Verify the copies on the drive before you continue, because a copy that never finished is not a backup.
Step 6: Switch the A/B slot when an update broke the boot
Phones with A/B partitions keep two copies of the system, and an update writes to the inactive slot before switching to it. If the update failed halfway, the phone may be trying to boot from a slot that never finished writing, while the previous slot still holds a working system. Switching back to the other slot can rescue the phone in minutes, and the slot switch method in understanding A and B partition flashing belongs in your rescue notes for exactly this reason.
From fastboot mode, check the current slot with fastboot getvar current-slot, then switch with fastboot set_active a or fastboot set_active b, choosing the slot that is not current. Reboot with fastboot reboot and wait a full two minutes. An A/B slot switch touches no user data at all, which makes it one of the safest repairs on this list, and it is the first thing to try when the loop started right after a system update.
What to check after switching slots
Check that the phone boots to the home screen and that your apps and photos are present. Check the Android version in Settings, because the working slot may hold the previous version, and that is fine for now. Do not accept the same update again until you know why it failed, and do not switch slots back and forth repeatedly, because each switch writes boot state and a tired phone does not need extra churn.
Step 7: Reflash the system without touching your data
A dirty reflash installs a clean system over the broken one while leaving the data partition alone. Download the exact firmware or ROM build that matches your device, your model code, and your region, and flash only the system partitions named in the device notes. Do not flash any command that formats user data, and do not tick any option that wipes the data partition. After the flash, the phone should boot with your apps and files still in place, and a dirty reflash is the repair to try when cache, safe mode, modules, and the slot switch have all failed. Owners who later read about the critical warning before flashing custom ROMs will recognise the same rule: verify the model code and the region code character by character before any flash.
On Pixel phones, the factory image flash script has a -w flag that wipes data, and you must remove that flag before running the script if you want to keep your files. On Samsung phones, use the HOME_CSC file in Odin rather than the regular CSC file, because HOME_CSC keeps user data while the regular CSC wipes it. On other brands, read the flashing guide for your exact model and look for the words that mean a data wipe in that tool, because every tool names it differently. Flash only the system, vendor, and boot images named in the guide, and never flash a full package blindly when the guide lists individual partitions.
This method fails when the data partition itself is corrupt. Signs of that deeper failure include recovery being unable to mount data, or file copies failing with read errors. In that case stop and seek help from a repair specialist with data recovery tools, because repeated flashing attempts on failing storage can make recovery harder. Knowing when to stop is a skill and not a surrender.
Fastboot Commands That Fix a Bootloop Safely
Fastboot mode is the low-level tool that talks to the phone before Android starts, and a few commands cover most bootloop repairs. Boot into fastboot mode with the button combination for your model, usually Power plus Volume Down from the powered-off state, then connect the phone and run fastboot devices to confirm the computer sees it. If the command returns a device serial, you are connected and you can work. If it returns nothing, try a different cable and a different USB port before you assume the phone is dead.
The safe commands are the ones that read state or switch slots: fastboot getvar all to read the model, the current slot, and the bootloader state; fastboot getvar current-slot to see which slot the phone is trying to boot; fastboot set_active a or fastboot set_active b to switch slots; and fastboot reboot to restart. The flashing commands are fastboot flash boot boot.img and fastboot flash system system.img, using only the image files from the exact firmware for your model. Flash one partition at a time and reboot after each one, because a single bad image is easier to trace than a batch of them.
Never run a command that formats the data partition while you are trying to save your files, and never run a command you copied from a forum without reading what each word does. The most dangerous commands are the ones with a familiar name and an unfamiliar flag, so read the help text for the tool before you run it. If a command asks for confirmation, that confirmation is the tool telling you the step is destructive, so stop and read it twice.
How to Rescue Photos and Files With TWRP and USB OTG
TWRP is the most capable rescue tool on a phone that has it installed, because it runs a full file manager and a terminal outside Android. Boot into TWRP, tap Mount, and mount the data partition, then connect a USB OTG flash drive and copy the folders that matter: DCIM for photos and videos, Documents for files, and the folders of any messaging app that keeps its own media. Copy to the OTG drive first, because it is fast and it does not depend on computer drivers, then copy from the drive to the computer and verify that the photos open.
If TWRP asks for a decryption password or pattern, enter the screen lock you used on the phone, because the data partition is encrypted with that lock. If the correct lock does not work in TWRP, do not try random patterns repeatedly, because some devices count failed attempts and lock the partition further. Try ADB sideload or the stock recovery file transfer mode instead, and if neither works, take the phone to a specialist with the correct tools rather than guessing your way into a locked partition.
Keep a written note of which folders you rescued and which ones you still need, because a rescue done in a hurry is easy to lose track of. Photos usually live in DCIM, but screenshots live in Pictures, voice notes live in app folders, and downloads live in Download. The debloat discipline in removing preinstalled apps that refuse normal uninstall uses the same idea: a written list lets anyone retrace a change without guessing. A rescue list does the same thing for your files.
Common Mistakes That Destroy Data During a Bootloop
The worst mistake is factory resetting in the first ten minutes. A reset feels decisive and it destroys the very data the owner wanted to save. The second mistake is flashing a firmware package for the wrong model or region because the file name looked close enough, which can harden a soft problem into a hard brick. The third mistake is ignoring the battery, because a phone that dies mid-flash can corrupt a partition that was healthy before the attempt, so charge the phone in recovery if the recovery supports charging.
The fourth mistake is deleting modules or files in a panic instead of renaming them. A renamed module folder can be renamed back if it turns out to be innocent, while a deleted folder is gone. The fifth mistake is running a format command copied from a forum without understanding it, because a format command does exactly what it says and it does not ask twice. The sixth mistake is trying every repair at once and then not knowing which one worked, which leaves you unable to prevent the next loop. Work in order, one change at a time, and write down what you did.
Prepare a Recovery Kit While the Phone Works
A recovery kit prepared on a healthy phone turns a future bootloop into a routine repair. The kit needs a good cable and a computer with the device bridge installed and a written note of the recovery button combination. Add your exact model code and the stock firmware file name to that note, and keep the note where you can find it under stress, because a panicked search through old messages wastes the calm window when clear thinking matters most.
Rehearse the recovery steps once every few months even when the phone works perfectly. Open recovery and confirm the menu appears, confirm the computer sees the device, list the modules, and confirm the list matches your written log. A rehearsal that takes ten minutes on a healthy phone saves an hour of fumbling on a looping phone, and it reveals a dead cable or a missing driver before those faults matter. Teach one trusted person where the kit lives and what it contains, so a second pair of hands can start the rescue while you focus on decisions.
Keep a copy of your rescue note outside your home as well as inside it. A cloud note or a message to yourself on another device keeps the rescue steps available when you travel, and a bootloop on holiday feels far worse when the rescue card sits in a drawer at home. Keep your computer device bridge updated too, because an outdated tool can fail to recognise a newer recovery version or a newer Android security patch. Update the tool quarterly and test the connection after each update. For the calmer mindset behind the whole job, read the emergency recovery command that calms boot loop panic next, and for a wider safety net, look at the module that automates a system backup on every reboot so the next failure starts from a fresh backup.
Frequently Asked Questions About Fixing Bootloops Without Data Loss
Will clearing cache delete my photos?
No. Clearing the cache partition removes temporary system files only. It does not touch the photo folders or the app data folders. Clearing data for an app is a different action and that one does erase that app data, so read every recovery menu label twice before you confirm it.
Can a bootloop mean dead hardware?
It can, but hardware failure is less common than software failure. A phone that loops only after a software change points to software. A phone that loops with no change, with a hot battery, or with a swelling case points to hardware and needs a repair shop rather than more flashing.
How long should I wait on the logo before calling it a bootloop?
Wait at least ten minutes on the first boot after an update, because the system may be building caches. If the logo restarts in a clear repeating cycle three times, treat it as a bootloop and move to recovery mode. A single long logo is patience territory and a repeating cycle is repair territory.
What should I do first when my phone starts looping?
Force a full power off, wait a minute, and boot into recovery mode. From there, clear the cache partition, then rescue your files over a cable before you try any riskier repair. Do not factory reset first, do not flash anything first, and do not delete anything while you are stressed. The order is: stop the loop, save the files, then repair the system.
Conclusion: Work Slowly, Save First, Wipe Last
Most bootloops end with the data intact when the owner works slowly and in the right order. Clear the cache, disable the last module, rescue the files, switch the slot, and reflash the system without a data wipe. Each step is small and each step protects the files that matter while it tests one theory about the failure.
Your concrete next step is to prepare a recovery kit today while your phone still works. Write down your recovery button combination and your model code, keep a cable and a computer ready, and copy your photos to the computer this week even if nothing is wrong. If your phone ever loops, open this order of steps and follow it before you touch any reset option.

