

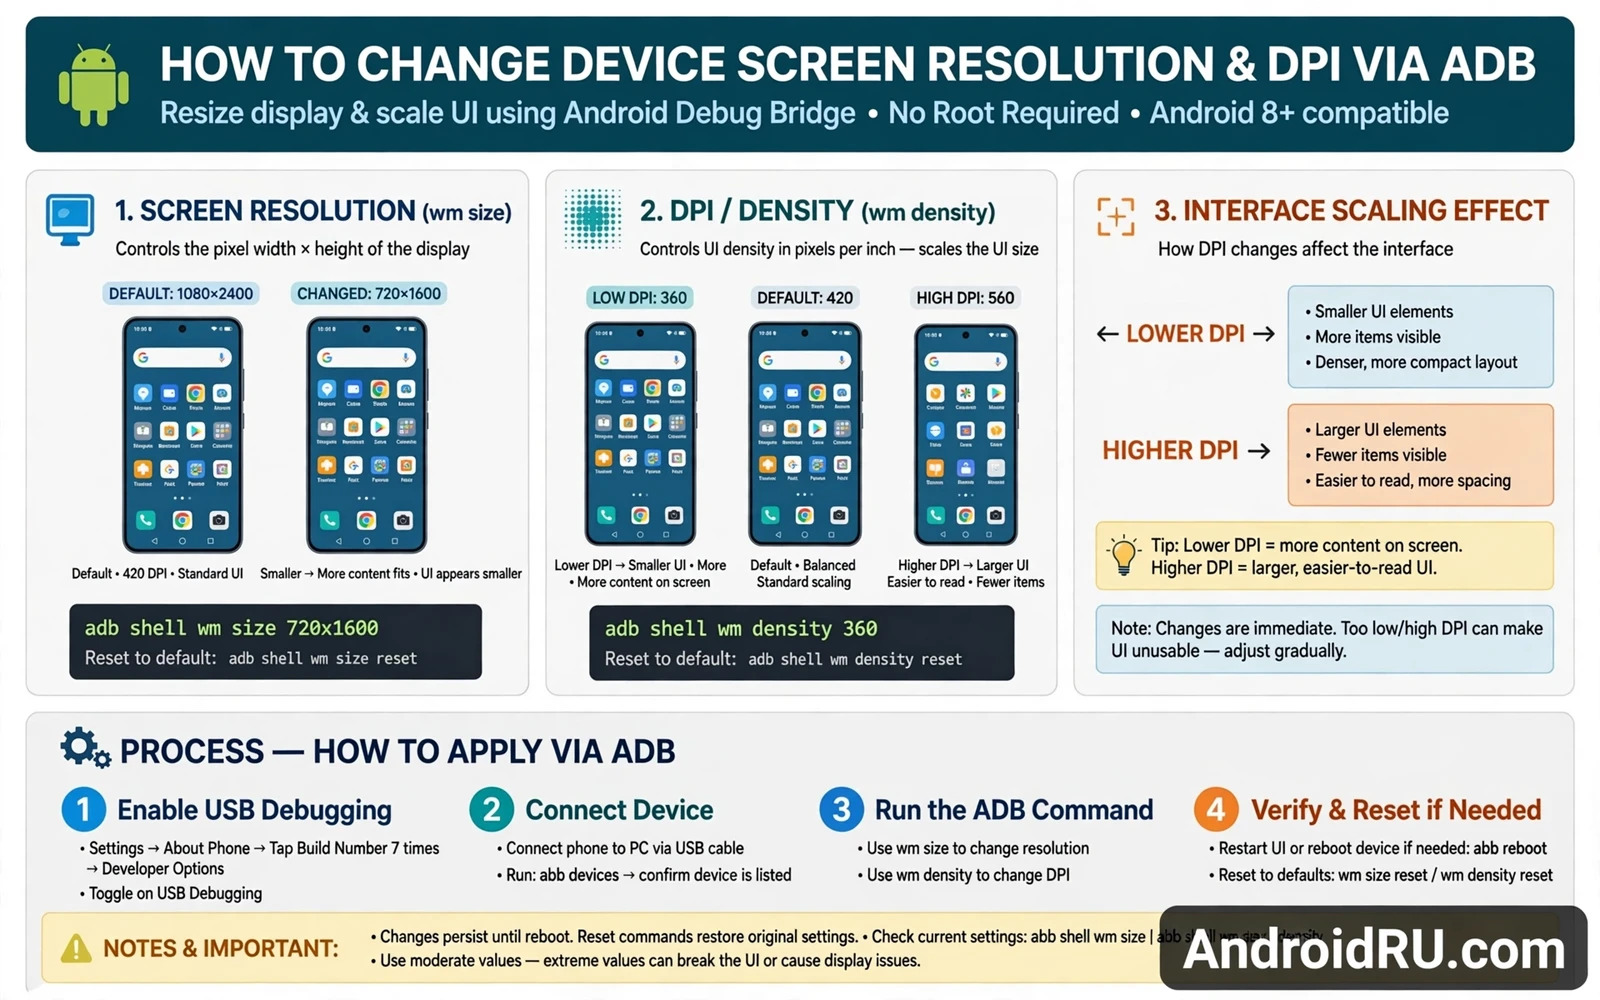
Why Resolution And DPI Are Different Settings
Screen resolution sets the number of pixels the system renders. DPI sets how large interface elements appear relative to those pixels. Changing resolution alone can make everything smaller or larger in a blurry way if the panel scaling is poor. Changing DPI alone keeps the pixel count the same while resizing text and icons and layout spacing. Most owners who want a roomier screen actually want a DPI change rather than a resolution change.
A lower DPI value makes interface elements smaller and shows more content on screen. A higher DPI value makes elements larger and easier to read and easier to tap. Extreme values in either direction break layouts. Apps may clip buttons or may hide controls when DPI moves far from the stock value. The safe approach is a small step away from stock followed by testing.
Resolution changes carry a different risk. A resolution that the display driver does not support can produce a black screen or a distorted image. That failure can be frightening but it is usually reversible through ADB if USB debugging remains enabled. A black screen with working ADB access is recoverable. A black screen without ADB access is much harder to fix.
Record the stock values before changing anything. Note the stock resolution and the stock DPI density value. Write them down away from the phone. A written record turns a recovery into a single command instead of a guessing game. Many owners skip this step and then struggle to remember the original numbers.
Setting Up ADB Safely
Enable developer options and enable USB debugging on the phone. Connect the phone to a computer with a reliable cable and authorise the computer when the prompt appears. Confirm that the computer detects the device before running any display command. A display command sent to the wrong device or to no device teaches nothing and can confuse the session.
Test display commands with temporary values first where possible. Some display commands apply immediately and can be reset with a matching reset command. Temporary testing lets you see the effect without committing to a value that survives reboot. If the screen becomes unreadable then run the reset command blind or reboot into safe mode depending on the device behaviour.
Keep a second way to control the phone during testing. A mouse through USB OTG or a nearby computer with ADB access can help if touch alignment shifts. Touch alignment shifts when DPI changes confuse apps that map touch coordinates to layout positions. Most modern apps handle DPI changes well but older apps may misalign taps.
Back up device settings before experimenting. A backup will not restore a display value directly in every case but it protects the rest of the setup if a reset becomes necessary. The guide on top Shizuku powered apps that do not require full root shows how some display and system tools can run with elevated permissions without full root. That context helps owners choose between an ADB session and a dedicated tool.
Choosing Safe Values And Testing Them
Start with a DPI change of a modest size from stock. If stock density is in the typical phone range then a change of a small step up or down is a sensible first test. Open the home screen and a messaging app and a browser after the change. Check that text remains readable and that buttons remain tappable and that no important control is clipped at the screen edge.
Test games and video apps separately because they often use fixed layouts. A DPI change that looks fine on the home screen can stretch a game interface or can shrink video controls. Test the apps you use daily rather than assuming that a clean home screen means a clean system. Daily apps are the real test.
Test resolution changes even more cautiously. Choose a resolution with the same aspect ratio as the stock panel. A mismatched aspect ratio distorts the image and wastes screen area. If the image looks stretched or squashed then reset immediately. A correct aspect ratio preserves the shape of the interface even when the pixel count changes.
Watch battery and performance during testing. A higher rendering resolution can increase GPU load and can reduce battery life. A lower resolution can improve performance in demanding games but can reduce sharpness for reading. There is no free benefit. Every display change trades one quality for another and the owner should choose the trade deliberately.
Resetting And Making A Change Stick
Reset display settings through the matching ADB reset commands when a value does not work. Reboot after a reset to confirm that the system returns to stock behaviour. A reset that looks correct before reboot but reverts strangely after reboot needs attention. Note the behaviour and avoid reapplying the same failing value.
Some devices reset ADB display changes after a reboot by design. Others keep them until manually reset. Do not assume persistence. Test persistence by rebooting and checking the values again. A change that disappears after reboot is not a failure. It is simply a temporary setting that needs a different method for permanence.
Persistent display changes through root tools or startup scripts carry the usual root risks including bootloops and warranty implications. A persistent change should only follow a successful temporary test. The value that works temporarily is the value to make persistent. Guessing a persistent value without testing it first invites a bootloop.
For a polished interface after a successful DPI change consider the wider customisation options available on Android. The guide on how to change system animation speeds for snappy response covers motion tuning that pairs well with a roomier layout. The guide on how to customize status bar and quick settings beyond stock limits covers the top of the screen where a DPI change is most visible. Together those guides help turn a technical display tweak into a coherent interface that feels intentional rather than accidental.
DPI Values And App Layout Breakage
App layout breakage from DPI changes follows predictable patterns because apps are designed for a range of densities rather than for every possible density. An app that assumes a narrow density range may place buttons off screen when density moves far from stock. An app that uses flexible layouts adapts gracefully across a wide range. Testing reveals which category each daily app falls into. Owners should not assume that all apps behave the same way.
Text scaling interacts with DPI changes in ways that surprise new tweakers. Android text size settings multiply with density effects in some apps. A large text size plus a low DPI value can produce oversized text in a roomy layout. A small text size plus a high DPI value can produce tiny text in a cramped layout. Test text size and DPI together rather than treating them as independent settings. Combined testing reflects real use.
Launcher grid settings also interact with DPI. A launcher grid designed for stock density may show too many icons per row at low DPI or too few at high DPI. Adjust launcher grid settings after a DPI change to restore a balanced home screen. A balanced grid prevents icons from looking lost in empty space or crowded into a small area. Launcher tuning completes a DPI change rather than being an optional extra.
Games deserve separate DPI testing because games often render their own interfaces outside standard Android layout rules. A game interface that looks fine at stock density may stretch or shrink at a new density. Some games ignore DPI entirely and render at a fixed scale. Others respect DPI and break badly. Test each game individually rather than assuming a system wide rule. Game behaviour is the least predictable part of DPI tuning.
Accessibility services can be affected by DPI changes because they rely on layout positions to identify interface elements. A screen reader that worked at stock density may misidentify elements at an extreme density. Owners who rely on accessibility services should test those services explicitly after any DPI change. Accessibility is not a side feature for its users. It is the primary way they interact with the phone.
Reverting DPI is straightforward when the stock value was recorded. Without a recorded stock value the owner must guess or look up the model default. Guessing wastes time and may leave the phone at a near stock value that still feels wrong. A written stock value turns reverting into a single command. That single command is the reward for thirty seconds of note taking before the first change.
Resolution Choices And Display Sharpness
Resolution changes affect sharpness differently on different panel types because panels have a native resolution at which they look sharpest. Rendering below native resolution can look soft because the panel must scale the image up. Rendering above native resolution cannot add detail beyond what the panel can display. The native resolution is therefore the sharpness sweet spot for reading and for photo viewing. Owners seeking sharpness should stay near native resolution.
Battery impact from resolution changes depends on content type. Static reading at lower resolution saves little power because the display itself dominates power use. Demanding games at lower resolution can save more power because GPU load drops significantly. Owners should judge battery claims by their own use pattern rather than by generic claims. A gamer and a reader experience different tradeoffs from the same resolution change.
Video playback at a changed resolution can behave unexpectedly because video apps may select a stream quality based on reported resolution. A phone reporting a lower resolution may receive a lower quality stream even when the panel could show more detail. A phone reporting a higher resolution may receive a higher quality stream that wastes data. Check stream quality settings in video apps after a resolution change. Manual quality selection avoids automatic downgrades.
Screenshot resolution follows rendering resolution rather than panel resolution in many cases. A screenshot taken at a lowered rendering resolution will be smaller than a screenshot at native resolution. Owners who share screenshots for work should consider that effect. A low resolution screenshot may look unprofessional even when the phone screen itself looked acceptable. Work use cases deserve native resolution.
Touch accuracy can shift subtly after a resolution change because touch coordinates map to the rendered layout. Most modern devices handle mapping correctly. Older devices or devices with custom display drivers may show offset taps after a resolution change. Test tapping on small targets near screen edges after any resolution change. Edge targets reveal mapping errors that centre targets hide.
A sensible resolution strategy starts with DPI tuning and adds resolution tuning only when a specific need exists. DPI tuning solves most roominess and readability goals without touching rendering resolution. Resolution tuning solves performance goals in games or compatibility goals for specific apps. Starting with DPI keeps risk low. Adding resolution only for a proven need keeps the system stable.

