

How to Install Dolby Atmos Sound Framework on Any Rooted Phone
Dolby Atmos promises sound that surrounds you instead of sound that merely plays at you. On a phone that promise means wider music, clearer dialogue in video, and a greater sense of space in games. Many phones ship without the full framework even when their hardware could support it, and root access lets you install the framework as a system module and bring that spatial sound to a phone that never had it.
The framework works by processing audio with spatial cues before it reaches your ears. It places sounds in a virtual space around the listener rather than only left and right. Movies gain a sense of height and depth, music gains separation between instruments, and games gain positional cues that help you locate action. The effect varies with headphones and content: well mixed content shines, poorly mixed content gains little, and honest expectations make the install satisfying instead of disappointing.
This guide walks you through the whole process in order: compatibility checks, install through your root manager, profiles for each kind of content, testing calls and video separately, and troubleshooting the problems that actually happen. Read the compatibility section before you touch anything, because a module installed on the wrong Android version is the single most common cause of a silent phone and a wasted evening.
What the Dolby Atmos sound framework actually does on a rooted phone
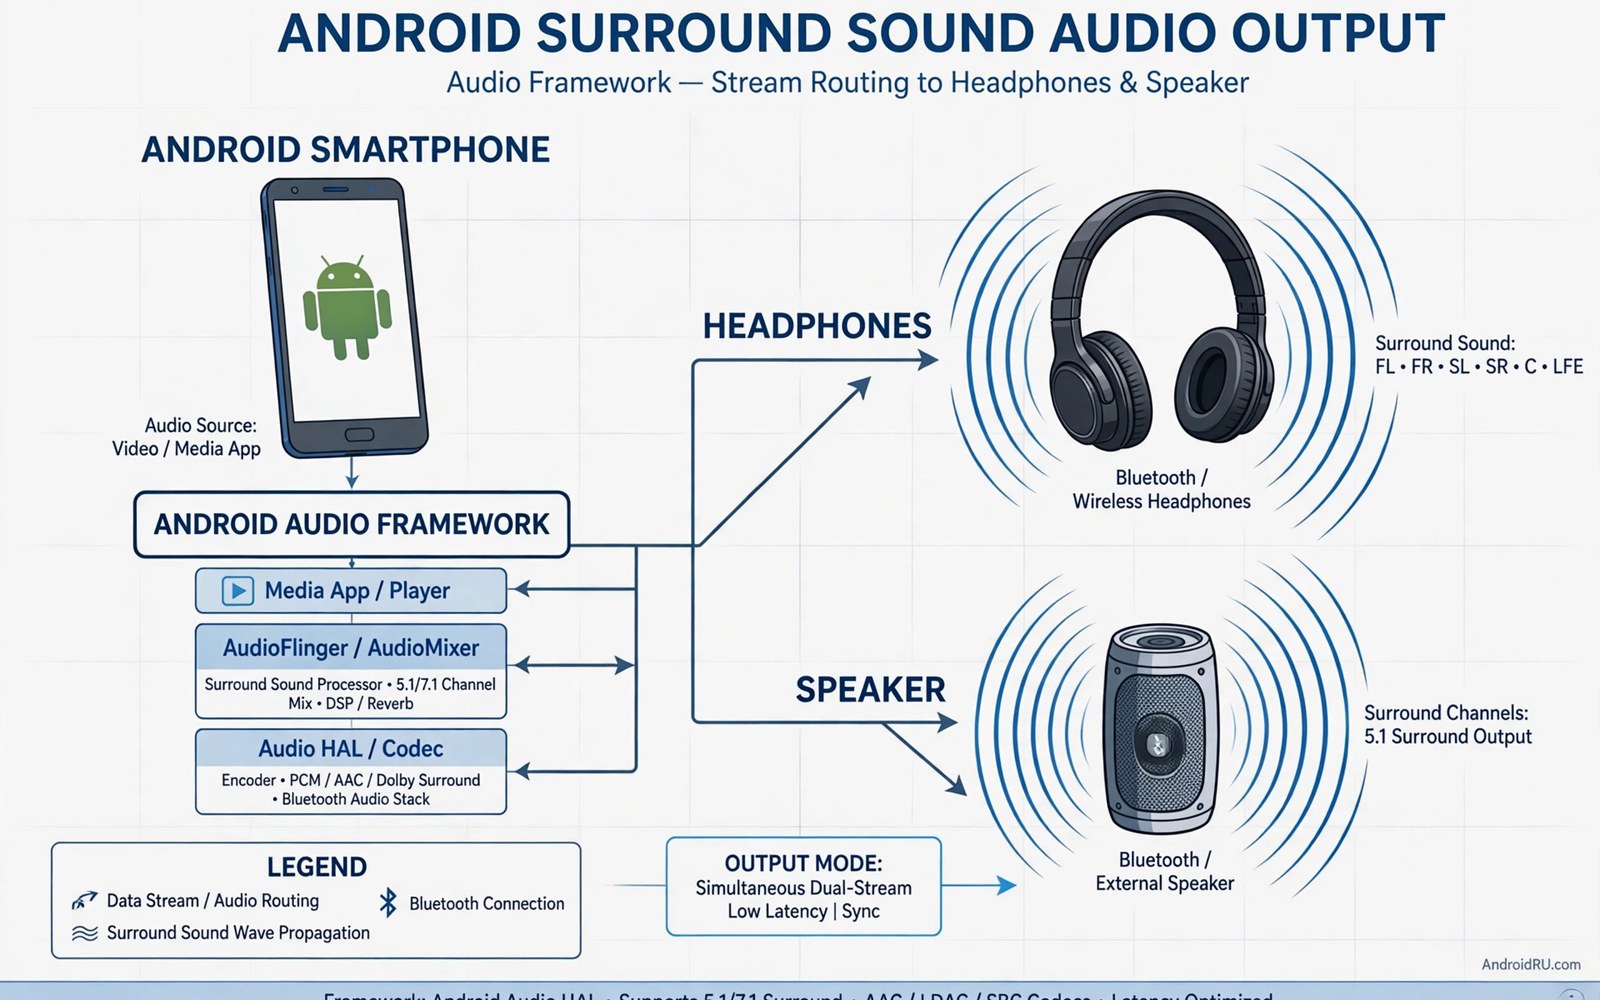
The framework sits in the audio path between your apps and your ears. When an app plays sound, the audio passes through the framework, which applies spatial processing, equalisation, and dynamic range control before the signal reaches the headphone jack, the USB audio output, or the speaker. That position in the chain is why it can change the sound of every app at once, and it is also why a second processor in the same chain causes trouble: two processors fighting over one stream will distort it.
Spatial audio is the headline feature, and it works by adding timing and level cues that your brain reads as direction and distance. A sound meant to come from above arrives with the cues your ears expect from above, and a sound meant to come from behind arrives with the cues your ears expect from behind. Headphones are the best way to hear this, because each ear gets its own precise signal, while a phone speaker can only suggest width within the limits of a small driver.
Object-based sound is the idea underneath it. Instead of mixing everything into a left channel and a right channel, the content describes sounds as objects with positions in space, and the framework renders those objects for your headphones or speaker in real time. Content made for spatial playback, such as a modern movie or a game with spatial audio, demonstrates the real capability. A stereo track upmixed by the framework gains width, but it cannot gain true height information that was never recorded, so judge the framework by its best content and set expectations for ordinary content accordingly.
Spatial audio, object-based sound and upmixing explained in plain terms
Think of stereo as a photograph and spatial audio as a room you can walk around in. The photograph shows you the scene from one angle, while the room lets sounds sit in places around you. Upmixing is the framework guessing where the sounds in a stereo photograph would sit if they were in a room, and a good guess sounds wide and natural while a bad guess sounds echoey and distant. That is why a light profile often beats a dramatic one: a subtle widening sounds natural for hours, while a heavy effect impresses for ten minutes and then fatigues your ears.
Headphones vs phone speaker: what actually changes after install
Headphones receive the full spatial processing, and that is where the framework earns its keep. The speaker receives a tuned version for a small driver, which improves clarity and virtual width but cannot create true surround separation from one small speaker. Test your headphones and your speaker separately after install, because a profile that sounds superb on headphones may sound thin on the speaker. Save separate profiles for each output and switch between them rather than forcing one profile to serve both.
Check compatibility before you install anything: Android version, audio policy and existing enhancers
Compatibility decides success more than enthusiasm does. The framework needs an Android version and an audio policy that the module supports, and it also conflicts with other audio processors that fight for the same stream. Check compatibility before you install and disable competing enhancers first, because a module installed on the wrong version may install cleanly and then fail silently, leaving you with no sound change and no error message to explain it.
Read the module notes for supported Android versions and supported audio architectures. A module built for an older Android version may install cleanly and then fail silently on a newer version. Check whether your phone uses a 64-bit only audio path or a mixed path, and check whether the stock system already includes a partial spatial framework that the module would duplicate. Duplication causes volume jumps and missing audio in some apps, and it is far easier to spot before install than to diagnose afterwards.
The audio chain knowledge from the sound driver module that turns a phone into a studio DAC helps here, because both projects live in the same audio path and the same rules apply: one processor in the chain, matched to your Android version, with the stock enhancer out of the way.
Android version and 64-bit audio path checks
Open Settings, then About phone, and write down your Android version and your security patch date. Then open the module release notes and confirm that your exact Android version is listed as supported. A module that lists Android 13 and 14 is not a promise that it works on Android 15, and a module that lists Android 12 may still work on 13 but deserves a careful test afterwards. If your version is not listed, stop and look for a newer build or a different module rather than hoping for the best.
Check your audio architecture too. Most modern phones run a 64-bit only audio path, but some older devices and some custom ROMs run a mixed path, and a module built for one will not attach cleanly to the other. The module notes usually state which path they support. If the notes do not say, ask in the module release thread with your phone model and Android version before installing, because that question takes two minutes and a bad install takes an evening to undo.
Spot a partial spatial framework already on your phone
Some phones ship with a partial spatial framework already built in, often under a name like Dolby Audio, Dirac, or a manufacturer sound setting. Open Settings, then Sound and vibration, then look for any spatial sound, surround sound, or 3D audio toggle. If one exists, note its exact name, because you will need to turn it off before judging the new framework, and because a phone that already has a partial framework is the most likely to suffer duplication problems.
Also check for a stock enhancer in the same menu. Samsung phones carry SoundAlive, Xiaomi phones carry Mi Sound Enhancer, OnePlus phones carry Audio Tuner, and many others carry their own. Any of these counts as a competing enhancer, and every one of them needs to be off before you test the new framework. Two enhancers on one stream create doubled bass, harsh treble, and volume swings, and no amount of profile tuning will fix that.
Commands that confirm your audio path before you install
If you are comfortable with a terminal, run these commands from a root shell to confirm what your audio service actually sees. They use the standard shell and audio service inspection tools, and you should read every line before you run it on your own device:
su
dumpsys media.audio_flinger
dumpsys audio
ls /data/adb/modules
getprop ro.audio.spatializer_enabled
Use the inspection commands to confirm the audio service sees the framework after install. The dump output should mention the spatial processing path when the framework is active. Silence in the dump means the install did not attach even when the companion app looks confident, so trust the service dump over the app badge, because the service controls the actual sound.
Install the Dolby Atmos module through your root manager, step by step
Install the framework module through your root manager and reboot once. The steps below assume Magisk, which is the root manager most readers use, and the same sequence applies in KernelSU with the module menu in the same place. Take a full backup before you start, because a system module touches the audio path and a backup is the only clean way back if something goes wrong.
- Check your Android version in Settings, then About phone, and confirm the module release notes list it as supported. Write the version down so you can compare it against the notes without guessing.
- Get the module file from the official release page for that module, and check the file size and the version number against the release notes. A file that is far smaller than the release notes describe is a bad file, so stop and get a fresh copy.
- Open Magisk, tap Modules at the bottom, then tap Install from storage at the top, and pick the module file you just obtained. Wait for the install log to finish and read the last lines for errors before you do anything else.
- Tap Reboot when Magisk offers it, and let the phone restart fully. Do not interrupt the first boot, because the module attaches to the audio service during that boot and an interrupted boot leaves it half attached.
- After the phone restarts, open the Dolby Atmos companion app and confirm that the framework reports an active state. A companion app that reports inactive means the framework did not attach to the audio path, so do not judge sound quality until the active state appears, because an inactive framework changes nothing no matter how many toggles you flip.
- Play a familiar track on headphones and listen for width and clarity. Then play a familiar movie scene and listen for dialogue position and space. If both sound wider and clearer, the install worked and you can move on to profiles.
- Run the inspection commands again from a root shell and confirm the audio service dump mentions the spatial processing path. This is the step most guides skip, and it is the step that catches a silent failure before you waste an hour tuning profiles for a framework that never attached.
Pick a module build that matches your Android version
Module builds are version specific, and the wrong build is the most common cause of a failed install. Look for the build whose release notes list your Android version, your audio architecture, and your root manager. If two builds both claim your version, pick the newer release date and read its changelog for fixes that mention your phone family. A build that mentions fixes for your manufacturer is a better bet than a generic build with a higher version number.
Keep the module file on your phone after install, in a folder you can find again, because you will need it if you ever need to reinstall after a system update. System updates can remove a module or break its attachment, and having the file ready turns a broken update into a ten-minute reinstall instead of an evening of searching.
Flash, reboot and confirm the active state in the companion app
The reboot is not optional. The module installs files into the systemless layer, and those files only become active when the audio service starts with them present, which happens at boot. A phone that has not been rebooted after install has not actually installed anything yet, no matter what the install log says.
Open the companion app after the reboot and look for the active indicator, which usually sits at the top of the main screen. If it says active, play your test track. If it says inactive, do not start tuning profiles. Go back to the module list in Magisk, confirm the module is enabled, reboot again, and then run the inspection commands. An inactive state after two reboots usually means a version mismatch, and the fix is a different build, not more reboots.
What to do when the companion app reports inactive after install
First, confirm the module is enabled in Magisk under Modules, because a module can install in a disabled state and never attach. Second, check that no other audio module is enabled at the same time, because two audio modules will fight and neither will report active cleanly. Third, run the dumpsys commands and look for the spatial processing path. If the dump shows nothing, the build does not match your Android version, so get a build that lists your version and install that one instead.
Turn off every other sound enhancer first: the dual-enhancer warning
Disable the stock sound enhancer before you judge the new framework. Two enhancers on one stream create doubled bass, harsh treble, and volume swings, and the result is not double quality. It is doubled processing that distorts dynamics and confuses volume control, and it will make a good framework sound bad for reasons that have nothing to do with the framework itself.
Go through Settings, then Sound and vibration, and turn off every enhancer you find: the stock equaliser, the stock bass boost, the stock surround toggle, and any manufacturer sound setting. Then open your music app and turn off its built-in equaliser too, because an in-app equaliser is a second processor just as surely as a system one. Then check for other audio modules in Magisk under Modules, and disable any other sound module, including ViPER4Android and JamesDSP, before you test. One processor in the chain is the rule, and every exception to it costs you sound quality.
This is the warning that matters most in this whole guide, so it bears repeating plainly: disable every other sound enhancer first, and only then judge the new framework. I have seen people uninstall a good framework because it sounded harsh, when the harshness came from a stock enhancer they never turned off. Test with a familiar movie scene and a familiar track after disabling the stock tool, and the difference should be clear within a minute. If the sound seems worse, check the profile and the output selection before you blame the framework itself.
Stock enhancers that clash: SoundAlive, Mi Sound, Audio Tuner and Dirac
Each manufacturer hides its enhancer under a different name, so here is a short map. Samsung phones carry SoundAlive under Settings, then Sounds and vibration, then Sound quality and effects. Xiaomi phones carry Mi Sound Enhancer under Settings, then Sound and vibration, then Sound effects. OnePlus phones carry Audio Tuner under Settings, then Sounds and vibration, then Earphone mode. Phones with Dirac carry a Dirac toggle in the sound settings, and phones with a built-in Dolby Audio toggle carry it in the same place. Turn each one off, and if you are unsure whether a toggle is an enhancer, turn it off for the test and turn it back on later if you miss it.
Why two audio frameworks never means double quality
Two processors in series do not add their benefits. Each one applies its own equalisation, its own dynamic range control, and its own spatial processing, and the second one processes the output of the first rather than the original sound. The result is bass boosted twice, treble sharpened twice, and dynamics squeezed twice, which sounds loud and impressive for a few seconds and tiring after a few minutes. A single well-tuned processor will always beat two processors fighting over the same stream, and that is why the cleanup step comes before the tuning step, not after it.
Choose a Dolby Atmos profile for movies, music, games and voice calls
Profiles tune the spatial effect for movies, music, games, and voice. A movie profile widens dialogue and effects. A music profile preserves instrument separation without exaggerating space. A game profile sharpens positional cues. A voice profile keeps speech forward and clear. Switching profiles by content gives better results than leaving one dramatic profile on for everything, because drama fatigue is real and a subtle profile you enjoy for hours beats an impressive profile you mute after ten minutes.
Open the companion app and look for the profile list, which usually sits on the main screen under names like Movie, Music, Game, and Voice. Pick the profile that matches what you are about to play, and give it a full minute before judging it, because spatial processing takes a moment to settle in your ears. Then try the same content on a different profile and notice what changes: dialogue position, bass weight, and the sense of space around instruments are the three things to listen for.
Movie profile: wide dialogue and a sense of height in films
The movie profile is the most dramatic of the four, and it earns that drama. It widens the front soundstage, lifts effects into a sense of height, and keeps dialogue anchored in the centre so speech stays clear while the room around it grows. Use it for films and series, and test it with a scene you know well: a quiet dialogue scene followed by a loud action moment. If the dialogue stays clear through the loud moment, the profile is doing its job. If the dialogue drowns, lower the effect strength in the profile settings rather than switching profiles.
Music profile: instrument separation without exaggerated space
The music profile is the subtlest of the four, and that is deliberate. It preserves instrument separation, keeps the vocal centred, and adds just enough width to make a track feel open without making it feel like a concert hall. Test it with a track you know by heart, and listen for the bass line, the vocal, and the highest instrument separately. If you can hear each one clearly without the track feeling hollow, the profile is right. A music profile that makes every track sound like a live recording has gone too far, and the fix is a lighter setting, not a different app.
Game profile and voice profile: positional cues and clear speech
The game profile sharpens positional cues, so footsteps and direction matter more than warmth. It is the profile for competitive play, where hearing where a sound comes from is worth more than hearing it beautifully. The voice profile does the opposite: it keeps speech forward and clear, pulls back the spatial widening, and makes long calls comfortable. Use the voice profile for calls and podcasts, because a voice that sounds spacious in a movie can sound distant in a call, and a podcast that sounds like it was recorded in a hall is a podcast you will stop listening to.
Build one profile for quiet rooms and one for noisy travel
Spatial sound behaves differently in a quiet room, on a busy street, and in a car. A profile tuned for quiet listening can sound washed out in noise, because the spatial cues compete with real-world sound. Build one profile for quiet rooms and one profile for noisy travel, and switch between them deliberately. Test each profile in its intended place rather than judging both in one room, because a profile judged outside its context will always disappoint. The internal capture guide in recording internal audio across the whole system shows the same context lesson, because a capture that sounds clean in silence can fail in a noisy room.
Test calls and video separately after install
Spatial processing can change call audio in unwelcome ways, so test a real phone call and a video call after install. A voice that sounds spacious in a movie can sound distant in a call, and if calls sound thin then disable the framework for call audio or choose a voice profile for calls. A music upgrade that harms calls is a downgrade for a daily phone, because you take far more calls than you watch films.
Make a test call to a friend and ask them how you sound, because call audio is two-way and the framework can change what the other person hears as well as what you hear. Then make a video call in your most-used video app and listen for echo, delay, or a hollow quality. If either call sounds worse than before, switch to the voice profile for calls, and if that does not fix it, turn the framework off for call audio entirely in the companion app settings. A framework that improves music and harms calls is still valuable when you know which one it helps and you set it up accordingly.
Test a real phone call and a video call before you trust the install
Do not test calls with a voicemail or a recording. Call a real person, talk for two minutes, and ask them directly whether your voice sounds clear, distant, or echoey. Then ask them to talk while you listen, and judge whether their voice sounds natural or processed. That two-minute test tells you more than any setting screen, and it is the test most people skip because they assume music quality and call quality move together. They do not, and the call test is what proves it.
Test your most-used video app, not just one video app
Video apps vary in how they route audio. Some apps send audio through the framework path and some use a direct path that bypasses it, so test your most-used video app specifically rather than assuming all video benefits equally. Play the same scene in two different video apps and compare them. A framework that improves one app and ignores another is still valuable when you know which app it helps, and that knowledge stops you from blaming the framework for an app that never used it.
Troubleshooting: no sound, volume jumps and missing audio in some apps
The most common problem is no change at all: the companion app says active, but the sound is identical. Run the inspection commands and check whether the dump mentions the spatial processing path. If it does not, the module did not attach, and the fix is a build that matches your Android version, not more profile tuning. If the dump does mention it, check the output selection in the companion app, because the framework may be processing the speaker while you are listening on headphones, or the other way around.
Volume jumps usually mean duplication: a partial stock framework is still running beside the new one. Go back through Settings, then Sound and vibration, and turn off every stock enhancer again, because a system update can turn one back on without telling you. Missing audio in some apps usually means those apps use a direct audio path that bypasses the framework, and that is normal behaviour rather than a fault. Test those apps with the framework off and on, and if the sound is identical either way, the app simply does not use the path.
The second most common mistake is copying a stranger’s profile tuned for different headphones. Headphone frequency response varies widely, and a profile is personal by nature, so a profile that sounds superb on one model can sound harsh on another. Retune from a flat starting point with your own headphones, save the result under the headphone model name, and keep the old profile labelled for the old headphones in case you return to them. Profile libraries organised by headphone model prevent the confusion of applying the wrong tuning to the wrong hardware, and the specialist set in systemless modules every root specialist requires values the same baseline habit, because a documented starting point makes every later comparison honest.
Keep a stock audio baseline recording in your notes so you can compare after every framework update. Updates can change the spatial tuning silently, and a baseline note catches the change before you adapt to it unconsciously. Write down one movie scene, one track, and your impression of each on stock audio, then revisit those same scenes after an update. Compare spatial sound on the same movie scene before and after each framework update, because a fixed reference scene makes changes obvious within a minute, while without one you adapt to a worse tuning and blame your headphones instead.
Dolby Atmos FAQ: the questions readers ask before installing
Does the Dolby Atmos framework work on the phone speaker?
Yes, but the effect is subtler, because a single small speaker cannot create true surround separation. The speaker profile tunes clarity and virtual width within physical limits, and it can make dialogue clearer and music wider than stock sound. Headphones remain the best way to hear the full spatial effect, so judge the framework on headphones first and treat the speaker improvement as a bonus.
Will the Dolby Atmos framework drain the battery?
Spatial processing uses extra processor cycles, so it adds a small battery cost during playback. The cost is modest on a modern chip and it grows with heavy profiles, so a light profile for daily listening keeps the cost low. If you listen for many hours a day, the difference is measurable but small, and most readers will notice the sound long before they notice the battery.
Can I remove the Dolby Atmos framework cleanly?
Yes, when you installed it as a systemless module. Disable the module in the root manager and reboot, and the stock audio path returns. Keep the module disabled for a day after removal to confirm no app still expects the framework, and then remove it fully if everything sounds normal. That clean removal is the main reason to install through the root manager rather than changing system files directly.
Why does Dolby Atmos sound different on each pair of headphones?
Because every headphone model has its own frequency response, and the framework renders spatial sound through that response. A profile tuned for one driver cannot transfer cleanly to a different driver, so retune from a flat starting point with the new headphones and save the result under the new model name. Keep one profile per output, labelled by headphone model, and the framework will sound right on every pair you own instead of right on only one.
What if the framework works in one app but not another?
That usually means the silent app uses a direct audio path that bypasses the framework, and that is normal behaviour rather than a fault. Test the same content in both apps, confirm the difference, and use the framework where it applies. Some apps also apply their own processing that conflicts with the framework, so turn off in-app equalisers and effects before concluding that the framework is at fault.
Your next step: check compatibility tonight, install tomorrow
A Dolby Atmos framework can bring genuine spatial sound to a rooted phone that never shipped with it. Success depends on compatibility checks, a clean install without competing enhancers, and profiles chosen for content rather than for show. The reward is music and movies that feel larger without new hardware, and calls that still sound like calls.
Your concrete next step is to check your Android version against the module notes today and disable your stock enhancer. Install the framework tomorrow and test one movie scene on headphones. If the scene gains space and clarity, build your profiles around that result, and for the driver-level audio picture continue with the sound driver module that turns a phone into a studio DAC as your next read.

