

A broken operating system does not always mean a dead phone. Recovery mode often still boots even when Android cannot start. Saved image files give recovery something good to write back. With the right images you can rebuild the system step by step. Patience and correct identification matter more than speed here.
This guide explains how to diagnose the failure first. Then it covers choosing images and restoring them safely. It also covers what to do when no backup exists. The goal is a working phone with as little data loss as possible.
Diagnosing the Failure
Start by describing what the phone actually does. Does it show the maker logo and stop there. Does it loop back to the logo again and again. Does it reach the lock screen and then crash. Each pattern points to a different damaged area. Logo loops often involve boot or system partitions. Crashes after boot often involve data or a bad module.
Try booting into recovery first. If recovery opens then the bootloader and recovery partition work. That is good news because repair tools are available. If recovery will not open then fastboot may still respond. Fastboot can flash images even when recovery is damaged. Knowing which modes respond shapes the whole repair plan.
What Saved Images Can Repair
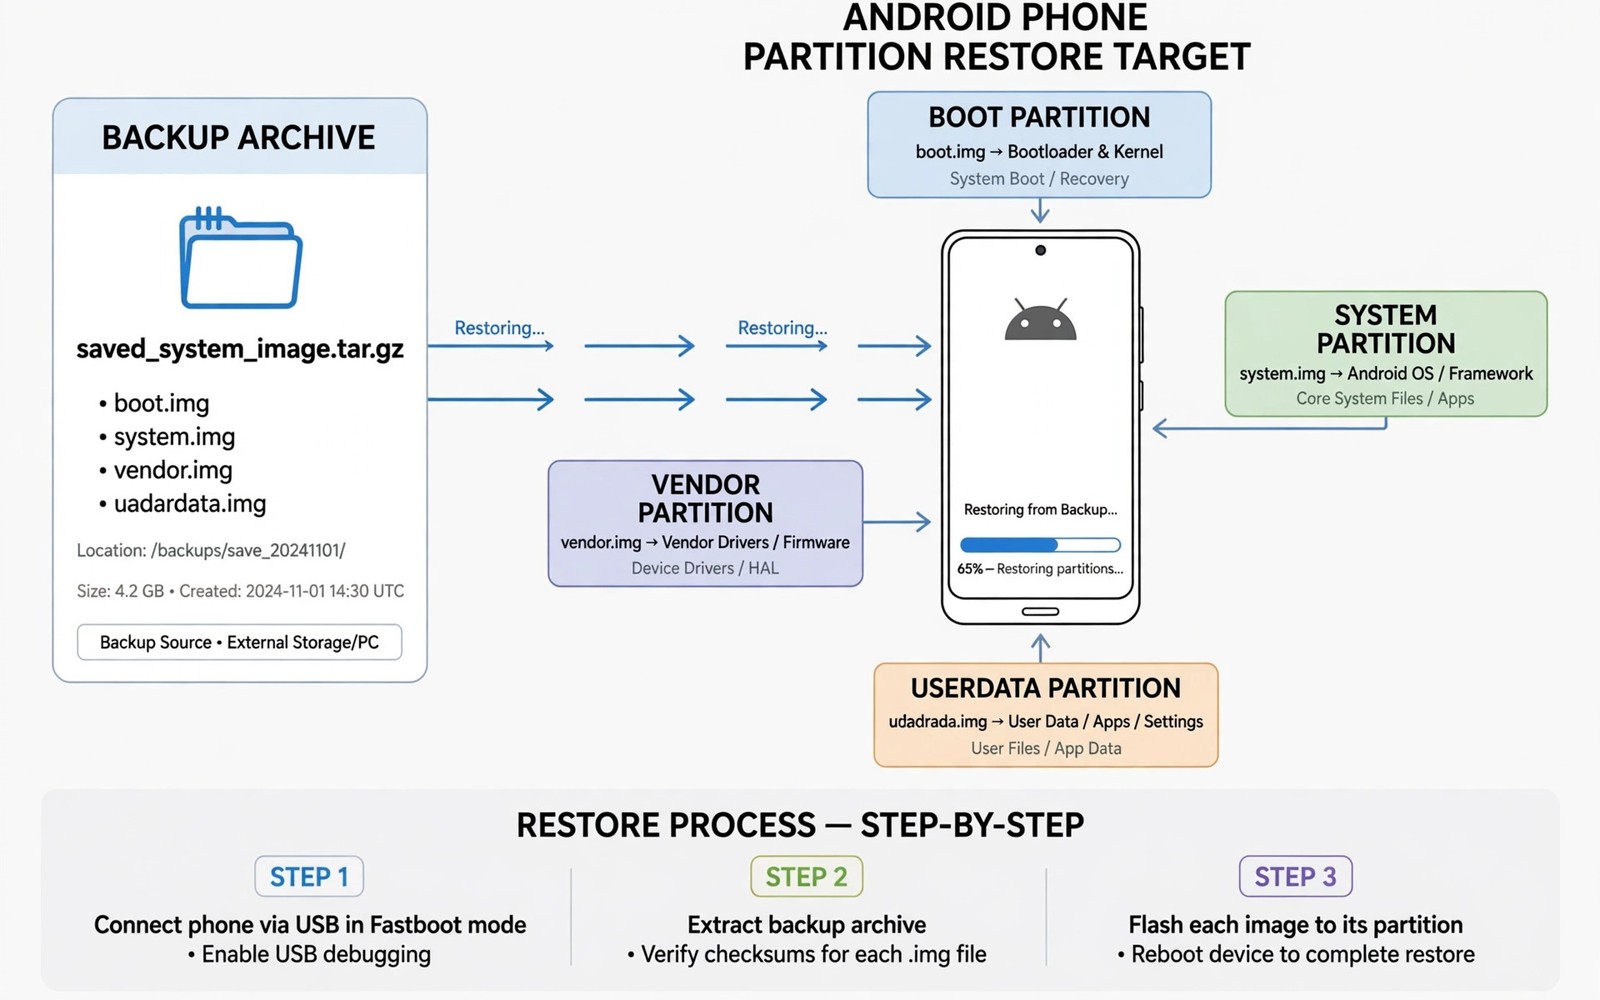
Saved images are exact copies of partitions from a working state. A system image restores operating system files. A boot image restores the kernel and boot setup. A vendor image restores hardware support files. Together they can rebuild the core software stack of the phone.
Images cannot repair hardware faults. A failing storage chip or a damaged board needs physical repair. Images also cannot restore data that was never backed up. If data was wiped then no system image brings it back. Set expectations honestly before you begin the restore.
- System images repair corrupted or missing operating system files
- Boot images repair kernel faults and bad boot configuration
- Vendor images repair hardware driver and firmware support files
- Full backup folders restore several partitions in one operation
Choosing the Right Images
Match images to the exact device codename and region variant. An image from a sibling model may boot partway and then fail. Check the ROM version and build date of the saved image. Images from the same ROM family restore most cleanly. Mixing system from one ROM with data from another can cause crashes.
Prefer your own backups over downloaded images when possible. Your own backup matches your setup and your data. Downloaded factory images are the next best option for a clean rebuild. They restore stock software but they usually erase user data. Read the notes for any factory image before flashing it.
Restoring From a Full Backup
Boot into recovery and open the restore screen. Select the backup folder from a known good date. Restore system and boot and vendor together for a consistent set. Swipe to confirm and wait for the process to complete. Then reboot and allow extra time for the first start.
If the phone still loops then try restoring data as well. Data from the same backup keeps apps consistent with the system. If that fails then a selective approach may help. Restore one partition at a time and test boot after each change. That slower path isolates which partition holds the fault.
Full backup technique is covered in depth in the guide to creating full Nandroid backups in recovery which explains partition choices. Understanding that guide helps you choose restore sets wisely.
Restoring Individual Images by Fastboot
When recovery is damaged, fastboot becomes the repair tool. Connect the phone in fastboot mode to a computer. Flash the boot image first if boot is suspect. Then flash system or vendor images as needed. Each flash should report success before you move on.
Slot based devices add a wrinkle to this process. You must flash to the correct slot or set the active slot first. Flashing the inactive slot and booting it can look like failure. Check slot status before flashing on newer devices. A short slot check prevents confusing results.
fastboot devices
fastboot flash boot boot.img
fastboot flash system system.img
fastboot reboot
The commands above show the general fastboot restore pattern. Partition names and image names differ by device and layout. Newer devices may use super partitions instead of separate system images. Confirm the layout for your model before flashing anything.
When No Backup Exists
Without a backup you can still rebuild with factory images. Download the factory package for your exact model and region. Flashing it returns the phone to stock software. User data usually does not survive this path. Accept that loss early and focus on a working phone.
Factory packages often include a flash script that handles partitions in order. Read the script or its instructions before running it. Some scripts lock the bootloader again as part of the process. That may be fine for a return to stock. It may be unwanted if you plan to modify the phone again.
Protecting Data During Repair
Do not wipe data until you have tried a system only repair. Many boot failures live in system or boot alone. Wiping data first destroys apps and files that might have survived. Try the least destructive restore that could fix the fault. Escalate to wipes only when gentler restores fail.
Mounting storage in recovery can rescue files before a wipe. Copy photos and documents to a computer or USB drive first. That rescue step takes minutes and can save irreplaceable files. Readers facing a bootloop can also use recovering from bootloops with individual partition backups for a targeted approach. Selective restores often save data that full wipes would erase.
Verifying the Repair
After a successful boot, check core functions before celebrating. Test calls and mobile data and Wi-Fi and camera. Check that storage mounts and that apps launch normally. A phone that boots but lacks camera or network support may need a vendor restore. Fix those gaps while recovery is still fresh in mind.
Make a new full backup once the phone works again. That backup captures the repaired state as your new baseline. Future failures then restore to a known good point. Also investigate what caused the original failure before repeating it. A bad module or a mismatched kernel will break the phone again if reinstalled.
If mount problems blocked the restore, the repair path in fixing mount errors and file system corruption in recovery shell explains shell level fixes. Mount health underpins every restore operation.
Reading Boot Failure Patterns
Boot failure patterns narrow the damaged area quickly. A phone stuck on the maker logo rarely reaches system services. That pattern implicates boot or early system loading. A phone that reaches the animation and loops implicates framework startup. A phone that reaches the lock screen and crashes implicates apps or data.
Timing also gives clues about the fault location. Very early failures happen within seconds of power on. Later failures happen after a longer animation period. Note the timing and the last visible screen before failure. Those notes help forum helpers diagnose faster. Vague reports slow help while precise notes speed it.
Sound and vibration cues can add information on some models. A vibration at startup shows the bootloader reached a stage. Absence of vibration may point to deeper bootloader trouble. Combine all sensory clues with screen behavior. A full symptom picture beats a single symptom every time.
Rebuilding Without a Backup
Factory images provide a clean rebuild path when backups are absent. They restore stock partitions in a known good combination. The cost is usually total user data loss on the device. Accept that cost early to avoid chasing impossible data rescue. A working stock phone beats a broken modified phone.
Download factory images only from maker sources for your exact model. Region and carrier variants matter for radio and modem files. A wrong region image may boot but break mobile network support. Check model and region codes twice before flashing. Precision here prevents a second repair round.
After a factory rebuild, set up backups before modifying again. Install recovery and capture a baseline backup immediately. That baseline protects the next experiment cycle. The painful lesson of a backup free failure should change habits. Future failures then become restores rather than rebuilds.
- Match factory images to model and region exactly
- Accept data loss early when no backup exists
- Capture a baseline backup after every rebuild
- Test network and camera after factory restoration
Choosing Between Repair and Rebuild
Repair preserves current data and settings when it works. Rebuild guarantees a clean system at the cost of data. The choice depends on backup availability and failure severity. A single partition fault favors targeted repair strongly. Multi partition corruption favors a clean rebuild instead.
Time pressure also shapes the repair versus rebuild choice. Repair diagnosis can take hours for subtle faults. Rebuild takes a predictable hour or two in most cases. When a phone must work by morning, rebuild wins. When data is irreplaceable, repair effort is justified.
Hybrid approaches combine both paths sensibly. Attempt targeted repair for a bounded time first. Rescue files during that window whenever mounts allow. If repair stalls, switch to rebuild without regret. Rescued files plus a clean system beat endless diagnosis.
Testing Restored Systems Thoroughly
Thorough testing after a restore catches partial repair failures early. Boot success alone does not prove full system health. Test mobile network registration and data throughput on the primary SIM. Test Wi-Fi connections to a known network and Bluetooth pairing briefly. Test camera capture and video recording and audio playback in turn. Each test covers a different driver area that restores can affect. A phone that passes all tests earns trust for daily use again. Note any failing area and restore the related partition again.
The steps above follow the approach described in the official developer documentation for this platform. That documentation explains boot flow and partition repair in general terms. It also covers image flashing concepts that apply across device generations. Combine it with model specific factory guidance for your exact phone.

