

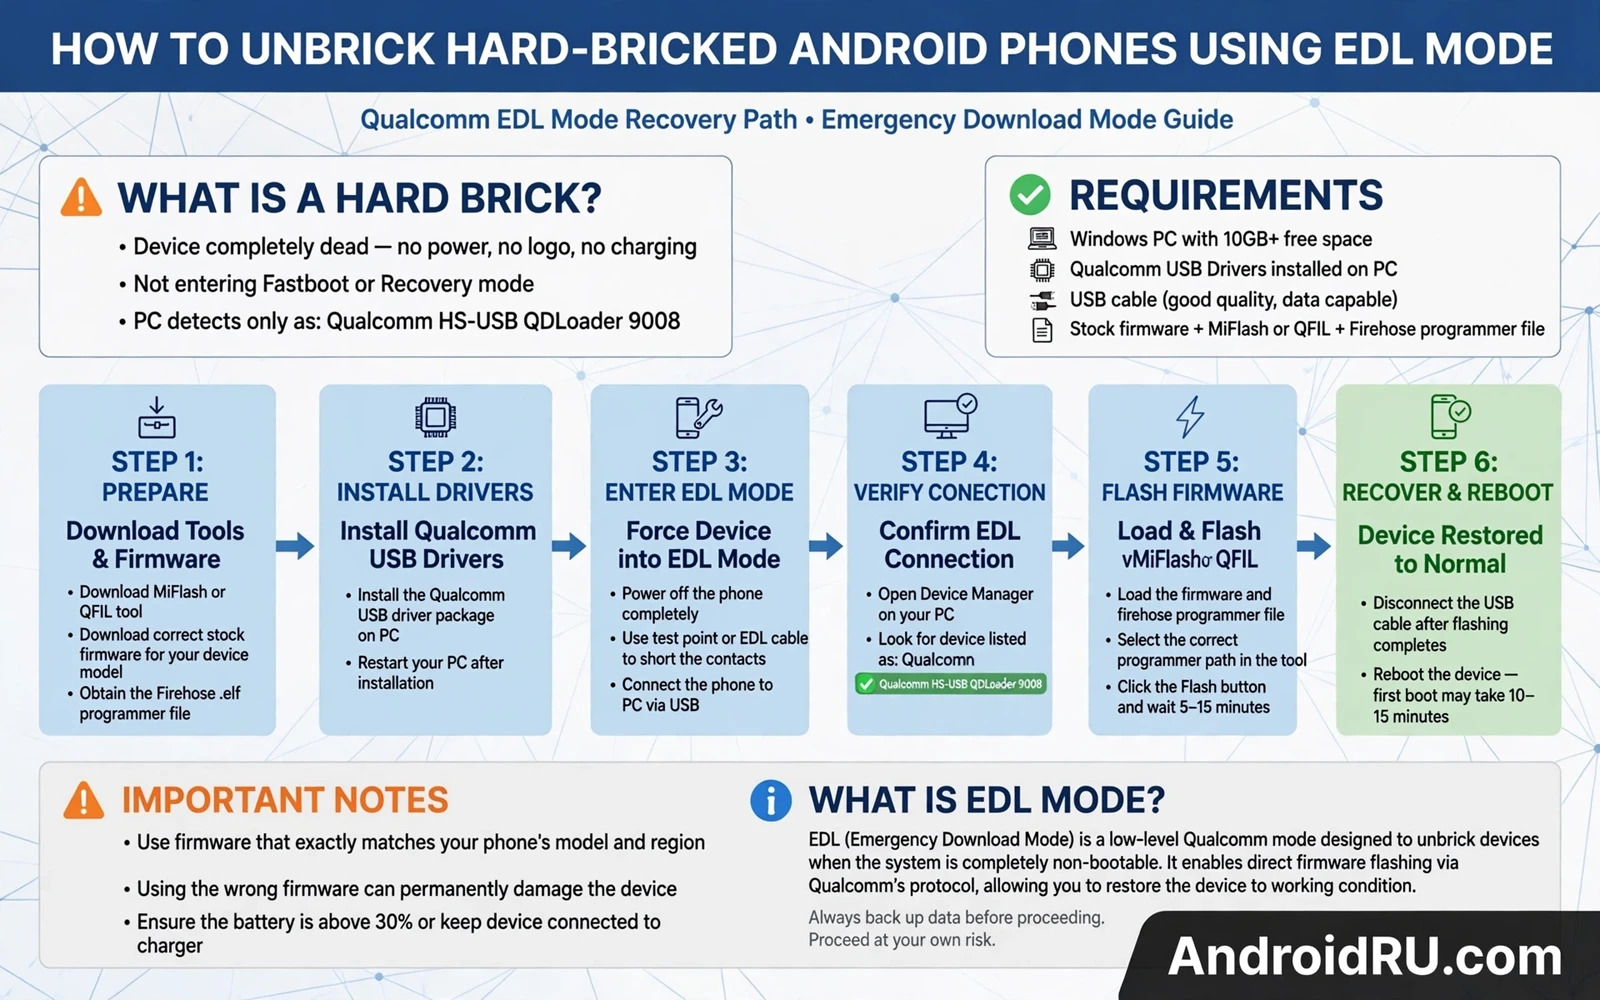
What Hard Brick Means
A hard bricked phone shows no sign of normal booting. It may show a black screen and may not respond to power button presses in the usual way. It may still be detected by a computer in a low level emergency mode. That detection is the key distinction. A phone detected in emergency mode can often be revived. A phone detected by nothing at all may have a hardware failure that software cannot fix.
Hard bricks usually follow a failed bootloader flash or a failed firmware flash or a wrong partition write. A soft brick still allows recovery or fastboot. A hard brick has lost those modes. The emergency download mode built into the chipset remains as a last interface. That mode exists precisely for factory recovery of devices whose main software is broken.
Emergency download mode is chipset specific. Qualcomm devices use EDL mode. MediaTek devices use a different preloader based mode with its own tool. Samsung devices use download mode through Odin. This article focuses on the Qualcomm EDL path. Owners of other chipsets should follow the mode for their chipset rather than forcing an EDL method onto incompatible hardware.
EDL recovery is a last resort because it typically wipes the device and requires authorised firmware and specialised tools. It should not be the first response to a bootloop. Bootloops with working recovery or fastboot have simpler fixes. EDL becomes relevant only when those modes are gone.
Preparing For EDL Recovery
Identify the exact model and chipset before attempting EDL recovery. EDL firmware is model specific and often region specific. Firmware for a similar model can fail to boot or can damage modem configuration. Check the model number printed on the device or on its original packaging if the phone screen is dead. Carrier variant information also matters where it affects modem files.
Install the correct Qualcomm USB drivers on the host computer. EDL mode appears as a Qualcomm device in device manager when drivers are correct. Without drivers the computer may show an unknown device and the flashing tool will not detect the phone. Driver installation should be completed before entering EDL mode so that detection can be confirmed immediately.
Obtain firmware from a trusted source and verify its contents before flashing. EDL firmware packages often contain a programmer file that talks to the chipset and a set of images for partitions. The programmer file must match the chipset. A mismatched programmer file is a common cause of EDL failure. Never use a programmer file from a different chipset family.
Understand that user data will usually be lost in EDL recovery. A full firmware flash through EDL rewrites partitions including user data in most procedures. Owners should accept that loss before starting. Attempting to preserve data through a half flash can leave the phone in a worse state. A clean full flash gives the best chance of a working phone.
Entering EDL Mode And Flashing
EDL mode can be entered through a key combination or through a test point short on the device board depending on the model. Key combination entry is safer because it does not require opening the phone. Test point entry requires disassembly and a precise short of two points on the board. Test point work should only be attempted by owners comfortable with hardware work and with proper tools. A slip during test point shorting can damage the board.
Connect the phone in EDL mode and confirm detection in the flashing tool before loading firmware. Detection confirmation is essential. Loading firmware for an undetected device wastes time and can lead to a mistaken conclusion that the firmware is wrong when the real problem is connection. Change cable or USB port if detection is intermittent.
Load the programmer file and the firmware images in the tool following the device guide. Use the flat build or the appropriate build type for the firmware package. Start the flash and do not disconnect the phone until the tool reports success. EDL flashing can take a long time. Patience during the flash is part of the procedure.
After a successful flash disconnect the phone and attempt a normal power on. First boot after EDL recovery takes longer than normal. Do not interrupt it. If the phone boots then test basic functions before restoring any backup. Mobile data and Wi-Fi and camera and sensors should be tested on clean firmware first.
When EDL Recovery Fails Or Is Not Possible
If the flashing tool cannot detect the phone in EDL mode then check drivers and cable and entry method. A phone that truly shows no USB device at all may have a power delivery failure or a board failure. Hardware repair may be needed. Software tools cannot revive a phone whose chipset receives no power.
If detection works but flashing fails at the programmer stage then the programmer file is the likely cause. Try a programmer file known to match the exact chipset and storage type. Storage type matters because some programmers are specific to a storage technology. A programmer for the wrong storage type will fail even on the correct chipset.
If flashing succeeds but the phone still does not boot then the firmware may be wrong for the model variant or a hardware fault may exist. Reflash with firmware confirmed for the exact variant before concluding hardware failure. One failed flash does not prove hardware damage. Repeated failures with confirmed firmware point more strongly to hardware.
Professional repair is a sensible option when EDL recovery fails or when test point work is beyond the owner skill level. A repair shop with proper EDL equipment can attempt recovery without the owner risking board damage. The cost of professional help should be weighed against the value of the phone and the value of any data that might still be recoverable.
Prevention remains the best lesson. Keep stock firmware for the exact model before any risky flash. The general flashing guide that explains how to flash firmware using Odin and Fastboot and SP Flash Tools covers safer flashing routes. The bootloop guide that explains how to fix bootloop issues after installing modules or ROMs covers earlier recovery stages. The FastbootD guide that explains how to use FastbootD mode for dynamic partition flashing covers modern partition flashing. Reading those guides before risky work reduces the chance of ever needing EDL mode.
EDL Tools And Driver Details
EDL flashing tools vary by manufacturer and by chipset generation. Some tools are official factory tools with strict authorisation requirements. Others are community tools that work with leaked programmer files. Official tools offer reliability but may require an authorised account. Community tools offer accessibility but carry higher risk from unverified programmer files. Owners should understand which category their tool falls into before trusting it with a dead phone.
Driver installation on Windows requires attention to driver signing and to device manager states. A Qualcomm device in EDL mode may appear under a generic port category when drivers are missing. Installing the correct driver changes the category and enables tool detection. Owners should verify driver installation in device manager before opening the flashing tool. Tool detection failure often traces back to driver state rather than to tool configuration.
USB port choice affects EDL stability because some ports provide inconsistent power or data during long flashes. A rear motherboard USB port on a desktop often provides more stable power than a front panel port or a hub port. Owners should prefer a direct motherboard port for EDL flashing. Port stability matters more for long EDL flashes than for short ADB commands.
Cable quality affects EDL flashing similarly. A cable that works for charging may fail for data transfer under sustained load. A cable that works for short ADB commands may fail during a long firmware write. Owners should use a cable known to transfer large files reliably. Cable testing with a large file copy before EDL flashing is a simple precaution.
Programmer file selection requires matching chipset and storage type and sometimes device generation. A programmer file that works for one storage type may fail for another storage type on the same chipset. Owners should verify storage type from device specifications where possible. Storage type information is often available in device teardowns or in firmware package documentation.
Authorisation requirements for EDL flashing have increased on newer devices because manufacturers restrict factory tools to authorised service centres. An unauthorised EDL attempt on a newer device may fail at an authorisation step even with correct firmware. Owners should research authorisation requirements for the exact model before attempting EDL recovery. Authorisation failure is not a firmware failure and cannot be fixed by trying different firmware.
Preventing Future Hard Bricks
Prevention starts with never flashing a bootloader image from a different model or a different variant. Bootloader images are the most dangerous flash targets because they control the earliest boot stage. A wrong bootloader can destroy fastboot and recovery access at once. Owners should treat bootloader flashing as a high risk operation requiring triple checking of model and variant before proceeding.
Partition backup before risky flashes should include bootloader and modem partitions where the flashing tool supports it. A backup of those partitions provides a restore path that a system backup alone does not. Owners often back up only system and data and forget bootloader and modem. Forgotten partitions become critical only after they are damaged. Complete backups include them from the start.
Flashing in a calm environment with stable power and no interruptions reduces hard brick risk significantly. A flash started during a storm with unreliable mains power or on a laptop with low battery invites interruption. Owners should flash only when power is stable and time is sufficient. Rushing a flash to meet a deadline is a common precursor to failure.
Reading the full guide before flashing prevents the most common hard brick cause which is skipping a required step. Guides often include a warning about a specific partition or a specific order that seems minor. That warning usually exists because someone already bricked a device by skipping it. Warnings in guides are lessons paid for by other owners failures. Reading them is free.
Keeping a second working phone during risky experiments provides a safety net for communication and for research. A single phone owner who bricks their only phone loses both the device and the ability to research recovery easily. A spare phone even an old one preserves research capability during recovery. Spare device availability changes recovery from a crisis into a project.
Knowing when to stop flashing is a skill. A flash that fails repeatedly with the same error should not be retried indefinitely with random changes. Repeated failures indicate a fundamental mismatch such as wrong firmware or wrong tool. Pausing to research the error beats a dozen blind retries. Blind retries can turn a recoverable soft brick into a hard brick through cumulative partition damage.

